Material Add Rebar Layout ( Modeling )
Tool summary :
- Adds rebar to a member. You must select a member to add the rebar to.
- This help page also discusses how to add a rebar layout as a stand-alone legacy miscellaneous member. When you add rebar as a legacy miscellaneous member, the rebar is shipped loose, can be auto detailed as a member detail, and you do not select a member to add the rebar to.
- You may left-click ( Locate ) to position up to 255 segments. The Rebar Layout window opens as you locate the points. Changes made on the window will be applied to the subsequently located point.
- Step-by-step instructions for rebar material layout are provided below. (
 )
)
Also see :
- Add Material
- F2 >
 Concrete/Rebar > Rebar Layout (adds a legacy miscellaneous member)
- Dimension precision (sets precision for distance entries)
- Material Change Options (may open after you press " OK ")
- Submaterial piecemark (each unique material identified by)
- Submaterial detail (2D drawing of a material)
- Rebar
- Grayed out fields (indicate mixed entries or that the field is disabled)
- Altering a miscellaneous member's main view
Rebar material or miscellaneous member layout :
|
1 . Rebar can be added to the 3D model as a submaterial of a member or as a miscellaneous member. Do one (1) of the following:
To add the rebar layout TO a member (pre-selection method):
- Select the one (1) member that you want to add the rebar layout to > press F3 > filter for "
- Select one (1) member > click the Material Add Rebar Layout icon or use a keyboard shortcut or etc. > continue to step 2. The tool can be found in the Ribbon Editor under the command group ' Model -- Material '.
To add the rebar layout AS a new member : F2 > filter for "
2 . The status line prompts, " Point location ." Locate - OK - Return mouse bindings become active and the Rebar Layout window opens. Any choice you make on this window will be applied to the next located points. Also, changing of any Locate options should be done before locating the next point.
|
|
|
bindings |
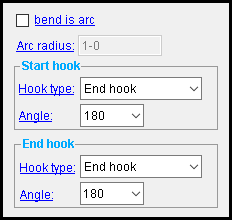 |
Remember to set " bend is arc " if desired before you left-click ( Locate ) at each bend. If you check "bend is arc", also set the Arc radius ". Making entries to the " Hook type " and " Angle " . |
2a : Left-click ( Locate ) to define points in a plane, remembering that you can change Rebar Layout settings prior to each point location if you so choose.
3c : Middle-click ( OK ) to complete the path of the rebar layout and close the Rebar Layout window.
3 . After you are done laying out work points, the Edit Rebar Shape window opens. A preview of the to-be-added rebar layout is shown on screen. Do one (1) of the following:
Alternative 1 : Press " Cancel " to prevent the the rebar layout from being added.
Alternative 2 : Change the rebar shape material's settings and then press " OK " step 2. Go to step 5.
Alternative 3 : Press the " OK " button to accept the rebar layout.
4 . Do one (1) of the following:
Scenario 1: If you are adding this material as a submaterial, follow the step-by-step instructions for Add Material (skipping to step 9) to complete the operation.
Scenario 2: If you are adding this material as a miscellaneous member, follow the step-by-step instructions for Add Miscellaneous Member to complete the operation.
Rebar material layout :
If ' bend is arc ' is checked (
If ' bend is arc ' is not checked (
), rebar is bent to half of the " Min bend diameter " set in the Reinforcing Bar Definition window.
Arc radius: The radius (in the primary dimension " Units " or other units ) at each bend. This applies when " bend is arc " is checked; otherwise, this distance is half of the " Min bend diameter " set in the Reinforcing Bar Definition window.
------ Start/End Hook ------
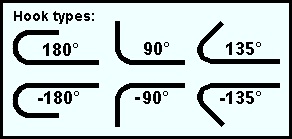
Hook type: None or End hook or Stirrup hook or Seismic stirrup hook . This is the type of hook, if any, that appears at the left (start) or right end of the rebar shape material. The " Hook type " chosen here determines which choices are available for the " Hook angle " setting.
|
Hook
type |
Available angles |
| None | — |
| End hook | 90, 180, -90, -180 |
| Stirrup hook | 90, 135, -90, -135 |
|
Seismic
stirrup hook |
135, -135 |
Angle: None or 180 or 135 or 90 or -90 or -135 or -180 . This is the bend, if any, that appears at the left (start) or right end of the rebar shape material. The choices available here are determined by the entry made to " Hook type ". The only value available for seismic stirrups is '(±) 135 '.