Add Void Space Cylinder ( Modeling > press F2 > ' Void Space Cylinder ')
- Locate two work points to add a void space cylinder member. The cylinder will create voids in materials through which it passes.
 |
After you add work points, you can modify the " End elevation " of each in the Void Space Cylinder Edit window. |
- See the step-by-step instructions .
Also see :
|
- Modeling (where custom members can be added)
- Custom members (topic)
- Delete key (or choose Edit > Delete to delete a custom member)
- Model > Member > Copy (can be used to copy a void space cylinder member)
- Model > Member > Move/Stretch (to move a void space cylinder member)
- Automatically process after modeling operation ( User and Site Options > Modeling > affects " OK ")
- Voids ( Display Options )
Step-by-step instructions :
To add a void space cylinder, you should be in Modeling in a non-isometric view.
1 . In Modeling , go to a flat (non-isometric) view in which -- in step 3 -- you want to lay out points. Tools that can get you to a desirable view include View > Plan View (for a horizontal cylinder), View > Section View , and View > Relative Depth . Using Navigate > Snap to Surface together with View > Relative Depth can put your layout a specific distance from a material.
2 . Press F2 or choose Model > Member > Prompt for Member Type , then double-click " Void Space Cylinder " on the Member Type Selection window.
3 . Locate - Repeat - Return mouse bindings become active, and you are prompted to locate the void space's work points. Be aware that:
3a : Select the appropriate Locate option.
3b : Left-click ( Locate ) an on-screen position to define the first member work point.

bindings , step 3b 3c : Locate - Pan - Return mouse bindings become active. Left-click ( Locate ) an on-screen position to define the second member work point.
bindings , steps
3c and 4.4 . After you are done laying out work points, the Void Space Cylinder Edit window opens. On this window, you will probably want to, at the very least, enter a " Diameter ." When you press " OK ," the void space cylinder member is added to the model. Right-click ( Cancel ) if you are done adding void space cylinder members.
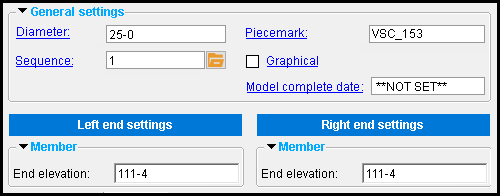
------  General settings ------
Diameter: A d istance (in the primary dimension " Units " or other units ). This sets the diameter of the void space cylinder.
Sequence: Any sequence name from the Sequence Names setup list can be entered. Either type the sequence, or you can press the "file cabinet" browse button ( ![]() ) and double-click any sequence name that is on the list.
) and double-click any sequence name that is on the list.
Tip: If you want to add a new sequence so that it can be selected here, you should first increase the number of " Maximum sequences " that are available.
Piecemark: The member piecemark of the void space cylinder.
Typing in characters makes the piecemark a user piecemark .
To clear a user piecemark, or if you are adding a new void space cylinder member, leave this field blank. Piecemarking will assign a system piecemark when you press " OK ."
Graphical: ![]() or
or ![]() . This member is automatically marked as "
. This member is automatically marked as " ![]() Graphical" if you, for example, perform a Cut On Plane operation on the void member's material.
Graphical" if you, for example, perform a Cut On Plane operation on the void member's material.
If this box is checked (
), changes you make on this window -- for example, to the " Diameter " of the void space -- will not be applied in the model since the member is prevented from undergoing Create Solids .
If the box is not checked (
), any graphical changes made to this void space will be lost the next time the member undergoes Create Solids . Also, any entries made on this window will be applied to the member at that time. If User and Site Options > Modeling > " Automatically process after modeling operation " is set to ' Process and create solids ', then this member will automatically be regenerated ( Create Solids will take place) after your press " OK ."
Note: A void space is dummy material with special properties. The material does not have an edit window, but you can perform certain material operations on it. For example, you can perform cut operations on it. Doing so makes the void space member graphical.
Model complete date: **NOT SET** or a month day year (see entering dates ).
' **NOT SET** ' removes the status designation of "model complete" from a member, thus allowing that member to be physically altered. To enter **NOT SET** , type in 0 then press Tab .
If a ' month day year ' is entered, Process and Create Solids is prevented from making certain changes to the member. For example, if you change the " Diameter " of the void space, that thickness will not be changed in the model so long as the date remains set. To enter today's date, double-click.
Setup: Auto model complete type .
|
|
|
------ Member ------
End elevation: The elevation (in the primary dimension " Units " or other units ) of the work point at this end of the void space cylinder. For a non-sloping cylinder, both the left and right end elevations are the same. When you add the void space, its work points are placed in your current view's reference elevation until you change their elevations here, on this window.

