 Material Add Bent Plate Layout
Tool summary :
Also see :
- Plate Material (topic)
- Miscellaneous members versus legacy miscellaneous members (topic)
- Bent plate layout miscellaneous member (instead of legacy)
- Bent Plate Layout (window opens when you add as material or legacy misc member)
- Use this point as new base position (useful DXDY option)
- Add Material (or F3 )
- Add Legacy Miscellaneous Member (or F2 )
page 1 | contents | add material | add legacy misc mem | bent plate layout window | top
 Adding a bent plate layout material or legacy miscellaneous member :
The following instructions assume that you are using a 3-button mouse.
1 . Multi-bend plate can be added to the 3D model as a submaterial of a member or as a legacy miscellaneous member. In either case, locating work points should be done in a view whose work plane is orthogonal to (at right angles to) the material or legacy miscellaneous member being added. Do one (1) of the following:
To add a multi-bend plate TO a member (pre-selection method): Select the one (1) member that you want to add the material to (so that it is displayed in the " Primary selection color ") > press F3 > filter for "
Plate / Bar "> double-click " Bent Plate Layout " > continue to step 2.
To add a multi-bend plate AS a legacy miscellaneous member: Confirm that the box is checked for User and Site Options > Site > "
Show legacy miscellaneous members in member add screen ." Then, in Modeling , press F2 > filter for "
Miscellaneous steel " > double-click " Miscellaneous -- Bent Plate Layout " > continue to step 2.
Also see: Bent plate layout miscellaneous member
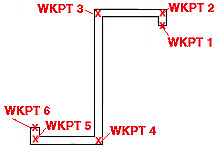
2 . The status line prompts, " Add: Material ." The illustration below shows the work points for a bent plate laid out in a plan view. You may left-click ( Locate ) to position up to 255 bends.

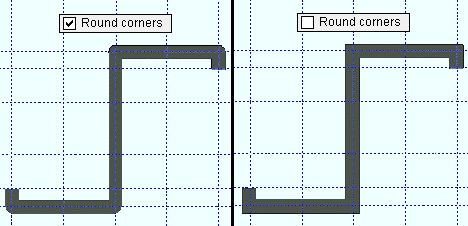
2a : Corner rounding options appear on either a window (classic) or on a section of the ribbon's Layout page (lighting). As you left-click ( Locate ) to define points, remember to set corner rounding for the most recently located point before you left-click ( Locate ) to define the next point. Below is an example of a multi-bend plate with and without corner rounding.

2b (optional) : If you accidentally locate a point you do not want, hold down the Shift key and left-click ( Remove ) to remove that point. You can use Remove to remove one, two, three or even all the points you have located. Unless you are done, continue locating points as described in 2a.
2c : Middle-click ( Complete ) AFTER you have located the final point. Complete does not locate a point.
2d : Bent Plate Layout prompts you to locate a material reference point . Position the point location target on screen (for instance, at the left end of the bent plate) and left-click ( Locate ).
3 . After you have located the material reference point, the Bent Plate Layout window opens.
3a : Enter the exact settings you want. Edit Material cannot be used to alter the shape of a multi-bend plate (see Warning ).
3b : Be sure to enter a " Material thickness ."
3c : Press the " OK " button to close the window.
4 . The Rotate Material window opens. A preview of the to-be-added multi-bend plate is shown on screen. Do one (1) of the following:
Alternative 1 : Press " Cancel " to back up to step 2. This stops the multi-bend plate from being added.
Alternative 2 : To accept the material's present rotation, press the " OK " button.
Alternative 3 : Change the material's rotational settings and then press " OK " if you want to rotate the material.
5 : Different end steps are required depending on whether you are adding a material to a member or adding a stand-alone legacy miscellaneous member.
End steps for adding a material TO a member: After rotating the material into place > right-click ( Return ) if done adding material to the member > Change All Options can be applied if the member the material is being added to is batched together with other members with the same mark.
End steps for adding a material AS a legacy miscellaneous member: After rotating the legacy miscellaneous member into place > right-click ( Return ) when you are done.
Tip 1: If you added a legacy miscellaneous member (see step 1), you cannot re-open the Bent Plate Layout window using Edit Member -- that opens the [Legacy] Miscellaneous Member Edit window. Bent Plate Layout is a material window, not a member window, and you therefore have to open it by, for example, using Edit One Material , " Edit Other " on the context menu, or by double-clicking the material in the Model Tree .
Tip 2: If you added this material as a submaterial (see step 1), you can, in addition to the edit methods described in tip 1, double-click the material to re-open the Bent Plate Layout window.
page 1 | contents | add material | add legacy misc mem | bent plate layout window | top


