Paste to Several ( Drawing Editor )
Tool summary :
Also see :
|
- Drawing Editor (where Paste Special is a tool)
- Paste (does not have Paste to Several options for scaling & rotation)
- Paste at Original Location (does not have Paste to Several location option)
- Paste Special (same as Paste to Several , but only pastes to one drawing)
- Add Standard Detail (for pasting of archived copies of drawings)
- Undo (undoes Paste to Several in your current drawing only)
- Save Standard Detail followed by Add Standard Detail to Several is a better alternative to Copy & Paste to Several if you want to save a standard image to file for repeated placement in multiple drawings and in different Jobs.
page 1 | contents | edit > | edit
The following instructions assume that you are using a 3-button mouse.
1a : You need to have saved an image to your cut/copy clipboard using Copy or Cut or Copy with Reference Point or Cut with Reference Point .
1b : Open a drawing that is representative of the other drawings that you want to paste to. Drawings of this same type will be in the list that appears in step 5 .
1c : On the Layer Panel, select the drawing layer that you want to paste to. This also sets the default layer for the other drawings that you will paste to.
2 . Invoke Paste to Several using any one (1) of the following methods:
Method 1 : Click the Paste to Several icon. The icon can be taken from the group named ' Edit ' and placed on a toolbar (classic) or the ribbon (lightning).
Method 2 : If " Drawing Editor layout style " is ' Classic ', you can use the menu system to choose Edit > Paste to Several .
Method 3, 4 or 5 : Paste to Several can also be invoked using a keyboard shortcut , the context menu , or a mode . For the ' Lightning ' layout style, configuration of the interface is done using Customize Interface .
Method 6 : In Select Items Mode , right-click ( Menu ) and choose " Paste to Several " on the context menu .
3 . A preview image of the contents of your cut/copy clipboard appears on screen along with the Paste to Several window. Go to step 4 if you find the preview image acceptable -- to adjust the preview image, do steps 3a.
3a (optional) : On the Paste to Several window, enter the settings (rotation, scaling, etc.) that you want applied to the preview image that is shown on screen.
Tip: Use Tab to move forward or Shift + Tab to move backward from one widget to the next (or previous). As you Tab out of " New image scale " or " Scale labels " or " Rotation " or " Mirror image ," any change you make is automatically applied to the preview image.
4 . Locate- Pan -Return mouse bindings become active along with various Locate options. The image shown on screen is a preview (except for color) of how the image will look when pasted.
Alternative 1 : Select the Locate option that you want (if it's not selected already), then place your mouse pointer (
) so that the point location target snaps to the on-screen location where you want the preview image to be placed, then left-click ( Locate ). Go to step 5.
Alternative 2 : Right-click ( Return ) or " Cancel " to end this operation without pasting the image. Do not continue.
5 . A selection dialog opens. On it is a list of drawings of the same type as your current drawing. A copy of the image is placed in your current drawing where you located it in the previous step.
|
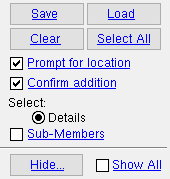
For maximum control over the final results, both " Prompt for location " and " Confirm addition " should be checked ( |
5a : If the box for " Prompt for location " is checked (
), you are prompted to manually paste the clipboard image. If the box is not checked (
), the clipboard image is automatically pasted at the coordinates defined in step 4.
5b : If the box for " Confirm addition " is checked (
), then for each drawing you select in step 5d you get a yes-no dialog (in step 6) that gives you the option to save your changes or not. If the box is not checked (
), each drawing you select in step 5d is saved automatically as soon as the clipboard image is pasted.
5c (optional) : Use the listing options " Hide ... " and " Show All " and " Sub-Members " to adjust which classes of drawings are shown on the selection list. " Hide ... " and " Show all " are available for both member details and submaterials. " Sub-Members " is only available for details.
5d : Select one or more drawings that you want to add the clipboard image to. Press the " OK " button (or hit the Enter key) to continue.
6 . One of the following takes place:
Possibility 1 : You are prompted to locate the clipboard image (because you checked the box in step 5a ). By default, the selected layer is a layer of the same name as the layer selected in step 1c (if such a layer exists). If there is no such layer, the default layer is the ' User annotation ' layer. This applies to each of the drawings selected in step 5d . Tip : With possibility 1 you have the option to Unshorten each drawing, or change the drawing layer, or change the image's settings (rotation, scale, etc.) before you locate the image on that drawing.
Possibility 2 : The clipboard image is pasted automatically (see step 5a ) in the drawing(s) you selected in step 5d. If the drawing has a layer of the same name as that selected in step 1c , the image is automatically pasted on that layer. If the drawing does not have a layer of that same name, Paste to Several creates a new layer of the same name and automatically pastes the clipboard image on that layer.
7 . When Paste to Several is done placing a copy of the clipboard image on each of the drawings selected in step 5d , your current drawing is reactivated. If you did not check the box for " Confirm addition ," any changes made to drawings selected in step 5d are saved automatically.
Tip: The clipboard image pasted using this procedure can be removed from your current drawing by using Undo . You cannot, however, automatically remove the image from the other drawings it was pasted to.
Note: Paste to Several does not automatically paste to drawings that are locked, for example, because they are being used by other users.
page 1 | contents | edit > | edit | top
The Paste to Several window :

- When this window opens, Locate- Pan -Return mouse bindings become active, and a preview image is shown.


bindings
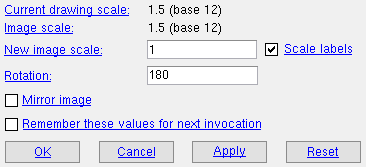
Current drawing scale: read-only . This tells you the scale of your current drawing or of a drawing you selected in step 5d . In other words, this is the scale of the drawing you are pasting the clipboard image to.
Image scale: read-only . This is the scale of the clipboard image you are pasting. If the image was cut or copied from your current drawing, then its scale is the same as that of your current drawing.
New image scale (Base 12 or Base 10) : The scale you want applied to the preview image. The scale is applied immediately (when you press Tab or " Apply "). To paste the preview image, see step 4 and/or step 6, possibility 1 .
(Base 12) means imperial dimensioning is being used. Enter the number of inches on your current drawing that you want to represent 1 foot in the shop or construction site.
(Base 10) means metric dimensioning is being used. Enter the number of millimeters on your current drawing that you want to represent 10 mm on the actual materials.
Objects not affected by " New image scale ": The sizes of labels , piecemarks , section sizes , pointer arrowheads , dimension terminals (
) and workpoint symbols are independent of the " New image scale ." The sizes of labels and dimension labels can be changed using "
Scale labels " (below) or on their edit windows. Other objects that are independent of scaling can also be resized using their edit windows.
Tip: You may want to make the " New image scale " match the " Current drawing scale ." Note that if you enter a new scale here, you may optionally choose to " Scale labels ." For more information, see " Drawing scale ."
Scale labels: ![]() or
or ![]() . This applies when you have changed the " New image scale ." The scale is applied to the preview image immediately (when you press Tab or " Apply "). To locate the preview image, see step 4 and/or step 6, possibility 1 .
. This applies when you have changed the " New image scale ." The scale is applied to the preview image immediately (when you press Tab or " Apply "). To locate the preview image, see step 4 and/or step 6, possibility 1 .
If this box is checked (
), the labels and dimension labels on the preview image are scaled per the " New image scale ." The label " Font size " and dimension label " Font size " reported on the pasted objects' edit windows will be changed in correlation with the new scale.
If the box is not checked (
), the labels on the preview image remain at the scale reported in the field " Image scale ."
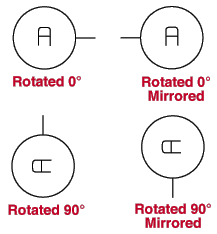
Rotation: Any positive or negative (-) angle from 360 to -360 degrees. The rotation is applied to the preview image immediately (when you press Tab or " Apply "). To locate the preview image, see step 4 and/or step 6, possibility 1 .

' 0 ' (zero) degrees reverts the preview image to its rotation in its drawing file. In other words, the preview image keeps the rotation it had when it first appeared in step 3 .
A ' positive number ' rotates the preview image counterclockwise that number of degrees.
A ' negative (-) number ' rotates the preview image clockwise that number of degrees.

If this box is checked (
), the preview image is made a mirror image of itself. A mirror image is one in which right and left are reversed.
If the box is not checked (
), the preview image remains oriented as it is oriented in its actual drawing file (as it first appeared in step 3 ).
Remember these values for next invocation: ![]() or
or ![]() . This affects whether or not the settings on this window are remembered during your current Paste to Several operation and for subsequent Paste to Several operations performed during you current Drawing Editor session.
. This affects whether or not the settings on this window are remembered during your current Paste to Several operation and for subsequent Paste to Several operations performed during you current Drawing Editor session.
If this box is checked (
) and you press " Apply " or " OK ," all settings on this window will be remembered when this window opens again in the next drawing that you select to paste in. The settings will also be remembered when the next Paste to Several operation starts.
If the box is not checked (
) and you press " Apply " or " OK ," the basic default settings will be the settings on this window when it is opened the next time.
-------------------------
"OK" (or the Enter key) closes this window, but does not end the operation. The preview image remains on screen, and Locate- Pan -Return mouse bindings are active.
Note 1: You do not have to close this window in order to proceed with the operation. You can left-click ( Locate ) the preview image with the window still open. You can also right-click ( Return ) with the window still open. See step 4 or step 6, possibility 1 .
Note 2: With respect to " Remember these values ," " OK " works the same way as " Apply ." See the discussion about defaults under " Apply ."
"Cancel" (or the Esc key) closes this window.
On your original drawing: " Cancel " closes this window and ends the operation. The preview image disappears.
On another drawing: " Cancel " closes this window, cancels the pasting of the image in that drawing, and opens the next drawing.
"Apply" updates the preview image with the current setting for the field that you are in (" New image scale " or " Rotation " or etc.) without your having to Tab out of that field.
Defaults for your current Drawing Editor session: If you press " Apply " (or " OK ") and " Remember these values " is checked, all of the current settings on the window become the default settings for the next time that the Paste to Several window opens during this session of the Drawing Editor .
" Reset " reverts the settings on the Paste to Several window back to the basic default settings that apply when Paste to Several is first invoked during a new session in the Drawing Editor .
Basic default settings: " New image scale " is made to match the " Image scale ." " Rotation " is set to ' 0 '. " Mirror image " and " Remember these values " are unchecked.


