Show Detail Dimensions ( Modeling )

Tool summary :

  • Overlays a member or material or group member in Modeling with dimensions from a member detail or submaterial detail.
  • The red or yellow dimensions that are shown in the model do not exactly match the corresponding " Label text " on the detail, but are written to their exact value, within the " Dimension precision " specified in Home > Project Settings > Fabricator > Detailing > Drawing Presentation > the " Primary Dimension " tab.
  • Before using this tool, make sure that the member associated with the material you want dimensions shown on is displayed in a solid form . This is needed so that you can select the connection material or member main material. After the dimensions are displayed, if you display the member in stick form, the dimensions will continue to be shown, even though the material is no longer shown.
  • Dimensions can be shown in any view, but you may want a view that is similar to the view that is shown on the member detail or submaterial detail. Snap to Surface may be used to display such a view.
  • Detail Members or Detail Submaterial or Detail Member Groups is required . If the member detail or submaterial detail or group member detail is not up to date, or a detail has not yet been generated, dimensions cannot be shown. Instead, you will be notified (see note 3 ) that you need to detail the member or submaterial or group member. Be aware that the drawing scale and the dimension label " Character width/height ratio " affect the dimension character sizes shown in the model, but the dimension label " Pen color " does not affect the color of dimension labels in the model. Also, on a group member detail, you need to Add Dimensions manually.
  • See (on this page):

Also see :

VIDEO Show Detail Dimensions is used to display dimensions from details in the model. The details can be member details, submaterial details or group member details. Clear Detail Dimensions makes the dimensions go away. (Recorded in SDS2 Detailing , v7.3.)

page 1 | contents | model > | clear dimensions (related) | top


   What's with those red and yellow dimension labels?

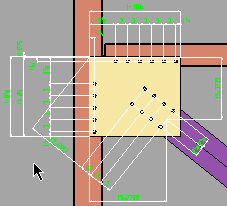
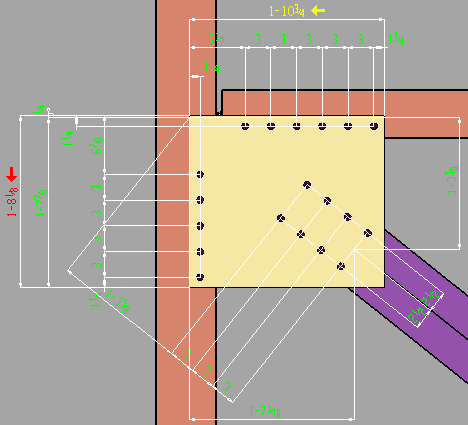
  • In Modeling , dimensions with green label text exactly match the values for equivalent dimensions on the member detail or submaterial detail. Dimensions with red labels show values that were manually changed on the member detail or submaterial detail -- each red label shows the exact distance that would be measured using the Ruler tool. A yellow dimension is displayed when the corresponding dimension on the detail has been changed to text that cannot be interpreted as a dimension.
In this example, the gusset plate's width dimension of 1-8 1/8 is shown in red because the user has manually changed it on the submaterial detail. It's length dimension of 1-10 3/4 is displayed in yellow because it was changed to XXX on the detail (shown below).
 
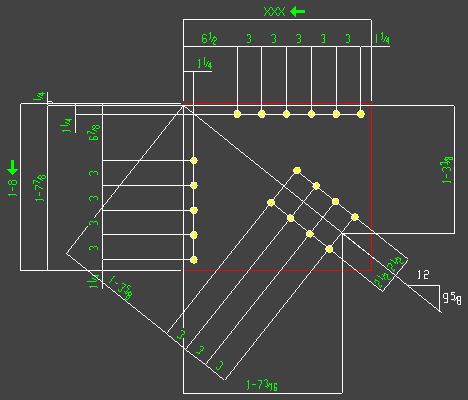
Below is the submaterial detail of the gusset plate that is shown above. Note that the width dimension has been manually changed on the detail to be 1-8 . Originally it was 1-8 1/8 , as is shown above. Also, the length has been changed to XXX , from its original value of 1-10 3/4 .

page 1 | contents | model > | clear dimensions (related) | top


   Step-by-step instructions :

  • Step 1 (preselection) is optional. If you don't do step 1, in-tool selection is required -- see note 2 .
1 . Select one or more members or materials. The selected items change to the " Primary selection color " ( green ).
2 . Invoke Show Detail Dimensions . If you didn't do step 1, see note 2 before going to step 3.
3 . Dimensions are shown in the model, if possible. If dimensions cannot be shown, you get a warning telling you that the member or material or group member needs to be detailed.
4 . The dimensions continue to be shown even if you deselect the member or group member or material (as shown), or if you rotate the member or material, zoom in/out, or show dimensions on other members or materials. To make the dimensions go away, you need to Clear Detail Dimensions .

Note 1: To invoke Show Detail Dimensions ...

Method 1 : Click the Show Detail Dimensions icon, which is pictured above. The icon can be taken from the group named ' Model ' and placed on a toolbar (classic) or the ribbon (lightning).

Method 2 : If " Modeling layout style " is ' Classic ', you can use the menu system to choose Model > Show Detail Dimensions .

Method 3, 4 or 5 : Show Detail Dimensions can also be configured to be invoked using a keyboard shortcut , the context menu , or a mode . For the lightning interface, this configuration is done using Customize Interface .

Note 2: If you didn't do step 1 (preselection), Show Detail Dimensions activates Select Item(s) mouse bindings so that you can select one or more members or materials. Press the Enter key or right-click ( Menu ) and choose " OK " on the menu when you are done selecting members or materials.

Select Item(s) bindings

Note 3: If one or more members or materials you selected have not yet been detailed, or if they need to be re-detailed, you will get a warning telling you that they need to be detailed. Since the dimensions shown in the model are actually generated from the member detail or submaterial detail, Show Detail Dimensions cannot show dimensions on members or materials whose details are nonexistent or not up to date.

Submaterial xxx needs to be detailed.
Member yyy needs to be detailed.
 
OK
Print
Save
 

page 1 | contents | model > | clear dimensions (related) | top