 Gather Sheet Autoloading ( Drawing Editor & Modeling )
Tool summary :
- Opens the Gather Sheet Autoloading window, which automates the creating of gather sheets and the loading of submaterial details onto those sheets.
- If you do not check the box for " Add details to sheet in numerical order ," Gather Sheet Autoloading may deviate from numerical order so that more details can be fit together on a single sheet.
- Each gather sheet is given a unique name as it is created.
- If you type $NAME to the title block on your sheet outline (using Label Add ), then later use that sheet outline when creating a sheet, Gather Sheet Autoloading replaces $NAME with the name of the gather sheet.
- Step-by-step instructions :
- Step 1: Invoke Gather Sheet Autoloading
- Step 2: Choose a sheet outline
- Step 3: Sheet naming options
- Step 4: Composition options > press " Criteria " (optional)
- Step 5: Press the " OK " button
- Step 6: Submaterial selection
Also see :
- Setting up sheet outlines (before you Auto Load )
- Sheet Loading Settings (sets some defaults for Auto Load )
- Sheet Item Add (alternative to Auto Load )
- Detail Sheet Autoloading (similar, but for detail sheets)
Step-by-step instructions :
Tip 1: Before Gather Sheet Autoloading , make sure that you have created an appropriate sheet outline that does not have a bill of material on it (bill information is NOT compiled onto gather sheets).
Tip 2: While accessing the sheet outline, use Label Add to type in $NAME to the title block. When autoloading creates a sheet from that outline, that sheet's name is automatically shown at the location of $NAME.
1 . Invoke Gather Sheet Autoloading using any one (1) of the following methods:
▸ At Home , choose Utilities > Process/Detail > Detail Sheet Autoloading.
▸ Click the Gather Sheet Autoloading icon. The icon can be taken from the group named ' Process ' and placed on the ribbon. In the Drawing Editor , it is in the group named ' Objects -- Sheet Items '.
▸ Gather Sheet Autolaoding can also be configured to be invoked using a keyboard shortcut , the context menu , or a mode . For the lightning interface, this configuration is done using Customize Interface .
2 . A selection dialog opens. On it is a selection list of the sheet outlines in your current Job.
|
Tip: Double-click selects the sheet outline you want AND closes the selection dialog without your having to press " OK ." |
Alternative 1 : Double-click the sheet outline that you want to use as a template for the gather sheets that will automatically be generated later in this procedure. Be sure to select a sheet outline that does not have a bill of material on it. Go to step 3.
Alternative 2 : Press " Cancel " to end Gather Sheet Autoloading and keep everything as it was before step 1. Do not continue.
Note 1: If you have not yet created sheet outlines, you get a warning message at this point. See Setting up Sheet Outlines for Detail/Gather/Erection Sheets .
Note 2: If the sheet outline has a sheet item on it, that sheet item will be replicated on all sheets that Gather Sheet Autoloading creates. Also, Gather Sheet Autoloading will not place submaterials over that sheet item.
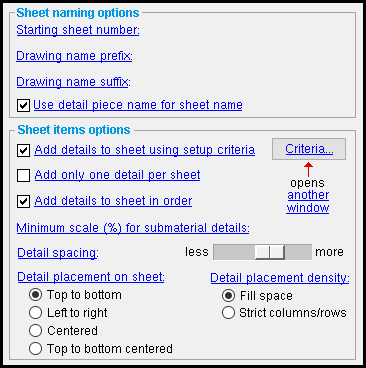
3 . The Gather Sheet Loading Options window opens. Make the entries you want to the following options to define how how you want to name the gather sheets created during this operation:
------ Sheet naming options ------
Starting sheet number: The number ( 1 or 2 or 3 or ...) that you want Gather Sheet Autoloading to assign to the first gather sheet that it autoloads. The second gather sheet that is autoloaded is assigned a number 1 larger than the number input here. If a gather sheet with this number and prefix and suffix already exists, Gather Sheet Autoloading does not overwrite it, but instead goes to the next higher number. Note: This option is disabled (grayed out) if " Use detail piece name for sheet name " is checked.
Drawing name prefix: A prefix of up to 6 characters that you want Gather Sheet Autoloading to assign to all of the gather sheets that it autoloads during this session. Leave this option blank if you do not want a prefix.
Example: To " Drawing name prefix ," you type ' Wflg '. You leave " Drawing name suffix " blank and enter ' 1 ' as the " Starting sheet number ." The resulting gather sheets are named " Wflg1 ," " Wflg2 ," etc.
Drawing name suffix: A suffix of up to 6 characters that you want Gather Sheet Autoloading to assign to all of the gather sheets that it autoloads during this session. Leave this option blank if you do not want a suffix.
Example: To " Drawing name suffix ," you type ' angl '. You leave " Drawing name prefix " blank and enter ' 1 ' as the " Starting sheet number ." The resulting gather sheets are named " 1angl ," " 2angl ," etc.
Use detail piece name for sheet name:
or
. This option is active only when " Add only one detail per sheet " is checked.
If this box is checked (
If this box is checked (
4 . Make selections to the following options to set the arrangement of submaterials on each gather sheet.
------ Sheet composition options ------
Add details to sheet using setup criteria:
If this box is checked (
button and select different sorting criteria.
If the box is not checked (
Add only one detail per sheet:
If this box is checked (
If the box is not checked (
Add details to sheet in order:
If this box is checked (
If the box is not checked (
Minimum scale (%) for submaterial details: 100 percent or a percentage of ' 95 or less '. This is the percentage of the " Drawing scale " set in the Drawing Data Panel for a submaterial detail . Sheet Loading Settings sets the default entry to this option. If autoloading sees that a submaterial does not fit onto a sheet with other submaterials, it skips placement of that submaterial on the current sheet and tries to place it first on the next sheet; if the submaterial does not fit on that next sheet, autoloading rotates the submaterial 90 degrees; if it still doesn't fit, it rotates it back and scales it down 5%; if it still doesn't fit, it rotates the scaled down submaterial. This cycle of rotation and scaling down by increments of 5% continues until the minimum scale entered here is reached. Tip: Enter ' 100 ' to prevent scaling from taking place.
Detail spacing: Applies regardless of the choice made to " Detail placement density ." Moving the slider to the left decreases the spacing between details, potentially increasing the total number of details that will be placed onto a sheet. The default setting for the slider is the " Detail spacing " set in Sheet Loading Settings .
less
more
'
Top to bottom ' arranges submaterials in columns on the sheet (see " Placement density ").
'
'
'
Detail placement density: Applies when ' Left to right ' has been selected for " Detail placement on sheet ."
'
'
5 . When you are done making changes to this window (the Gather Sheet Loading Options window), press the " OK " button:
6 . A Submaterial Selection window opens. On it is a list of all submaterial details in your current Job except those that are marked for detailing or marked as having been placed onto gather sheets.
|
Optional : Use the listing options " Hide ... " and " Show All " and " Status Display " to adjust which classes of submaterials are shown on the selection list. |
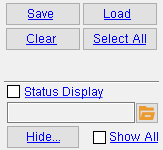
Alternative 1 : Select the submaterials that you want placed onto sheets, then press the " OK " button. Go to step 7.
Alternative 2 : Press the " Cancel " button to end the Gather Sheet Autoloading procedure. Do not continue.
7 . A progress bar appears on screen as the gather sheets are being created.
The submaterials are placed onto gather sheets in the approximate order that they appeared on the Submaterial Selection window ( step 6 ), though Gather Sheet Autoloading may adjust this order so that more submaterials can be fit together onto a single sheet.
If you typed in $NAME to the title block on the sheet outline you are using, then you will find, when you open the autoloaded sheets, that the name of each gather sheet is now printed in its title block.
8 . The mouse bindings that were active when you invoked Gather Sheet Autoloading become active again.
Warning: Gather Sheet Autoloading is not as smart as you are. You should view each autoloaded gather sheet to make sure that submaterials have been properly placed. If necessary, drag with Select to reposition the submaterials on the sheet.

