Group Member Review ( Modeling )
Tool summary :
Also see :
- Use member mark for member main material in shop bill of group member ( Fabricator Setup )
- Member status > Grouped member ( Status Display )
page 1 | contents | model > group member > | model -- group member | group member
Description: The " Description " that appears in line 1 of the group member's bill of material.
| " Description " entered here : |
|
|
| " Description " in the bill of material : |
|
Status Display: Group member status > Group description
System piecemark or User piecemark: A string of up to 61 characters which identifies this group member.
| System piecemark or User piecemark | |
| System piecemark | Indicates that thecharacters entered here are the system piecemark that a full-featured SDS2 program has assigned. |
| User piecemark | Indicates that the characters are a piecemark that a user of a full-featured SDS2 program has assigned. |
Group members also have index numbers: These index numbers are usually shown in brackets [num] , much like a member number is shown in brackets for a member. Each group member index number in a Job is unique, providing a programmatic way to distinguish group members that have the same piecemark.
Status Display: Group member status > Group piecemark
Main member: The member that to be used to create preset views from. For example, if the member is the top chord of a truss, and a preset "TOP FLANGE" view has been added, the view is the top chord of the truss.
Tip: See " Main view locked to main member " to set the member that is selected here is also the "MAIN VIEW" that is shown on the detail and in isolation.
Piecemark on member: The member that the " System piecemark " or " User piecemark " (entered above ) is displayed on in a view in Modeling .
Surface finish: None or Sandblasted or Red oxide or Yellow zinc or Gray oxide or Blued steel or Galvanized or Duplex Coating or Undefined 1 or Undefined 2 or Undefined 3 or Red oxide 2 or Any user added surface finish. This applies the surface finish to the sub-members as well as the attached submaterial, with the check box (![]() ) checked on for auto inside of the material edit window. This affects the colors of 'Solid ' members on erection views in the Drawing Editor . This also sets the color when "Output material color " is set to 'Surface finish ' for a VRML Export or a DWG/DXF Export . The "Color " ( not "Surface finish ") sets the color of this material in Modeling .
) checked on for auto inside of the material edit window. This affects the colors of 'Solid ' members on erection views in the Drawing Editor . This also sets the color when "Output material color " is set to 'Surface finish ' for a VRML Export or a DWG/DXF Export . The "Color " ( not "Surface finish ") sets the color of this material in Modeling .
| sand blasted | red oxide | yellow zinc | user surface finish 1 |
| gray oxide | blued steel | galvanized | user surface finish 2 |
To assign a different surface finish, you can drop-down the current surface finish and select the one you want, or you can press the "file cabinet" browse button (
) and double-click any surface finish that is on the list.
Reset ![]() or
or ![]() .
.
If this box is checked (
), all attached materials surface finish are reset to follow what is selected on the submember level, with the check box (
If the box is not checked (
), all attached materials surface finish remains at what is set inside the material edit window.
Note 1: If the member's material surface finish changes from what the group member level has set, an information tag is shown next to the surface finish in the group member edit window. This notifies the user that a member is not following what was set on the group member level.
Note 2: Member Piecemarks can be split apart by surface finish. All surface finishes that do not have the 'Break Marks Member' checked on can be applied to any like member with out the member splitting. If the 'Break Marks Member' is checked on then only like members with that specific surface finish can have the same piecemark.
Tip 1: "Surface area" is reported on the General Information inside the material edit window -- and this can be used to estimate the amount of coating required and its cost.
Tip 2: Changing "Steel grade " "Color " and "Surface finish " do not cause the material to be regenerated. This means that, if you change those settings only, material fit operations such as a Fit Exact may, optionally, be preserved.
Report Writer: MemberMaterial.Material.SurfaceFinish
Setup: Surface Finish Settings
Sequence: A sequence name from Home > Project Settings > Job > Modeling > Zone and Sequence > press " Sequence Names " > Sequence Names .
Setup: The Zone and Sequence window.
Status Display: General status options > Sequence and Zone .
Main view locked to main member: ![]() or
or ![]() .
.
If this box is checked (
If the box is not checked (
Show member marks on detail: ![]() or
or ![]() . This applies when this group member is auto detailed in a full-featured SDS2 program .
. This applies when this group member is auto detailed in a full-featured SDS2 program .
|
If this box is checked (
If the box is not checked (
Note: If " Show member marks ... " is checked along with " Show sub material ... " and " Show section sizes ... " then a single pointer to the member main material is used for the main member mark, the submaterial mark and the section size.
Show sub material marks on detail: ![]() or
or ![]() . This applies when this group member is auto detailed in a full-featured SDS2 program .
. This applies when this group member is auto detailed in a full-featured SDS2 program .
|
If this box is checked (
If the box is not checked (
Note: If " Show sub material ... " is checked along with " Show member marks ... ', a single pointer and label will be used to identify the member and submaterial mark for each member main material. Only the submaterial mark will be shown on submaterials other than the member main material.
Show section sizes on detail: ![]() or
or ![]() . This applies when this group member is auto detailed in a full-featured SDS2 program .
. This applies when this group member is auto detailed in a full-featured SDS2 program .
|
If this box is checked (
If the box is not checked (
Note: If " Show section sizes ... " is checked along with " Show sub material ... " and " Show member marks ... " then a single pointer to the member main material is used for the main member mark, the submaterial mark and the section size. For submaterials other that the member main material, the label associated with a pointer will show the submaterial mark and the section size.
Organize BOM by submember piecemark: ![]() or
or ![]() . BOM stands for bill of material. You can review a group member's bill of material by choosing Objects > Bill of Material > Edit Bill while reviewing the group member's detail. Auto detailing in a full-featured SDS2 program updates a group member's bill of material based on the choice made here.
. BOM stands for bill of material. You can review a group member's bill of material by choosing Objects > Bill of Material > Edit Bill while reviewing the group member's detail. Auto detailing in a full-featured SDS2 program updates a group member's bill of material based on the choice made here.
|
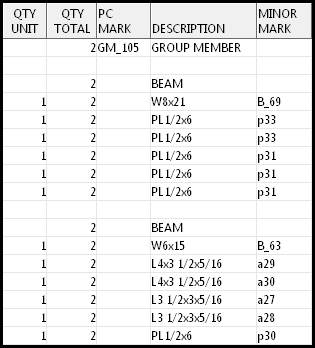
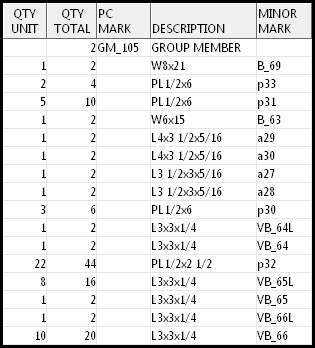
||||||
|
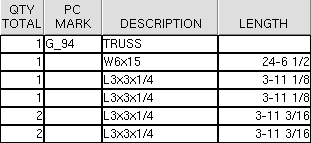
Neither of these examples show the entire BOM . They show only the top part. For both BOMs, the setup option " |
If this box is checked (
If the box is not checked (
page 1 | contents | model > group member > | model -- group member | group member | top
Marked for processing: ![]() or
or ![]() or
or ![]() .
.
means that all members that make up this group member will automatically undergo Process and Create Solids the next time that operation takes place in a full-featured SDS2 program .
means that all members that make up this group member have undergone Process and Create Solids in a full-featured SDS2 program .
indicates mixed entries to this field. It means that some members that make up this group need to undergo Process and Create Solids , but other members do not.
page 1 | contents | model > group member > | model -- group member | group member | top
To close the Group Member window :
![]()
![]()
![]()
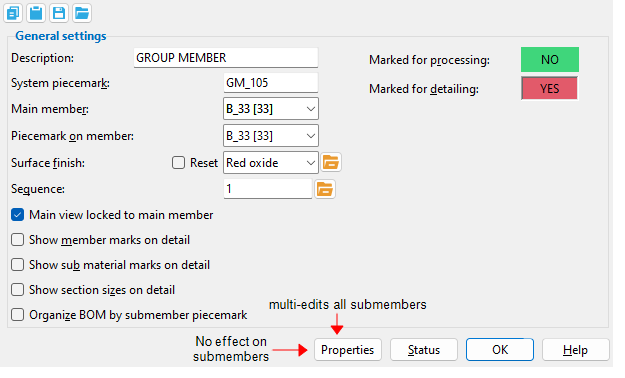
"Properties" opens the Edit Properties window, on which you can make entries to custom properties . The properties that you set affect the group member only -- they do not affect submembers. If, at the time it was created, your current Job was set to use a legacy flavor, the window that opens is named Custom Properties , not Edit Properties .
Note: Group members employ the member schema that are set up at Home > Project Settings > Job > [ Custom Properties ] > Member . There is no separate set of schema for group members.
Tip: Model > Group Member > Properties is an alternative to this button. It opens the Edit Properties window directly, without your first having to open the Group Member window.
Status Display: Group member status > Group custom property
" Status " opens the Member Status Review window, which can give you information about the status of all submembers of this group member. Mixed entries are blanked out in gray if submembers have different entries for that field. Any change you make to a group member's status is inherited by all submembers.
Note: This button is orange if one or more ' Repeat ' check boxes on the Member Status Review window do not match the checked-unchecked state of same-named fields in User and Site Options > Site > " Items to Copy/Repeat " On the Status Review window, the fields that do not match User and Site Options are printed in red .
"OK" (or the Enter key) closes this window when you are done reviewing the settings on it.
page 1 | contents | model > group member > | model -- group member | group member | top