 Exporting a Steel Detailing Neutral File (SDNF)
- General Overview
- Step-By-Step
- Tips and Tricks
- Related Tools
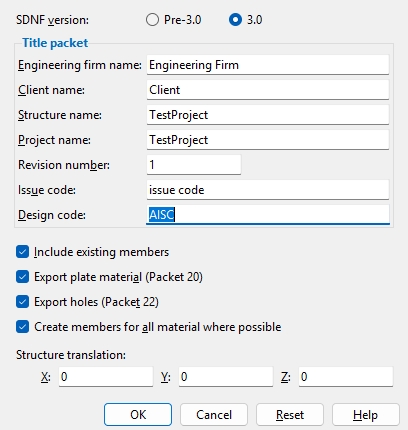
Select Pre-3.0 if you want Export Model to generate a steel detailing neutral file for older versions of the Intergraph Framework program. The file will not include Packet 22 (hole information).
Select version 3.0 if you want Export Model to output an Intergraph steel detailing neutral file (SDNF) that includes Packet 22, which has hole, slot and Cut Layout information. The first line in Packet 00 of the version 3.0 neutral file will read SDNF Version 3.0 so that the file can immediately be distinguished from earlier versions. If any members in your current Job were originally generated from an Intergraph SDNF v3.0 file using Import Model , the Export Model program will automatically reference a copy of the original neutral file used to import those members in order to ensure that material orientation remains the same for unchanged members that are in both the input and output SDNF files.
Title packet
|
Entries under this heading appear in Packet 00 of the steel detailing neutral file. If any member in your current Job were imported from an Intergraph SDNF v3.0 file, these fields are automatically filled out with information from that file. Note: Entering data in these fields is optional. |
Engineering firm name: A character string that signifies the name of the engineering firm that is overseeing the project.
Client name: A character string for the client's name, identifying the customer who hired the engineering firm.
Structure name: A character string that signifies the name of the structure that is represented in the 3D model that is being exported.
Project name: A character string that signifies the name of the project that the 3D model that is being exported from.
Revision number: Any number that you want to identify this revision.
Issue code: A character string that identifies this issue of the file.
Design code: A character string that identifies the design code used to design the structure.
Other options
If this box
is checked and your model has Existing members in it, those members will be included in the steel detailing neutral file.
If the box
is not checked, any Existing members will NOT be included in the steel detailing neutral file.
Export plate material (Packet 20): ![]() or
or ![]()
If this box
If the box
Export holes (Packet 22): ![]() or
or ![]() . This only applies if 3.0 is selected as the SDNF version.
. This only applies if 3.0 is selected as the SDNF version.
If this box
If the box
Tip: Export Model writes hole data fairly quickly; however, importing holes can take a long time in some programs.
Create members for all material where possible: ![]() or
or ![]()
If this box
If the box
Structure translation: 0 or a positive/negative distance. Each member’s work points have specific global X, Y, and Z coordinates at both ends in the 3D model. To move all members in the exported file by a set amount along X, Y, and/or Z, enter that distance here.
0 for X and Y and Z exports a model with the same origin ( 0, 0, 0 global coordinate ) as the model in your current Job.
A positive distanceadds to the X, Y or Z coordinates of all exported members.
A negative distancesubtracts from the X, Y or Z coordinates of all exported members.
OK (or the Enter key) closes this screen and applies the settings.
Cancel (or the Esc key) closes this screen without saving any changes.
Reset undoes all changes made to this screen since you first opened it. The screen remains open.
1 . Click the Export Model icon, which is pictured above. The icon can be found on the Import/Export page > Model section.
Method 2: Click Export Model on the home screen. The command can be found on the Export tab in the 3D section. Skip step 2.
Alternative: Use the Find Tool by searching the command name and clicking the Export Model icon, which is pictured above.
Learn more about alternative methods for launching commands.
2 . The status line prompts Select members, and the Select - Pan - Menu mouse bindings become active. Select the member(s), then press Enter or right-click and select OK.
Alternative: Press the Esc key or right-click and select Cancel to end the command.
3 . The Export Model window opens. Select Steel detailing neutral file as the Export file format. Set the Destination where you want the file to be sent. Directory outputs the file to a folder. Select Properties to open the Steel detailing neutral file Properties window (as shown on the General Overview tab).
4 . Select OK to export the .dat file.
Alternative: Press the Esc key or select Cancel to end the command.

