 Material Edit Command
- Step-By-Step
- Tips and Tricks
- Related Tools
1 . Preselect one or more materials to enable the Materials contextual page and click the Edit icon  )
)
Alternative: Use the Find Tool by searching the command name and clicking the Material Edit icon, which is pictured above. Proceed to step 2.
Learn more about alternative methods for launching commands.
2 . Select the material(s).
▸ Right-click and select "OK" from the shortcut menu.
▸ Press the Enter key.
Alternative : You can press the Esc key or right-click and choose "Cancel" on the shortcut menu to end the command.
3 . The material's edit window opens.
Option 1 : When you are done using the material's edit window, click OK to accept changes and close the window. Proceed to step 4 if changes were made.
Option 2 : Click Cancel to close the window without accepting any of the changes made to its settings, and end the command. Skip step 4.
4 . The Change All Options window opens, informing you that material will be regenerated.
Option 1 : Select the options you want and click the "OK" button to complete the Material Edit command.
Option 2 : Click the "Cancel" button to close the window and end the Material Edit command. The material remains unchanged.
-
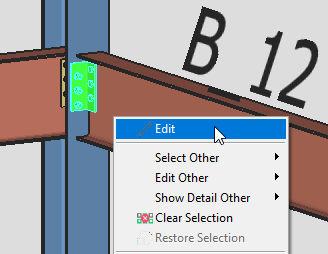
Preselect one or more materials. Right-click to bring up the shortcut menu and click Edit.
-
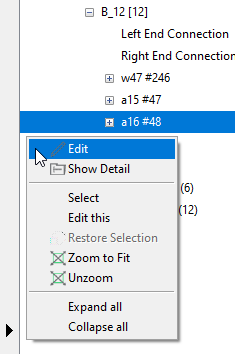
With your mouse pointer (
 ) hovering over the material(s), right-click to bring up the shortcut menu. Click the material piecemark from the Edit other list. You can also select the "All a16" option in the example below. This method allows you to edit review material that is not in view, which is demonstrated in the example below.
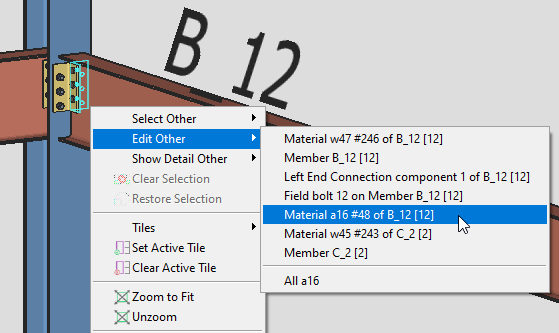
-
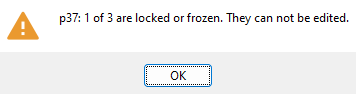
When selecting the "All..." option from the Edit Other list, if any of the materials are located on a member with the "Model complete" date set, a warning window appears showing the material piecemark and the quantity of the material that can't be edited. Clicking OK brings up a second alert window explaining that same material will not be selected. Clicking OK brings up the material edit window for the materials that are not located on the "Model complete" member.
-
In the Model Tree, with your mouse pointer (
) hovering over the material piecemark, right-click to bring up the shortcut menu and click Edit this. Alternatively, preselect one or more material piecemarks and click Edit.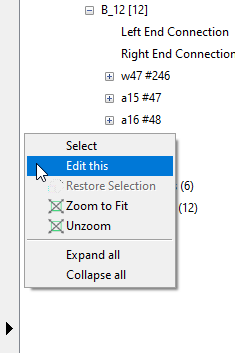
- Double-click (left-click twice) the material you want to edit. This can be done in the modeling space or in the Model Tree.
- Double-click and Edit Other limits you to reviewing one material at a time.
- When the selection filter is set to Default, double-click does not edit a material that is a main member material or a connection material. To edit a member main material or a connection material, you can Edit other or you can set the selection filter to 'Material' or 'Legacy Selection Filter'. Instead of using Material Edit to change these materials, you might get better results using member edit or connection design locks to make those changes.
- If you change settings other than the color or surface finish in the material edit window of a connection material that is part of a system connection, the material is made into a user modified connection material and the connection is made graphical.
- If you change settings other than color or surface finish in the material edit window of a main member material, the material becomes user modified main material.
- The material edit window is read-only if the material you are attempting to edit is part of a member that has its " Model completed " date set.
- Material Edit and related tools open one of the following windows.
This is a list of the most common types of materials used in SDS2. There could be additional material types in your project. Click the
 button in any material edit window for more information.
 - When multiple materials are preselected and the materials are not the same type, the User Created Standard Part Material window opens when Material Edit is invoked.
- When you hover the listing of a material on the shortcut menu, the actual material is highlighted in the model.
- As you hover the listing of an item in the Model Tree , that item is highlighted in the model. When you select an item in the Model Tree , that item is selected in the model.
- If you preselect items other than materials (for example, members), those items will be removed from the selection when Material Edit is invoked.
- When editing multiple materials, be aware that the contents of a field are gray if there are mixed entries in that field. You can edit such fields.
- If you multi-edit materials with the same submaterial mark but different index numbers , certain fields may have mixed entries on the edit window. If you change the mixed entries to a single entry, some of the edited materials may shift to a new location in the model, or cuts may move to the opposite end of a material. Click here for more information.
- Any changes made by editing a material are reflected in the 3D model immediately, without your having to Process and Create Solids .
- Double-click (easiest way to Material Edit )
- User Created Standard Part (window may appear for multiple materials)
- Find Material (can perform Material Edit in)
- Stretch Material (alternative for changing material dimensions)
- Frame (alternative to Material Edit for rolled sections)
- Review 2D Items (to review material specs in the Drawing Editor )
- Grayed out fields (indicate mixed entries or that the field is disabled)

