 Member Edit ( Drawing Editor & Home )
Tool summary :
- Opens a selection dialog with a list of all members that have been added to the 3D model . Select one or more members to edit.
- When you edit one member (
 by Number ), you are given the option to change all members that share the same piecemark or change only the member you selected. When you edit multiple members , you do not have this option.
- Windows that Member Edit can open include the following:
- When you select mutiple members of the same type, the multi-member edit window for members of that type opens. For example, if you selected members of the beam type, the Beam Edit -- Multiple window opens.
- The Edit Properties or Custom Properties window opens when you select multiple members of different types.
- After you close the window, the member selection dialog reappears on screen. You can either select one or more other members to edit or press " Cancel " if you are done.
- See the step-by-step instructions .
Also see :
- Drawing Editor (where Member Edit is a tool)
- Automatically process after modeling operation ( User and Site Options > Modeling > , affects this tool)
- Edit by Location (alternative to Member Edit )
- Edit by Piecemark (alternative to Member Edit )
- "Edit Other" on context menu (alternative to Member Edit )
- Edit by Member Number (alternative to Member Edit )
- Search Options (another way to open edit windows)
- Editing multiple members
- Grayed out fields (indicate mixed entries or that the field is disabled)
- Multiple Object Edit Password (prevents unauthorized multi-member edit)
Step-by-step instructions :
1 . Invoke Member Edit using any one (1) of the following methods:
▸ Home > Utilities > Member Edit .
▸ Member Edit can also be configured, in Drawing Editor , to be invoked using an icon on a ribbon, or by a keyboard shortcut , the context menu , or a mode . For the lightning interface, configuration is done using Customize Interface . The command group is ' Edit ' ( Drawing Editor ).
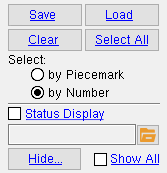
2 . A selection dialog opens. If you select " ![]() by Piecemark " and choose a piecemark that is assigned to multiple members, all members under that mark will be edited. To give you finer control, the default selection setting is "
by Piecemark " and choose a piecemark that is assigned to multiple members, all members under that mark will be edited. To give you finer control, the default selection setting is " ![]() by Number ," which references each member by its member number [in brackets] and its piecemark .
by Number ," which references each member by its member number [in brackets] and its piecemark .
|
" Hide ... " and " Show All " and " Status Display " can be used to to adjust which classes of members are shown on the selection list . |
Alternative 1 : Select one or more members, then press " OK " to continue to step 3.
Alternative 2 : Press the " Cancel " button to end the Member Edit operation. Do not continue.
A special case: If a " Multiple Object Edit Password " has been entered and you selected multiple members (or a piecemark that has multiple members under it), you cannot go to step 3 until you have entered that exact, case-sensitive password.
3 . Member Edit opens the edit window for the type of member you selected. If you selected multiple members, the window is titled " ... Multiple Members " (e.g., Beam Edit -- Multiple Members ). If you selected multiple types of members, Member Edit opens the Edit Properties window.
Alternative 1 : Edit the settings for the one member or multiple members whose edit window or multi-edit window you are reviewing, then press the " OK " button at the bottom of the window. Go on to step 4 or to step 5 (if step 4 does not apply).
Alternative 2 : Press the " Cancel " button to end the Member Edit operation without changing the one member or multiple members. Do not continue.
Note 1: For a miscellaneous member, the edit window only shows the member's piecemark and sequence number, plus gives you access to the Status Review window or Edit Properties window for that member.
Note 2: If in step 2 you selected by piecemark and double-clicked a single piecemark with multiple members under it, Member Edit opens the multi-member edit window for members of that type.
4 (if applicable) : Skip this step if it does not apply. If you edited a single member and more than one member has the same piecemark as that member, a yes-no dialog opens. On it is the question, "Do you want to change all members with this piecemark?"
Alternative 1 : Press the " Yes " button to apply the settings you edited in step 3 to all members with the same piecemark or, if you changed the " Sequence ," to the one member only.
Alternative 2 : Press the " No " button to apply your revised settings to only the member whose edit window you were on.
5 . Member Edit once again opens the selection dialog that first appeared in step 2. If you hid members in step 2, the selection list of members will continue to be masked.
Alternative 1 : Repeat these instructions beginning with step 2 to edit or review additional members.
Alternative 2 : Press the " Cancel " button on this selection dialog to end the Member Edit operation.

