 ORTHO
ORTHO
Tool summary :
- ORTHO stands for "Orthogonal." It works with another point locator to snap to locations that are at right angles to the previously located point.
- ORTHO is exclusively for second, third or nth point location.
- Normally, turning a point location icon on turns off competing point location icons. However, if you click ORTHO on when a single point locator such as INCL or EXPT is on, or when Auto Point is on, that other locator stays on. This is because ORTHO works together with the other point locator.
- If UCS axes are not shown (turned off), then ORTHO uses screen coordinates to snap to the nearest point on a horizontal or vertical line through the previously located point. You can turn the UCS axis on or off using " Toggle UCS ."
- If UCS axes are on, ORTHO tranlates the point that is located using that other point locator to the nearest point on a line that is drawn through the previously located point and is parallel with a UCS axis . A user coordinate system can be used to do complicated layouts of members or materials in isometric views, or for drawing complex geometric forms with lines in the Drawing Editor .
- If you use the default user coordinate system ( UCS axes ) in a plan view , or on a Drawing Editor drawing, ORTHO uses the UCS axes (not screen coordinates ), but behaves exactly as it would with the UCS axes turned off.
- ORTHO in an isometric view ( UCS axes on) can snap to the X, Y or Z axis, whichever is closer. Points that snap to the X or Y axis are in the X-Y plane. Points that snap to the Z axis, however, are in the plane of the screen. Tip: Always turn the UCS axes on when working with ORTHO in an isometric view.
- ORTHO is compatible with typed distances, which are reported in the status line . A typed angle, however, will override ORTHO . To get different angles using ORTHO , you need to reset the UCS axes using UCS icons .
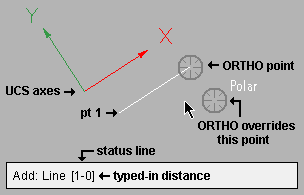
- Here's an example of ORTHO to draw a line in the Drawing Editor :
|
In this example, ANNO is turned off, so that dimensions are not shown. The UCS axes are turned on (" Toggle UCS "). The 33° rotation of the axis was done using " Rotate UCS " A distance of 1 foot (1-0) was typed after locating the first point.
|
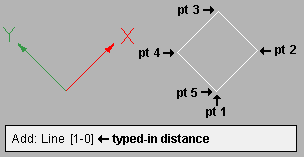
- Here's a bit more complicated example:
|
In this example, points 2, 3, 4 and 5 were located with ORTHO, entering 1-0 as the typed in distance for each point. The same UCS axes -- shown -- were used for all four ORTHO points.
|
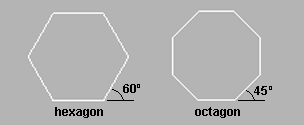
- You can rotate the UCS between point locations:
|
The hexagon was created by rotating the UCS in 60° increments. The octagon was created by alternating the UCS between 0° (using " Reset ") and 45° (using " Rotate ").
|
To toggle ORTHO on and off :
▸ Click the ORTHO icon, which is pictured above. The icon can be placed on your ribbon. It can be found in the command group called ' Locate ' ( Modeling ) or ' Locate ' ( Drawing Editor ).
▸ ORTHO can also be configured to be invoked using a keyboard shortcut , the context menu , this configuration is done using Customize Interface .
YouTube: Point Location / User Coordinate System, v7.3 (  )
)

