 Bolt Add Command
Inserts 3D bolts through face-to-face materials to which matching holes have been added.
- Quick Step-By-Step
- Detailed Step-By-Step
- Tips and Tricks
- Related Tools
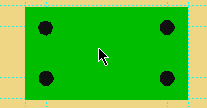
Preselection versus in-tool selection: This example shows the adding of bolts by preselecting a material in Select Items Mode , then invoking Bolt Add . In-tool selection takes place when you do not do step 1 or select items other than just one material in step 1.

|
1 . Select the material that you want to add bolts to. The material changes to the " Primary selection surface color " (green in this example). Field bolts will associate with the member of this first selected material. |

|
2 . Invoke Bolt Add . |

|
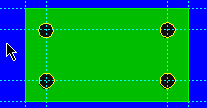
3 . Select one or more materials to bolt to. The material changes to the " Secondary selection surface color " (blue in this example). Press the Enter key (or right-click and choose " OK "). |

|
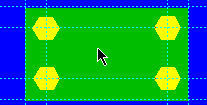
4 . Left-click ( Yes ) to accept the bolt direction. ( No reverses the direction). |

|
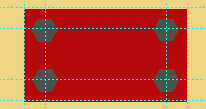
5 . The bolts are added. The materials and bolts are shown in their usual colors (instead of their selection colors). |
1 . Before using this tool:
1a : Make sure that holes have been matched through the materials that you want bolted together. Tip : The " Bolt diameter " on the Hole Edit window tells you the diameter of bolt that will be added to the holes.
1b (optional) : With an appropriate selection filter selected, select a material associated with the member you want to add bolts to. When the material is selected, it will be displayed in the User and Site Options > Modeling > " Primary selection color ," which by default is green. Tip : To select a member main material, right-click ( Menu ) and choose " Select Other.. " on the context menu or first set the selection filter to ' Material '.
Note 1: When the " Default bolt class " in Bolt Settings is set to ' Automatic ', bolts are designated as being shop bolts if the materials being bolted together are submaterials of the same member. Bolts are designated as field bolts if the materials being bolted are submaterials of different members.
2 . Invoke Bolt Add using one (1) of the following methods:
Method 1: Click the Bolt Add icon, which is pictured above. The icon can be found on the Material page > Fasteners section. Proceed to step 3.
Method 2: Preselect a material you want to add bolt(s) to. This enables the Materials contextual page. Click the Bolt Add icon found in the Fasteners section. Skip step 3.Alternative: Bolt Add can also be invoked using the Find Tool by searching the command name and clicking the Bolt Add icon, which is pictured above. Proceed to step 3.
Learn more about alternative methods for launching commands.
3 . Skip this step if you already selected a material in step 1b or invoked this tool from a mode.
3a (if you didn't preselect) : The status line prompts, "Select material to bolt:" Use Select One Item mouse bindings to left-click ( Select ) the material you want to bolt. This prompting also occurs, for example, when a member (instead of a material) is selected.
4 . The status line prompts, "Select material to bolt to:" Select - Pan - Menu mouse bindings become active.
4a : Place the mouse pointer (
) on a material with matching holes that you want the bolts to be inserted through and left-click ( Select ). Alternative : Right-click ( Menu ) then choose the piecemark of the material you want on the menu .
4b (optional) : Hold down the Shift key and left-click ( Select + ) any additional materials with matching holes that you want to insert the bolts through. To deselect a material, hold down the Ctrl key and left-click ( Select- ) a selected material. The selected materials change color to the User and Site Options > Modeling > " Secondary selection surface color ."
4c : When all of the materials you want the bolts through are selected, press the Enter key (or right-click and choose " OK " on the context menu ). This signals that you are done selecting materials.
5 . Skip this step if it does not apply. Depending on the class of bolt you are adding, if the materials you are bolting together have a gap greater than the Home > Project Settings > Job > Bolt Settings > " Maximum shop bolt gap " or the " Maximum field bolt gap ," a yes-no dialog opens. On it is the following message: " The gap of [...] is larger than the maximum of [...]. Would you like to bolt across it anyway? "
Alternative 1 : Press the " Yes " button to bolt across the gap. Go to step 6.
Alternative 2 : Press the " No " button to cancel the bolt operation. Do not continue.
6 . The status line prompts, "Verify bolt direction." Bolts are inserted through the matching holes in the selected material. Yes - No mouse bindings become active.
Alternative 1 : Left-click ( Yes ) to generate the bolts as you see them depicted on your computer screen (for example, head side up).
Alternative 2 : Right-click ( No ) to flip the bolts so that they come into the holes from the opposite side as before (e.g., nut side up). Then left-click ( Yes ) to generate the bolts as shown.
Alternative 3 : Right-click ( No ) to flip the bolts, then right-click ( No ) again. This cancels the operation so that no bolts are generated.
- 3D bolts (about bolts in Modeling )
- Add Holes (before Bolt Add )
- Match holes (before Bolt Add )
- Preferred bolt type (sets the bolt type to be applied to holes)
- Bolt Add to Single Ply (for bolts through holes in a single ply of material)
- Add Point to Point (to add a bolt or nut/washer, not necessarily to a hole)


