The CMU Edit window
Add [Legacy] Miscellaneous Member options :
Once a legacy miscellaneous member is added, these options are shown on the [Legacy] Miscellaneous Member Edit window.
Special indicator :


Red-colored highlighting identifies an entry that is invalid. You need to change that setting, or you will not be able to close this window using " OK ."
To open this window ( in Modeling ):
- Model > Material > Add
- Model > Member > Add > Miscellaneous
- Edit One Material (gives change options)
- Edit Multiple Materials (no change options)
- Double-click the material (to edit a material added using Add Material )
- "Edit Other" (to edit a material added using Add [Legacy] Miscellaneous Member )
- Double-click a material in the Model Tree
- Review 2D Items ( Drawing Editor -- non-editable)
Also see :
- Dimension precision (sets precision for distance entries)
- General Information (can be opened from this window)
- Submaterial piecemark (each unique material identified by)
- submaterial detail (2D drawing of a material)
- CMU (material)
- The CMU Templates window (manages templates used by this window)
- Altering a legacy miscellaneous member's main view
To add CMU :
1 . CMU can be added to the 3D model as a submaterial of a member or as a miscellaneous member. Do one (1) of the following:
To add CMU TO a member : Select the one (1) member that you want to add the concrete masonry unit to (so that it is displayed in the User and Site Options > Modeling > " Primary selection surface color "), then select Prompt for material type and invoke Add Material . Select " CMU Material " as the material type. Special case: If no member is selected before Add Material , you are prompted to select a member. This prompting also takes place when more than one member is selected or a submaterial (rather than a member) is selected.
To add CMU AS a new member : Model > Member > Add > Miscellaneous then select ' CMU Material ' as the material type. Alternatively, press F2 , then select ' Miscellaneous -- CMU ' as the member type.
2 . The status line prompts, " Add: .. ." Locate- Pan -Return mouse bindings become active.
|
|
|
bindings |
2a : Select the appropriate Locate option, then left-click ( Locate ) at two different points to define the work line to be between those two points. The first point defines the material reference point (the pivot point around which subsequent rotation takes place) .
3 . After you are done laying out work points, the CMU Edit window opens. On it are settings for the CMU that you are adding.
3a : Enter a " Template " to define the member's profile.
3b : Choose cut settings as required.
3c : Press the " OK " button to apply your settings and close this window.
4 . The Rotate Material window opens. A preview of the to-be-added CMU is shown on screen. Do one (1) of the following:
Alternative 1 : Press " Cancel " to back up to step 2 . This stops the CMU from being added.
Alternative 2 : To accept the material's present rotation, press the " OK " button. Go to step 5.
Alternative 3 : Change the material's rotational settings and then press " OK " if you want to rotate the material around various axes that originate at the first work point that you located in step 2. Go to step 5.
5 . Follow the step-by-step instructions for Add Legacy Miscellaneous Member to complete the operation.
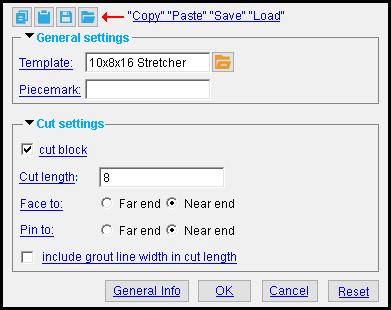
 " Copy " " Paste " " Save " " Load " buttons :
- You'll find buttons like these embedded in the border of individual sections on this window. At the top of this window, the buttons apply to all user-editable settings (except " Piecemark ") that are on this window. Click here for more information.
- You can " Copy " (
 ) the settings on this window, then " Paste " (
  ) those settings to a different CMU.
- " Save " (
 ) saves a file to the
  form/CMUMaterial_GenSettings folder that is used by your current version of SDS2. Give the file a name that will help other users identify its purpose. " Load " (
  ) copies over all settings on this window (except " Piecemark ") with the settings that are stored in the file that you select.
- " Paste " and " Load " replace mixed entries to a single field with a single entry. " Copy " and " Save " ignore fields with mixed entries, treating them as if they have no entry or do not exist.
------ Cut settings ------
If this box is checked (
), the block is cut if the " Cut length " is less than the actual " Length " entered when the CMU template was added
If this box is not checked (
), the block is not cut.
Report Writer: MemberMaterial.Material.CustomMaterials.WeldedWireMesh.is_cut
Cut length: The distance (in the primary dimension " Units " or other units ) from the furthest point on the material's face to the point at which the material is cut in the model. This applies when " cut block " is checked ( ![]() ).
).
If " include grout line width in cut length " is checked (
If the length you enter is greater than the actual " Length " entered when the CMU template was added , " Cut block " may be unchecked (
Report Writer: MemberMaterial.Material.CustomMaterials.WeldedWireMesh.cut_length
Face to: ' Far end ' or ' Near end ' . This applies when " cut block " is checked ( ![]() ).
).
' Far end ' places the face of the CMU material -- defined by the work point of the CMU block profile -- toward the second work point that you entered when you added the CMU material or legacy miscellaneous member.
' Near end ' orients the face toward the first work point that you entered.
Report Writer: MemberMaterial.Material.CustomMaterials.WeldedWireMesh.is_face_to_near_end
Pin to: ' Far end ' or ' Near end ' . This applies when " cut block " is checked ( ![]() ).
).
' Far end ' places either the face or the end that is cut -- depending on whether " Face to " is ' Far end ' or ' Near end ' -- at the second work point that you entered when you added the CMU material or legacy miscellaneous member.
' Near end ' places either the face or the end that is cut -- depending on whether " Face to " is ' Far end ' or ' Near end ' -- at the first work point that you entered.
Report Writer: MemberMaterial.Material.CustomMaterials.WeldedWireMesh.pin_side
include grout line width in cut length: ![]() or
or ![]() . This applies when " cut block " is checked (
. This applies when " cut block " is checked ( ![]() ).
).
If this box is checked (
Example: The nominal length of the CMU template profile is ' 1-4 '. The actual length of the profile is ' 1-3 5/8 '. Therefore, the width of the cut line is 3/8" (1'-4" minus 1'-3 5/8"). When the " Cut length " entered is ' 8 ', the cut length modeled is 7-5/8" (8" minus 3/8").
If this box is not checked (
Report Writer: MemberMaterial.Material.CustomMaterials.WeldedWireMesh.incl_grout_in_cut_len
To close this window :
![]()
![]()
![]()
![]()
![]()
" General Information " opens the General Information window, which provides additional information and settings that pertain to this CMU.
Tip: You can use the General Information window to change the material's " X ," " Y ," or " Z " global coordinates (and thus reposition the material within the 3D model).
Also: The " Properties " button at the bottom of the General Information window lets you Edit Properties for this material.
"OK" (or the Enter key) closes this window and applies the settings on it to the material(s).
If this window opened for adding a material or legacy miscellaneous member, you can still press " Cancel " on the Rotate Material window to end the add operation (see step 4 ).
If you opened this window to edit a CMU ( single-edit ), the Change All Options & Warning List opens after you press the " OK " button. You can use that window to cancel your changes or, if other materials with the same submaterial piecemark exist, apply your changes to those other materials. Also, if a Cut on Plane or related cutting operation was previously done on this CMU, pressing " OK " gives you the option to undo that operation.
"Cancel" (or the Esc key or the ![]() button) closes this window without saving any changes that you have made to it.
button) closes this window without saving any changes that you have made to it.
Possibilities: If you are performing a Add Material or Add [Legacy] Miscellaneous Member operation, " Cancel " brings you back to the work point location step ( step 2 ) in the add operation. For a Edit Material operation, " Cancel " ends the operation.
Tip: When you open this window to review information only, the preferred way to exit is to press " Cancel ."
"Reset" undoes all changes made to this window since you first opened it. The window remains open.

