 Freeze Piecemark ( Modeling )
Tool summary :
Also see :
- Modeling (where Freeze Piecemark is a tool)
- Frozen piecemarks (topic)
- Piecemark group (identifies piecemarks that are frozen)
- Thaw Piecemark (tool for unfreezing a piecemark)
- Approval and modeling > Member piecemark frozen ( Status Display )
- Model Tree (useful tool for selecting piecemarks)
- Piecemark status (to freeze piecemarks using Update Attributes )
- User piecemarks (alternative to Freeze Piecemark )
page 1 | contents | model > member > | model -- member | frozen piecemarks
| Applications : A reason to Freeze piecemarks is to, for example, separate members that are going to be galvanized or painted from other members that are, in all other ways, exactly like those members. |
 Scenario 1 :
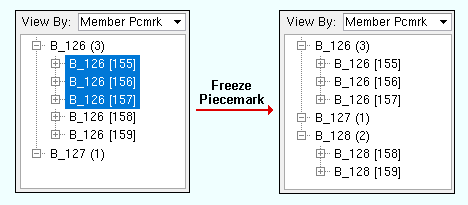
You have five beams whose " System piecemark " is B_126. You Freeze Piecemarks on three of them that are going to be galvanized. All three of those beams continue to be piecemarked B_126, and their " Piecemark group " changes from ' 0 ' to ' 1 '. The piecemarks of the other two beams change to B_128 , and their " Piecemark group " remains ' 0 '.
 Scenario 2 :
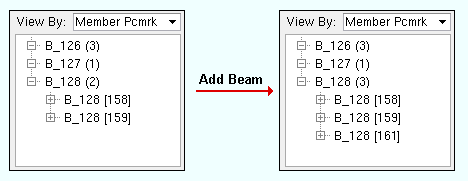
You do an Add Beam to place a member that is physically equivalent to the five members in scenario 1. During Create Solids , the new member is assigned B_128 as its " System piecemark " even though it is also exactly like the three members with the frozen piecemark, B_126 . Piecemarking does not combine new members under a piecemark that has been frozen.
 Scenario 3 :
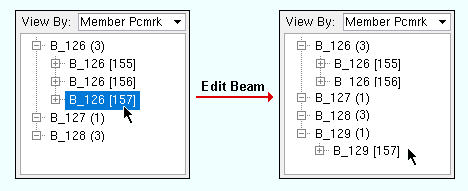
In the Model Tree , you double-click one of the beams with the frozen piecemark B_126 . You change its " Input connection type ." The member is assigned an entirely new piecemark, B_129 , since it is unlike any other members that have non-frozen system piecemarks. Piecemarking can break apart members under a piecemark that has been frozen. For example, it will assign a new piecemark to a member with a frozen piecemark that is stretched but will not necessarily assign a new piecemark if the member with the frozen piecemark is moved.
 Scenario 4 :
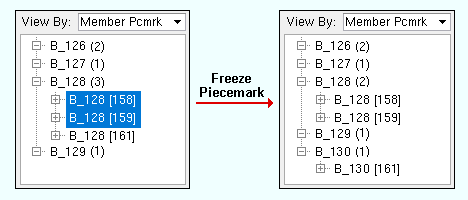
As a result of scenarios 1, 2 and 3, you now have two beams with the frozen piecemark B_126 . Three other beams have the piecemark B_128 and are physically equivalent to the two beams with the frozen piecemark. You Freeze Piecemarks on two of the beams with piecemark B_128 because they are going to be painted. Both of those beams continue to be piecemarked B_128, and their " Piecemark group " number changes from ' 0 ' to ' 2 '.The third member's piecemark is changed from B_128 to B_130 , and its " Piecemark group " remains ' 0 '.
 Scenario 5 :
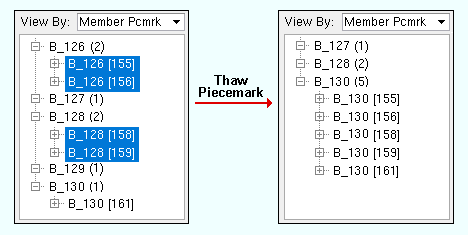
As a result of scenarios 1, 2, 3 and 4, you now have two beams with the frozen piecemark B_126 , two other beams with the frozen piecemark B_128 , and a fifth beam with the non-frozen piecemark B_130 . All five of these beams are physically the same. You now do a Thaw Piecemark and select the four beams with the frozen piecemarks. Those four beams are all combined under the piecemark B_130 , and their " Piecemark group " is set to ' 0 '.
page 1 | contents | model > member > | model -- member | frozen piecemarks | top
 Step-by-step instructions :
Freeze piecemarks can be used to separate members from other members that are exactly like them and to ensure that no new members combine under the frozen piecemark. To freeze member piecemarks, you select the members whose marks you want to freeze. You can select members under as many piecemarks as you like. You must do either step 1c (preselection) or step 3 (in-tool selection) to perform this operation. Be aware that, although these instructions recommend that you use the Model Tree to select members, you can instead select members using Select or Select+ (or drawing an area box ) in Select Items mode. A reason to Freeze piecemarks is to, for example, separate members that are going to be galvanized or painted from other members that, in all other ways, are exactly like those members.
1a : You need to be in Modeling .
1b : You should Open ( Ctrl + o ) a view that shows all members in the 3D model. This allows the Model Tree to show all members under a particular piecemark, giving you a more complete picture of the results of your freezing a piecemark. On the Model Tree , set " View By " to ' Member Piecemark '.


Select Items bindings (step 1c) 1c (optional) : Use the Model Tree to select the members whose piecemark you want to freeze, holding down the Ctrl key to select noncontiguous members. Note that the selection filter must be set to something that allows member selection (e.g., ' Default ' or ' All ' or ' Members ').
2 . Invoke Freeze Piecemark using any one (1) of the following methods in Modeling :
Method 1 : Click the icon. The icon can be taken from the group named ' Model -- Member ' and placed on a toolbar (classic) or the ribbon (lightning).
Methods 2 : If " Modeling layout style " is ' Classic ', you can use the menu system to choose Model > Member > Freeze Piecemark .
Method 3, 4 or 5 : Freeze Piecemark can also be configured to be invoked using a keyboard shortcut , the context menu , or a mode . For the lightning interface, this configuration is done using Customize Interface .
3 . Skip this step if you preselected members in step 1c .
|
|
|
Select Item(s) bindings |
3a (if you didn't preselect) : Freeze Piecemark activates Select Item(s) mouse bindings, and the status line prompts you to " Select members ." Use the Model Tree to select the members whose piecemark you want to freeze. Press the Enter key or right-click ( Menu ) and choose " OK " on the context menu when you are done selecting the members you want. Go to step 4.
Alternative : You can press the Esc key (or right-click and choose " Cancel " on the context menu ) if you want to end this operation without freezing any piecemarks. Do not continue.
page 1 | contents | model > member > | model -- member | frozen piecemarks | top


