 Split Rebar ( Modeling )
Tool summary :
Also see :
|
- Modeling (where Split Rebar is a tool)
Step-by-step instructions :
1 . Before using this tool:
1a (often required to do 1b) : Set the Selection Filter to ' Rebar '.


Select Items bindings (step 1b) 1b (optional) : In Select Items mode with an appropriate selection filter selected, use Select or Select+ (or draw an area box ) to select the rebar(s) whose length you want to change.
2 . While in Modeling , choose from one (1) of the following methods:
Method 1 : Click the Split Rebar icon. The icon can be taken from the group named ' Model -- Concrete ' and placed on a toolbar (classic) or the ribbon (lightning).
Method 2, 3 & 4 : Split Rebar can also be configured to be invoked using a keyboard shortcut , the context menu , or a mode . For the lightning interface, this configuration is done using Customize Interface .
3 . Skip this step if you already selected rebar in step 1b .
| Select Item(s) bindings |
3a (if you didn't preselect) : Split Rebar activates Select Item(s) mode mouse bindings, and the status line prompts you to " Locate Rebar ." Press the Enter key or right-click ( Menu ) and choose " OK " on the menu when you are done selecting the rebar you want. Go to step 4.
Alternative : You can press the Esc key (or right-click and choose " Cancel " on the context menu ) if you want to end this operation without extending any rebar ends. Do not continue.
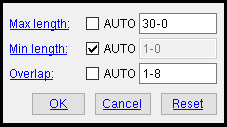
4 . The Split Rebar window opens.

Alternative 1 : Check " Auto " or enter a positive distance (in the primary dimension " Units " or other units ) in any or all of the " Max " or " Min length " and " Overlap " fields. Then press the " OK " button at the bottom of the window to apply your settings and close this window.
Alternative 2 : Press the " Cancel " button to end this operation. Do not continue.
Split Rebar options :
Max length: Auto or the maximum length (in the primary dimension " Units " or other units ) of any resulting segment when the rebar is split.
'
Auto (checked) ' instructs the Split Rebar program to use the value entered in the " Stock / max fab length " field in the Reinforcing Bar Definition window.
'
Auto (not checked) ' you can enter a distance to the desired precision in the appropriate units.
Min length: Auto or the minimum length (in the primary dimension " Units " or other units ) of any resulting segment when the rebar is split
'
Auto (checked) ' instructs the Split Rebar program to use the value entered in the " Min fab length " field in the Reinforcing Bar Definition window.
'
Auto (not checked) ' you can enter a distance to the desired precision in the appropriate units.
Overlap: Auto or the length (in the primary dimension " Units " or other units ) of the resulting overlap of rebar segments.
'
Auto (checked) ' instructs the Split Rebar program to use the value entered in either the " Horz. in concrete " " Vert. in concrete " or " In masonry " field in the Reinforcing Bar Definition window is used, depending on the placement of the rebar.
'
Auto (not checked) ' you can enter a distance to the desired precision in the appropriate units.


