 Add Reveal ( Modeling )
Tool summary :
The settings that control the reveal are stored the [ Vertical and Horizontal settings ] section on that tilt-up panel's window.
A custom profile for the reveal can be defined, as can the number of reveals and their spacing.
To edit the custom component, you can edit the tilt-up panel or use the Model Tree .
Also see :
- Modeling (where custom components can be added)
- Reveal Setup ( Concrete Job Setup window, sets defaults for this window)
- Custom components (topic)
- Component Plugin Defaults ( Home > Project Settings > Job > Plugin Defaults > )
- Copy Component (to copy the reveal to another tilt-up panel)
- Move Component (to move the reveal to another tilt-up panel)
- Explode Component
- Component Selection Tool (to search for custom components of a selected type)
- Model Tree (to find custom components and select them for deletion, editing, etc.)
To add, edit or delete the Reveal custom component :
Setup of default settings is available for the edit window that opens when you add this component. See Home > Project Settings > Job > Plugin Defaults > Component Plugin Defaults .
To add the custom component: 1 ) Set your Selection filter " to ' Members ' and select the panel to which you want to add the reveal. 2 ) In Modeling , Add Component . 3 ) On the custom component selection list, choose " Reveal " as the custom component you want to add. 4 ) The Reveal Edit window opens. Check " Add horizontal reveal " or " Add vertical reveal " as desired, then specify the distances from the edges of the panel each reveal. Press " OK " to close the window. 5 ) If User and Site Options > Modeling > " Automatically process after modeling operation " is set to ' Process and create solids ', the reveals will be generated immediately. If not, the reveals will be generated on the panel the next time it undergoes Process and Create Solids .
Tip: If you use in-tool selection -- that is, select the panel after selecting " Reveal " as the custom component you want to add -- only tilt-up panels will be selectable. Also, it will not be necessary to set your Selection filter " to ' Members '. To delete a Reveal custom component: 1 ) Use the Component Selection Tool and select the component in the tilt-up panel. Or , select the component in the Model Tree . It will be listed under its under its tilt-up panel member and not under the group member to which the panel belongs 2 ) Press the Delete key (or choose Edit > Delete ). 3 ) You will need to Process and Create Solids if User and Site Options > Modeling > " Automatically process after modeling operation " is not set to a choice that automatically creates solids.
To edit a Reveal component using a member edit window, you can open the Tilt-up Panel Edit window of the member on which the reveal is placed. Select the tilt-up panel, right-click and choose Edit Other , then choose the tilt-up panel member. The component's settings will be contained in that window in a section named [ Vertical and Horizontal settings ].
You edit a Reveal custom component without opening the Tilt-up Panel Edit window, provided that " Voids " are checked in the Display Options window. Set the " Selection filter " to ' Custom Components ''. Select a void, right-click, and choose Edit . Or, select the reveal by double-clicking it.
To multi-edit reveal components, use the Component Selection Tool to select that component type.
You can also edit a Reveal component using the Model Tree . In the Model Tree , the custom component is listed as Reveal when " View By " is set to ' Member piecemark ' or ' Member number '. The Reveal component is listed under its panel, after that member's connection components ( Left End and Right End ), and before that member's submaterials. It is not listed under the group member to which the panel belongs.
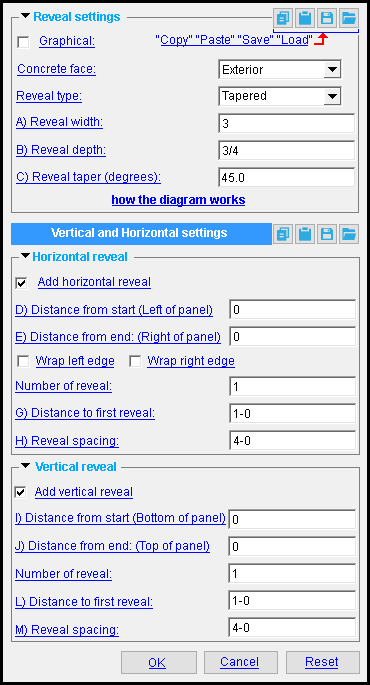
Reveal custom component settings :
 ------ Reveal settings ------
Graphical: ![]() or
or ![]() . This member is automatically marked as "
. This member is automatically marked as " ![]() Graphical" if you, for example, perform a Cut On Plane operation on the void member's material.
Graphical" if you, for example, perform a Cut On Plane operation on the void member's material.
If this box is checked (
), changes you make on this window -- for example, to the choice of " Concrete face " -- will not be applied in the model since the member is prevented from undergoing Create Solids .
If the box is not checked (
), any graphical changes made to this reveal will be lost the next time the member undergoes Create Solids . Also, any entries made on this window will be applied to the member at that time. If User and Site Options > Modeling > " Automatically process after modeling operation " is set to ' Process and create solids ', then this member will automatically be regenerated ( Create Solids will take place) after your press " OK ."
Note: Reveals are composed of voids. Voids are dummy material with spatial properties. The material does not have an edit window, but you can perform certain material operations on it. For example, you can perform cut operations on voids. Doing so makes the void space member graphical.
Concrete face: Exterior or Interior . Whether a face of the tilt-up panel is considered interior or exterior depends on where the points were added when it was placed.
If the points that placed the tilt-up panel were laid out from left to right:
' Interior '

' Exterior '

' Interior ' places the reveal to the interior (lower) face. ' Exterior ' places the reveal to the exterior (upper) face. If the points that placed the tilt-up panel were laid out from bottom to top:
' Interior '

' Exterior '

' Interior ' places the reveal to the interior (right) face. ' Exterior ' places the reveal to the exterior (left) face. If the points were placed from right to left or from top to bottom, the faces would be reversed.
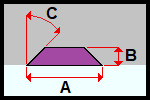
Reveal type: Tapered or Custom .
' Tapered ' uses a shape defined by " Reveal width " , " depth " , and " taper (degree) " values that you enter.
' Custom ' lets you define a shape by placing grips to locate coordinates.
| The following options apply when " Reveal type " is ' Tapered '. |
Reveal width: A distance (in the primary dimension " Units " or other units ). The width is measured at the face of the tilt-up panel.
|
A = " Reveal width " |
Reveal depth: A distance (in the primary dimension " Units " or other units ). The depth is measured perpendicular to the face of the tilt-up panel.
|
|
B = " Reveal depth " |
Reveal taper (degrees): A positive or negative number of degrees.
|
|
C = " Reveal taper " -- positive in this example. |
| The following options apply when " Reveal type " is ' Custom '. |
Diagram
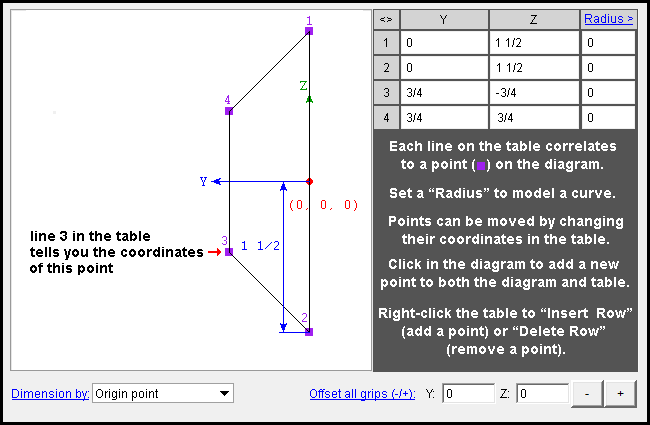
Radius: A distance (in the primary dimension " Units " or other units ) that defines the amount of corner rounding that takes place.
" Radius " is the radius of a circle. Two lines that are tangent to that circle meet at the located point. The arc of the rounded corner ends at the points of tangency of these two lines. 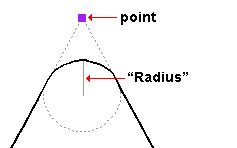
A " Radius " of ' 0 ' designates a sharp corner with no corner rounding.
Increasing the size of the " Radius " moves the edge of the rounded corner back from the corner point. This is because the " Radius " defines a circle that is tangent to both lines to the corner point. The arc of the rounded corner begins and ends at the tangent points.
You can set a different " Radius " for each corner. Clicking on the upper-right corner of the table (" Radius > ") lets you set the radius for each point to be the same value.
Dimension by: Length and angle or Previous point or Origin point . This applies when you hover a point in the diagram with your mouse pointer ( ![]() ), regardless of whether or not you are adding points.
), regardless of whether or not you are adding points.
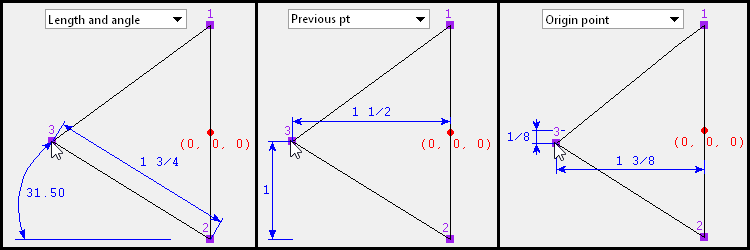
' Length and angle ' shows one or two dimensions and an angle. The dimension(s) are to the point you are hovering. One dimension may be to the previous point, and another dimension may be to the next point. The angle to the point you are hovering may be the included angle between the hovered point and the previous two points. Or it may be the angle between the hovered point and a horizontal or vertical bisector to the previous point.
' Previous point ' shows horizontal and/or vertical dimensions between the point you are hovering and the previous point in the diagram. Dimensions of zero will not be shown.
' Origin point ' shows horizontal and/or vertical dimensions from the origin point (0, 0, 0) to the point you are hovering. Dimensions of zero will not be shown.
Adding points: You can click a line in the diagram to add a point. The new point snaps to your mouse pointer until you left-click to locate that point or right-click to cancel. Dimensions are shown as you move your mouse pointer to reposition the snapped-to point. An alternative to clicking in the diagram to add points is to enter the points to the table.
Offset all grips (-/+): Y point and X point . These are distances (in the primary dimension " Units " or other units ) from which the reveal shape is offset from its origin point.
To apply an offset, 1 ) enter a ' distance ' into one or both of the " Y " and " Z " fields, and 2 ) press the "+" button to offset the shape from its origin point in a positive direction by the entered distance. Press the "-" button to offset in a negative direction. The table is automatically updated with the resulting coordinates.
------ Horizontal reveal ------
If this box is checked (
If the box is not checked (
| The following options apply when " Add horizontal reveal " is ' True '. |
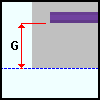
Distance from start (Left of panel): The distance (in the primary dimension " Units " or other units ) from the left end of the panel to the start of each horizontal reveal.
|
D = " Distance from Start "
|
Distance from end (Right of panel): The distance (in the primary dimension " Units " or other units ) from the right end of the panel to the start of each horizontal reveal.
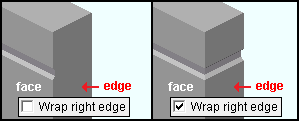
Wrap left/right edge: True or False . " Wrap left edge " applies only when " Distance from start ... " is ' 0 ' . " Wrap right edge " applies only when " Distance from end ... " is ' 0 ' .
|
Voids are not shown in this illustration for clarity. |
Number of reveal: The number of horizontal reveals. If you enter ' 0 ' , the result is the same as if you unchecked " Add horizontal reveal ". If the number of reveal multiplied by the " Reveal spacing " is greater than the height of the panel, some reveals will be omitted.
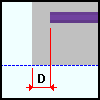
Distance to first reveal: The distance (in the primary dimension " Units " or other units ) from the bottom of the panel to the bottom of the first horizontal reveal.
|
G = " Distance to first reveal "
|
Reveal spacing: A distance (in the primary dimension " Units " or other units ). This is the spacing on center between each horizontal reveal.
------- Vertical reveal ------
If this box is checked (
If the box is not checked (
| The following options apply when " Add vertical reveal " is ' True '. |
Distance from start (Bottom of panel): The distance (in the primary dimension " Units " or other units ) from the bottom of the panel to the bottom of the each vertical reveal.

|
I = " Distance from Start "
|
Distance from end (Top of panel): The distance (in the primary dimension " Units " or other units ) from the top of the panel to the top of each vertical reveal.
Number of reveal: The number of vertical reveals. If you enter ' 0 ' , the result is the same as if you unchecked " Add horizontal reveal ". If the number of reveal multiplied by the " Reveal spacing " is greater than the length of the panel, some reveals will be omitted.
Distance to first reveal: The distance (in the primary dimension " Units " or other units ) from the right end of the panel to the edge of the first vertical reveal.
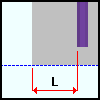
|
L = " Distance to first reveal "
|
Reveal spacing: A distance (in the primary dimension " Units " or other units ). This is the spacing on center between each vertical reveal.

