 Create RFI (Request For Information)
Tool summary :
Tip: If you leave this window blank except for the Export options, then press " OK ," Create RFI generates a .pdf file that includes a picture only. You can copy ( Ctrl+c ) and paste ( Ctrl+v ) that picture to a form previously created in, for example, Adobe Acrobat. Another way to get a picture without the form is to do a Export Model U3D export.
Also see :
- Modeling (where Create RFI is a tool)
- Three solid forms (members must be displayed in)
- Holes (check the box for display of if you want holes in the 3D screen shot)
- Bolts (if you want bolts in the 3D screen shot)
- Welds (if you want welds in the 3D screen shot)
- U3D (Export Model export option that produces a similar 3D screen shot)
- https://get.adobe.com/reader/ (Adobe Reader)
- Exporting from your current Job (index)
- 7.2 Create_RFI_v3_04.py can be found in the macro/examples folder. It runs Create RFI and populates the appropriate RFI custom property fields when the DDLegacy flavor of member custom properties is used.
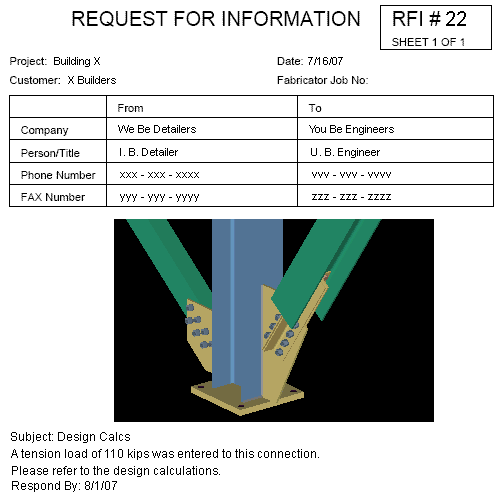
Example of an RFI :
Tip: If you leave this window blank except for the Export options, then press " OK ," Create RFI generates a .pdf file that includes a picture only. Your PDF viewer may allow you copy that picture (for example, by right-clicking and selecting " Copy ") and paste it into another document
You can copy ( Ctrl+c ) and paste ( Ctrl+v ) that picture to a form previously created in, for example, Adobe Acrobat.
Step-by-step instructions :
You must be in Modeling and do step 1b (preselection) or step 3 (in-tool selection) to perform this operation. An RFI is a request for information in the form of a .pdf file that includes a 3D screen shot with multiple views. The following instructions assume that you are using a 3-button mouse.
1a : Open ( Ctrl + o ) a view that shows the situation you want to inquire about in the RFI. Display the view in one of the three solid forms . If Status Display colors have been set, the 3D screen shot will be rendered in the colors that the members you select for inclusion are displayed in.

Select Items bindings (step 1b). 1b (optional) : In Select Items mode with an appropriate selection filter selected, use Select or Select+ (or draw an area box or Select Members by Number or use the Model Tree ) to select the member(s) that you want depicted in the 3D screen shot for the RFI. Use Select- if you want to deselect members.
Note: The units of the file created using this procedure will be inches if your primary dimension " Units " are ' Imperial (ft-in fractions) ' or ' Imperial (in-fractions) ' or etc. The units of the file are mm if your primary dimension " Units " are ' Metric (millimeters) '.
2 . Invoke Create RFI using one (1) of the following methods:
▸ Click the Create RFI icon, which is pictured above. Click the Revert icon. The icon can be taken from the group named ' File ' and placed on the ribbon.
▸ Create RFI can also be configured to be invoked using a keyboard shortcut , the context menu , or a mode . For the lightning interface, this configuration is done using Customize Interface .
3 . If you did not do step 1b, the program prompts you to use Select Item(s) mode options to select the member(s) you want to create an RFI for. Skip this step if you already selected members in step 1b .
|
|
|
Select Item(s) bindings |
Alternative 1 (to output 3D screen shot) : Select the members that you want, then press the Enter key or right-click ( Menu ) and choose " OK " on the context menu when you are done. A 3D screen shot of the selected members will be included as part of the RFI. Go to step 4 .
Alternative 2 (to output a text-only RFI) : Do not select any members. Instead, right-click ( Menu ) and right-click and choose " Cancel " or " OK " on the menu . A 3D screen shot will not be included as part of the RFI. Go to step 5 .
4 . If you did step 1b or step 3, alternative 1 , Locate- Pan -Return mouse bindings become active, and the status line prompts, " Locate rotation point ."
|
|
|
bindings |
4a (optional) : You can use Pan (middle mouse button) or Rotate (middle mouse button + Shift ) or Nav Once (middle mouse button + Ctrl ) to reposition your current view to the way you want it to be shown in Adobe Reader.
Alternative 1 : Left-click ( Locate ) when the point location target is where you want the center point of the "Default" view that will be shown in Adobe Reader. This is also the point around which you can rotate that view. Go to step 5.
Alternative 2 : Right-click ( Return ) to cancel this operation. Do not continue.
5 . The Request for Information window opens.
Alternative 1 : Fill out the information that you want included on the cover page, then press " OK ." Create RFI will generate a .pdf file that includes the information that you entered.
Alternative 2 : Leave this window blank, then press " OK ." Create RFI will generate a .pdf file that includes a picture only. You can copy ( Ctrl+c ) and paste ( Ctrl+v ) that picture to a form previously created in Adobe Acrobat.
6 . After you close the Request for Information window, a dialog opens that allows you to enter the name of the .pdf file and the file folder ( ![]() ) in which you want it placed.
) in which you want it placed.
Alternative 1 : Press " Save " to save the file. Go to step 7 if Adobe Reader is installed on your computer.
Alternative 2 : Press " Cancel " to end this operation without saving the file. Do not continue.
7 . If it is installed on your computer, Adobe Reader launches to give you the opportunity to review the RFI.
Note 1: If you don't have Adobe Reader, you can still view the file with an different PDF viewer, but the 3D screen shot won't be viewable. You can download a copy of the Adobe Reader at https://get.adobe.com/reader .
Note 2: The 3D screen shot embedded in the PDF document automatically includes several views of the members selected in step 1b (or step 3 ). These are "Default," "North Elevation," "South Elevation," "East Elevation," "West Elevation," "Top Plan" and "Bottom Plan." The point located in step 4 sets the center of the "Default" view. North, south, east and west are set based on Home > Project Settings > Job > Job North > " Degrees for job north ." North is at the top of the "Top Plan" and "Bottom Plan" views.
The Request For Information window:
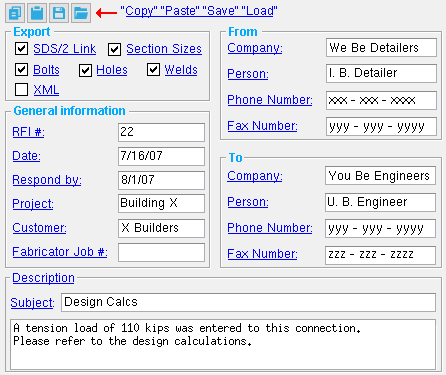
![]() " Copy " " Paste " " Save " " Load " buttons
" Copy " " Paste " " Save " " Load " buttons
- You'll find buttons like these at the top of this window. Click here for more information.
- Suppose that you are creating a number of related RFIs to be sent to the same destination. You can " Copy " (
 ) the entries on this window, then " Paste " (
  ) those entries to the next RFI that you create. But this is not really necessary since SDS2 remembers the last entries you have made and automatically fills out this window with those same entries the next time you open this window during this session of Modeling .
- Suppose that you repeatedly send RFIs to the same destination. " Save " (
 ) places a file (which you name) in the
  form/rfi folder in the data directory for your current version of SDS2. That file saves the entries made to this window. Give the file a name that will help you identify its purpose in this Job and other Jobs -- for example, name the file after the person or organization you are sending the RFI " To ." " Load " (
  ) opens the form/rfi folder and automatically fills out this window with the entries that are stored in the file that you select.
- Tip: Instead of using the RFI format that this program provides, you may want to create your own format in Adobe Acrobat. If you leave this window blank except for the Export options, then press " OK ," Create RFI generates a .pdf file that includes a picture only. You can copy ( Ctrl+c ) and paste ( Ctrl+v ) that picture to the RFI previously created in Adobe Acrobat.
Export
![]()
If this box is checked (
), a "Designed with SDS2" logo will be added to the footer of the RFI. The logo is hyperlinked to the SDS2 web site.
If the box is not checked (
), the RFI is generated without an SDS2 logo.
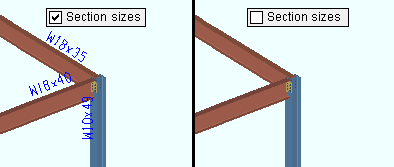
Section sizes: ![]() or
or ![]() . This controls whether section sizes are (
. This controls whether section sizes are ( ![]() ) or are not (
) or are not ( ![]() ) included in the 3D screen shot.
) included in the 3D screen shot.
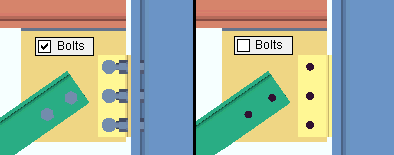
Bolts: ![]() or
or ![]() . This controls whether holes are (
. This controls whether holes are ( ![]() ) or are not (
) or are not ( ![]() ) included in the 3D screen shot.
) included in the 3D screen shot.
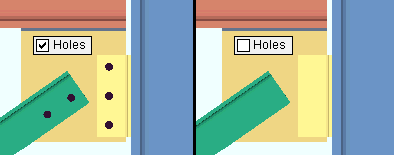
Holes: ![]() or
or ![]() . This controls whether holes are (
. This controls whether holes are ( ![]() ) or are not (
) or are not ( ![]() ) included in the 3D screen shot.
) included in the 3D screen shot.
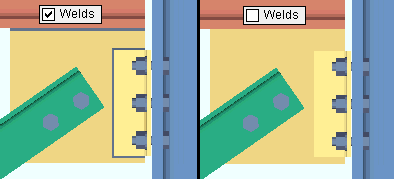
Welds: ![]() or
or ![]() . This controls whether welds are (
. This controls whether welds are ( ![]() ) or are not (
) or are not ( ![]() ) included in the 3D screen shot.
) included in the 3D screen shot.
XML: ![]() or
or ![]() . This controls whether an XML file is (
. This controls whether an XML file is ( ![]() ) or is not (
) or is not ( ![]() ) included along with the RFI. The XML file will be placed at the location specified in step 6 . It will have the same name as the RFI, but with an .xml extension instead of a .pdf extension. The data contained in the file will include the information that you have entered on this window and may be used with FabSuite software.
) included along with the RFI. The XML file will be placed at the location specified in step 6 . It will have the same name as the RFI, but with an .xml extension instead of a .pdf extension. The data contained in the file will include the information that you have entered on this window and may be used with FabSuite software.
General Information
RFI #: The number of this RFI.
- In the example , this number is 22.
Date: Today's date, or the date that you are sending this RFI.
- In the example , this date is 7/16/07.
Respond by: The date by which you wish a response to this RFI.
- In the example , this date is 8/1/07.
Project: The name of the construction project which this RFI concerns.
- In the example , the project is Building X.
Customer: The name of the customer that your company will be billing out your services to.
- In the example , the customer is X Builders.
Fabricator Job #: The number assigned to this Fabricator and Job.
from
Company: The name of the company you work for or represent on a contractual basis.
- In the example , the company is We Be detailers.
Person: Your name or the name of the person for whom you are filling out this form.
- In the example , you are I. B. Detailer.
Phone Number: The telephone number of the " Person " entered above.
- In the example , your phone number is xxx-xxx-xxxx.
Fax Number: The FAX number of the " Person " entered above.
- In the example , your FAX number is yyy-yyy-yyyy.
to
Company: The name of the company you are sending the RFI to.
- In the example , the company is You Be Engineers.
Person: The name of the specific person in the above " Company " you are sending the RFI to.
- In the example , the person is U. B. Engineer.
Phone Number: The telephone number of the " Person " entered above.
- In the example , the person's phone number is vvv-vvv-vvvv.
Fax Number: The FAX number of the " Person " entered above.
- In the example , the person's FAX number is zzz-zzz-zzzz.
Subject: A summary of the " Description ."
- In the example , the subject is Design Calcs.
Description
| Key Bindings for Text Entry (when the cursor is in the text-entry field) |
|
| key | action bound to key |
| Enter | creates a line break |
| Ctrl +a | selects all text |
| Ctr+c * | copies selected text |
| Ctrl+x * | cuts selected text |
| Ctrl+v * | pastes selected text |
| Tab | moves focus to next widget |
| * = applies to all text entry fields. | |
To close this window :
![]()
![]()
"OK" (or the Enter key) closes this window and generates the RFI in the form of a PDF document.
Create RFI remembers the entries made to this window and automatically fills out this window with those same entries the next time you open this window during this session of Modeling .
Tip: If you leave this window blank except for the Export options, then press " OK ," Create RFI generates a .pdf file that includes a picture only. You can use Adobe Acrobat to create your own form.
"Cancel" (or the Esc key or the ![]() button) ends this operation without generating the RFI.
button) ends this operation without generating the RFI.

