Add Surfaces Connection ( Modeling )
Tool summary :
- Connects flat surfaces on two different members with a shear plate or bent plate.
- If you pre-select a member prior to invoking this tool, the surfaces connection is made a component of that member.
- If you do not pre-select a member prior to invoking this tool, you are prompted to " Locate member to add to ," and that first member that you select becomes the member that the surfaces connection is a component of.
- Settings that control the connection are a " Component " that is stored in a [ Surfaces connection ] section on the edit window of the member it is added to.
- Those same settings are on the Surfaces Connection Edit window, which you can open by double-clicking the surfaces connection with the " Selection filter " set to ' Default ' or ' All ' or ' Custom Components '.
- Because Surfaces Connection relies on specific surfaces, it is not copied when the member it belongs to is copied.
VIDEO 
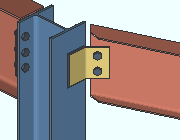
A Surfaces Connection component is added between a beam and a column.
- See to invoke Add Surfaces Connection and the quick Instructions .
Also see :
- The Surfaces Connection edit window (this tool opens)
- Custom components (topic)
- Surfaces Connection Edit (window)
- Copy Component (to copy the plate(s) to another member)
- Move Component (to move the plate(s) to another member)
- Explode Component (to reduce the component to its constituent materials)
- Component Selection Tool (to search for custom components of a selected type)
- Model Tree (to find custom components and select them for deletion, editing, etc.)
To invoke Add Surfaces Connection :
Quick instructions (two examples and a video) :
Example 1: A skewed W flange beam at a roof ridge is supported at its left end by a W flange column. Given the member sizes and the angle of skew, the system cannot design a bent plate connection for the beam. Instead, the Surfaces Connection is used to add a bent plate. The shows the adding of the surfaces connection component by preselecting a beam in Select Items Mode , then invoking Surfaces Connection . In-tool selection would take place after step 4 if preselection did not take place in step 3.
|
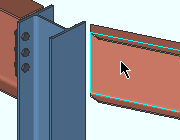
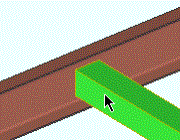
1 . In Modeling , Snap to Surface is used to surface to the face of the beam's web. |
|
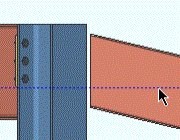
2 . A construction line is added to locate the component's origin point. For the end of the beam that is on our left, this origin is along the lowest edge of the plate. (Were the beam end on our right, the origin would be along the highest edge.) |

|
3 . Left-click ( Select ) selects beam, which changes to the " Primary selection color " (green in this example). The bent plate will become a component of this member. |
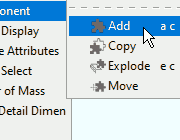
| 4 .Start component Add to invoke the Add Component . | |
|
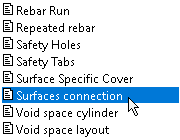
5 . On the custom component selection list, choose ' Surfaces connection ' as the custom component to add. |
|
6 . With FRPT the active Locate option, left-click ( Locate ) selects the surface of the supporting column to which the outstanding leg of the bent plate will be shop attached. The point location target is shown on this surface. |

|
7 . Left-click ( Locate ) selects the surface of the supported beam to which the web leg of the bent plate will be field attached. |

|
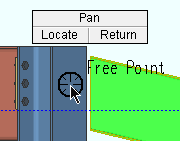
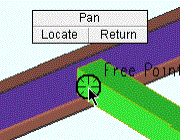
8 . A preview simulation of the surfaces connection component is shown. With ONLN the active Locate option, left-click ( Locate ) establishes a point on the connection axis when the point location target snaps to the construction line that you added in step 2. |
|
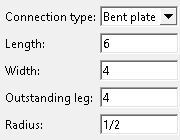
9 . The Surfaces Connection Edit window opens. The " Connection type " in the " |
|
10 . Since User and Site Options > Modeling > " Automatically process after modeling operation " is set to ' Process and create solids ', the bent plate is generated immediately. If it was set to ' Do nothing ', the two member would have to undergo Process and Create Solids in order for the connection to be generated. |
Example 2: Connection design cannot generate system connections for miscellaneous members or legacy miscellaneous members . However, components can be added to miscellaneous members (but not legacy miscellaneous members). In this example, the Surfaces Connection is a shear plate that connects an angle miscellaneous member to a channel beam. Since the miscellaneous member is the first member selected, the Surfaces Connection component becomes a component of that member and is editable on the Rolled Section Edit window, which is the name of the angle miscellaneous member's edit window. The example shows in-tool selection. If the example showed preselecting the angle beam prior to step 1, step 3 would be skipped.
|
1 . In Modeling , Add Component is invoked by choosing Model > Component > Add . |
|
|
2 . On the custom component selection list, ' Surfaces connection ' is selected as the custom component to add. |
|
3 . Left-click ( Select ) selects the angle miscellaneous member, changing it changes to the " Primary selection color " (green in this example). The shear plate will become a component of this miscellaneous member since it is the first member that was selected. |

|
4 . With FRPT as the active Locate option, the surface of the web of the supporting beam to which the shear plate will be shop welded is hovered, as shown by the point location target . Left-click ( Locate ) selects that surface. |
|
5 . Left-click ( Locate ) selects a surface on the supported angle. The shear plate will bolt to this surface. |
|
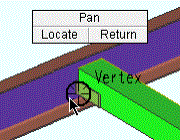
6 . The surfaces connection component is visible. With VTPT the active Locate option, left-click ( Locate ) locates a point on the connection axis when the point location target snaps to the bottom toe of the angle. (Were the beam end on our right, we would locate the origin at this angle's heel.) |

|
7 . The Surfaces Connection Edit window opens. The " Connection type " in the " |

|
8 . Since User and Site Options > Modeling > " Automatically process after modeling operation " is set to ' Process and create solids ', the shear plate is generated immediately. If it was set to ' Do nothing ', the two members would have to undergo Process and Create Solids in order for the shear plate to be generated. |

