The Hand Rail window (common settings)
![]() "Copy" "Paste" "Save" and "Load" buttons appear above various sections on the Hand Rail window.
"Copy" "Paste" "Save" and "Load" buttons appear above various sections on the Hand Rail window.
Section size: Any section size of the specified material type that is in the local shape file . You can type in the section size that you want, or you can press the "file cabinet" browse button ( ![]() ) and double-click any section that is on the list of available materials in the local shape file. Validation only lets you enter a material that is listed in the local shape file. Also, if you enter a section size that is not available, validation brings up a yes-no dialog with the warning, " The section size is not available from suppliers. Are you sure you want to use it? "
) and double-click any section that is on the list of available materials in the local shape file. Validation only lets you enter a material that is listed in the local shape file. Also, if you enter a section size that is not available, validation brings up a yes-no dialog with the warning, " The section size is not available from suppliers. Are you sure you want to use it? "
Material Type Typing in a size Material Window angle naming convention " Section size " HSS round (pipe) naming conventions " Section size " HSS rectangular (tube) naming conventions " Section size " round bar naming conventions " Section size " W tee naming convention " Section size " Also see : Click here for information on the handrail parts that these material types are used for. Setup: Hand Rail Setup ( Home > Project Settings > Job > Plugin Defaults ...)
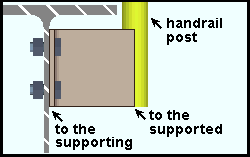
Long leg to: Supported or Supporting . This applies when the " Section size " is an angle with unequal legs.
|
A handrail whose " Type " of post connection is ' Clip angle '. The example shows a wide flange beam, but a similar connection would be designed if the supporting member were a channel beam. Click here for work point layout considerations. |
' Supported ' welds the long leg of the clip angle to the post of the handrail.
' Supporting ' bolts the long leg of the clip angle to the web of the beam.
Setup: Hand Rail Setup ( Home > Project Settings > Job > Plugin Defaults ...)
Grade: A36 or A572 or etc. The steel grade of the material. Steel grades that are available for a particular material depend on the type of that material. If the grade of steel that you want is not shown as a menu option ( ![]() ) on the Hand Rail window, you can add the grade you want to the setup table.
) on the Hand Rail window, you can add the grade you want to the setup table.
| Material Type |
Job Settings Table
|
Material Window |
| angle | Angle Grades | " Steel grade " |
| HSS round | Pipe Grades | |
| HSS rectangular | HSS/TS Grades | |
| W tee | WT Grades | |
| flat bar | Round and Square Bar Grades or Plate Grades | " Steel grade " |
| round bar | " Steel grade " | |
| square bar | " Steel grade " | |
| bent plate | Plate Grades | " Steel grade " |
| rectangular plate | " Steel grade " | |
| round plates | " Steel grade " | |
| Also see : Click here for information on the handrail parts that these material types are used for. | ||
Warning : Do not set a handrail part's steel grade on its material windows -- instead use the Hand Rail window. Changing material information on a material window instead of the Hand Rail window makes the handrail graphical .
Setup: Hand Rail Setup ( Home > Project Settings > Plugin Default s...)
Surface finish: None or Sandblasted or Red oxide or Yellow zinc or Gray oxide or Blued steel or Galvanized or Duplex Coating or Undefined 1 or Undefined 2 or Undefined 3 or Red oxide 2 or Any user added surface finish. This affects the colors of 'Solid ' members on erection views in the Drawing Editor . This also sets the color when "Output material color " is set to 'Surface finish ' for a VRML Export or a DWG/DXF Export . The "Color " ( not "Surface finish ") sets the color of this material in Modeling .
| sand blasted | red oxide | yellow zinc | user surface finish 1 |
| gray oxide | blued steel | galvanized | user surface finish 2 |
To assign a different surface finish, you can drop-down the current surface finish and select the one you want, or you can press the "file cabinet" browse button (
) and double-click any surface finish that is on the list.
Auto ![]() or
or ![]() .
.
If this box is checked (
), the material surface finish follows what is set on the member level.
If the box is not checked (
), the material surface finish can be changed to whatever is available in the list of surface finishes. If the surface finish changes from what the member level has set, the auto checkbox will be unchecked automatically. When the auto check box is unchecked, the member edit window shows an information tag which notifies the user that an attached material is not following what was set on the member level.
Report Writer:MemberMaterial.Material.SurfaceFinish
Setup: The surface finishes for all materials can be set in the Hand Rail Edit window. To set the defaults for the material surface finish, Home > Project Settings > Job > Member Plugin Defaults > Hand Rail Setup .
Setup:Surface Finish Settings
Thickness: The plate thickness of the handrail part (in the primary dimension " Units " or other units ).
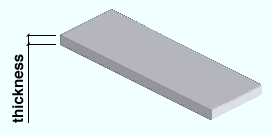
Warning: do not change the " Material thickness " of this plate on the Rectangular Plate Material window -- instead, do it on the Hand Rail Edit window. Changing material information on a material window instead of the Hand Rail window makes the handrail graphical .
To enter gage plate: Type the ' gage number' followed by ' ga ' (example: ' 4ga ' is rewritten as ' 4GA ' when you Tab out of the field). Right-click tells you the stored thickness (based on industry standards), from which the weight of the gage plate is calculated. Allowable gages are any whole number from 3 to 38 . You can also enter an exact decimal thickness to get the gage (example: ' .1345 ' becomes ' 10GA ' when you Tab out of the field). The " Description " for a gage plate follows the format: ' plate prefix ' + ' numberGA ' + ' x ' + ' width ' (example: PL16GAx15 1/2 ).
Setup: Hand Rail Setup ( Home > Project Settings > Job > Plugin Defaults... )
Type: Standard round or Short slot or Oversized round or Long slot . The " Hole type " to be used for a particular handrail part.

If the " Type " of hole is for handrail post connections such as a ' Base Plate ' or ' Bent Plate ' or ' Bolted (Angle) ' or ' Clip angle ' or ' Rectangular Plate ' or ' W Tee ', matching holes will be generated in the supporting member so that the connection material can be bolted to that member. The matching holes in the support will be standard round even if " Short slot " or " Long slot " or " Oversized " is used.
See Table J3.3 or Table J3.3M ( AISC Thirteenth Edition , p. 16.1-105) for information on how holes of particular types are sized with respect to the input bolt " Diameter ."
Setup: Hand Rail Setup ( Home > Project Settings > Job > Plugin Defaults... )
Rotation: A positive or negative value from 90 to -90 degrees. This is also the " Slot rotation " of the hole on its edit window. This slot rotation applies only when the hole " Type " is ' Long slot ' or ' Short slot '. Slot rotations can be modeled to a precision of 0.1 degree.
| when material X axis (length)
is horizontal (<==>) |
when material X axis (length)
is vertical |
' 0 ' (zero) degrees sets the length of the slot parallel to the material X axis . Since an angle post has a X material axis that is vertical, the orientation of the slot would also be vertical.
A ' positive number ' of degrees rotates the slot counterclockwise.
A ' negative number ' of degrees rotates the slot clockwise.
Exceptions: The rule that ' 0 ' sets the slot rotation to be parallel with the length of the material works for handrail, but does not apply to other member types. For other member types, the hole group X axis follows the member's length, not the material's length. Also, this rule does not work for holes that are generated on the support since these holes are created by matching from the connection material on the handrail.
Setup: Hand Rail Setup ( Home > Project Settings > Job > Plugin Defaults... )
Diameter: The diameter (inches or mm) of the shank of the bolt. This is also the " Diameter " of the bolt on its edit window.
| diameter |
|
The hole in the handrail that the bolt is inserted through is sized based on the bolt's " Diameter " and the " Type " of that hole.
Setup: Hand Rail Setup ( Home > Project Settings > Plugin Defaults... )
Type: A307 or etc. The " Bolt type " of the bolt.
Note: Since handrail members do not undergo connection design , the Hand Rail program does not check to see if the bolt " Type " or the " Diameter " that you enter will stand up to loading conditions. It is your responsibility to ensure that the required design calculations are made.
Setup: If the bolt type that you want does not appear as a selectable option (
), you may add it in to the menu for this field by using Home > Project Settings > Job > Bolts, Washers, and Holes > Bolt Specifications .
Setup: Hand Rail Setup ( Home > Project Settings > Job > Plugin Defaults... )
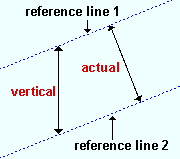
Dimension type: Actual or Vertical . This sets the method for measuring the distance between two parallel reference lines.
|
If the handrail slopes, ' Actual ' sets the dimension to be the shortest distance (a perpendicular) between the two lines. ' Vertical ' sets the dimension to be measured vertically. For a non-sloping handrail, both ' Actual ' and ' Vertical ' are perpendicular to the two parallel lines. |
| Handrail Part | Reference Line 1 | Reference Line 2 |
| member line | member line (" Reference line ") | finished floor (top of steel workline plus " Floor thickness ") |
| bottom midrail | bottom midrail | finished floor |
| toe plate | bottom edge of toe plate | finished floor |
| grab bar | center of grab bar | center of top rail |
Setup: Hand Rail Setup ( Home > Project Settings > Job > Plugin Defaults... )
Detail description: A string of any number of characters . Long strings may be truncated in the bill of material to comply with the " Field width " limitation set at Home > Project Settings > Fabricator > Bill of Material Layout .
This is the " Description " on the material's General Information window and, after detailing, the " Description " for that material in the member bill of material.
You may want to enter a description that matches the reference used for that material in the catalog you are ordering the material from.
For fabricating framed wire mesh from separate frame and wire components, you can enter a " Detail description " for the mesh wire and a different " Detail description " for the mesh frame .
Setup: Hand Rail Setup ( Home > Project Settings > Job > Plugin Defaults... )
Fit to ... ![]() or
or ![]() . This option is enabled when ' Pipe ' is the type of post or top rail or midrail that you are fitting to. It applies when the setback from the center of the pipe is less than half of the pipe's depth, creating a situation where, if there was no fit operation, the material would clash with the pipe.
. This option is enabled when ' Pipe ' is the type of post or top rail or midrail that you are fitting to. It applies when the setback from the center of the pipe is less than half of the pipe's depth, creating a situation where, if there was no fit operation, the material would clash with the pipe.
|
(pipe to pipe)  |
(pipe to pipe)  |
(tube to pipe)  |
(angle to pipe)  |
| Situation | Setback | Fit to ... |
| Midrail to pipe post | Pipe post centerline setback | Fit to post |
| Post to pipe top rail | Pipe top rail centerline setback | Fit to top rail |
| Mesh support to rail | Pipe top rail centerline setback
Pipe mid rail centerline setback |
Fit to pipe rail |
| Grab bar to pipe end post | Pipe post setback | Fit to post |
If this box is checked (
If this box is not checked (
Setup: Hand Rail Setup ( Home > Project Settings > Job > Plugin Defaults ...)
Internal: ![]() or
or ![]() . This option is for internal galvanizing vents for posts , midrails , pickets/mesh , grab bars .
. This option is for internal galvanizing vents for posts , midrails , pickets/mesh , grab bars .
|
|
If this box is checked (
Internal in Connection Plates "
If this box is not checked (
Also see: Internal in Connection Plates (creates internal vents at post connection material)
Setup: Hand Rail Setup ( Home > Project Settings > Job > Plugin Defaults... )
Internal in Connection Plates: ![]() or
or ![]() . Documentation in progress . This option is for internal galvanizing vents at post connection material when that connection" Type " is ' Continuous Bottom Plate , ' Base Plate ' or ' L Shaped Plate .'
. Documentation in progress . This option is for internal galvanizing vents at post connection material when that connection" Type " is ' Continuous Bottom Plate , ' Base Plate ' or ' L Shaped Plate .'
|
|
If this box is checked (
Internal " is unchecked.
If this box is not checked (
Auto interior hole diameter: ![]() or
or ![]() . Documentation in progress . This applies when " Internal " and/or " Internal in Connection Plates " is checked. This option is for setting the diameter of the internal galvanizing holes for posts , midrails , pickets/mesh , grab bars .
. Documentation in progress . This applies when " Internal " and/or " Internal in Connection Plates " is checked. This option is for setting the diameter of the internal galvanizing holes for posts , midrails , pickets/mesh , grab bars .
If this box is checked (
If this box is not checked (
Setup: Hand Rail Setup ( Home > Project Settings > Job > Plugin Defaults... )
Interior hole diameter: Documentation in progress .The diameter (a distance in the primary dimension " Units " or other units ) of the internal vent holes for posts , midrails , pickets/mesh , grab bars . This applies when " Internal " and/or " Internal in Connection Plates " is checked, and when " ![]() Auto interior hole diameter " is not checked.
Auto interior hole diameter " is not checked.
Setup: Hand Rail Setup ( Home > Project Settings > Job > Plugin Defaults... )
Auto hole diameter: ![]() or
or ![]() . This option is for setting the diameter of the external vent holes for posts , top rails , midrails , pickets/mesh , grab bars .
. This option is for setting the diameter of the external vent holes for posts , top rails , midrails , pickets/mesh , grab bars .
If this box is checked (
If this box is not checked (
Setup: Hand Rail Setup ( Home > Project Settings > Job > Plugin Defaults... )
Hole diameter: The diameter (a distance in the primary dimension " Units " or other units ) of the external vent holes for posts , top rails , midrails , pickets/mesh , grab bars . It applies when " ![]() Auto hole diameter " is not checked. On the Hole Edit window, this diameter is reported as the " Hole diameter ."
Auto hole diameter " is not checked. On the Hole Edit window, this diameter is reported as the " Hole diameter ."
Setup: Hand Rail Setup ( Home > Project Settings > Job > Plugin Defaults... )
Plug type: No Plug or Zinc Plug or Plug Weld or Aluminum or Epoxy . This is the " Plug type " of the external vent hole.
Setup: Hand Rail Setup ( Home > Project Settings > Job > Plugin Defaults... )

