 Add Thickened Slab ( Modeling )
Tool summary :
When you add a concrete slab, the thickness you specify is uniform across the entire slab. The Thickened Stab custom component lets you add an area of additional thickness to that slab, presumably to provide additional support at a particular slab location which is likely to be subjected to greater stress.
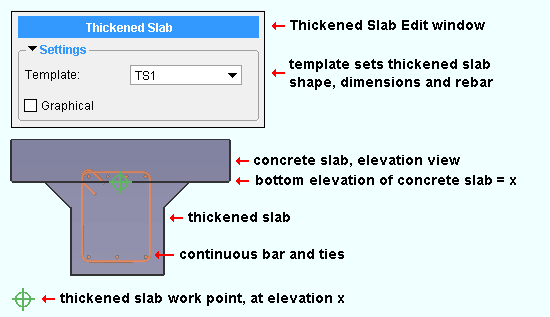
On the Concrete Slab Edit window, the names of the leaves for the thickened slab " Component " will be contained in the [ Thickened Slab ] section.
After you have added a thickened slab, you can open this edit window (shown at left) by double-clicking one of the Thickened Slab materials while the " Selection filter " is set to ' Default ' or ' All ' or ' Custom Components ''.
Step-by-step instructions for adding a thickened slab :
1a : You should confirm that the template that you want to use for the thickened slab is listed on the Thickened Slab Templates window. The template sets, for example, whether the profile applied to the thickened slab is rectangular or a custom shape. It also defines the thickened slab's rebar system. If the template you want is not listed, then add the template.
2 . In Modeling , in the view in which you want to add the thickened slab, display in solid form the concrete slab that you want to add the thickened slab to.
Alternative 1 : View > Solid Opaque to display in solid form the concrete slab that you want to add the thickened slab to.
Alternative 2 : View > Change All to Solid to display in solid form all members that are in the view.
3 . Assuming the concrete slab is flat, go to a plan view that is at the elevation of the bottom of that slab.
Tip: To go to such a view, you may want to go to a view that is close to that elevation by using Snap to Surface or a similar tool to go to the surface of the concrete slab. Then, choose View > Relative Depth to make the needed adjustment to the elevation of the view.
4 (optional) : Draw construction lines, the intersections of which will be along the edge of the concrete slab that you want to add the thickened slab to, and will define the start and end points of the thickened slab.
5 (optional) : If you plan to use other Locate options for locating points, you may want to turn on your " ![]() Z filter " so that all points snap to the elevation of your current view.
Z filter " so that all points snap to the elevation of your current view.
6 (optional) . Select the concrete slab. It changes to the " Primary selection color " (green).
7 . Add Component and choose " Thickened slab " as the custom component you want to add. If you skipped step 6, you will be prompted to select, in the model, a slab. Only concrete slabs will be selectable.
8 . Locate the first end point of the thickened slab. The first point you locate establishes its left end .
9 . Locate the final end point of the thickened slab.
10 . After you locate two points at the elevation of the bottom face of the slab, the Thickened Slab Edit window opens. On the Thickened Slab Edit window, select a " Template ," enter others setting that you want, then press " OK " to close the window.
|
| How the component was added : The thickened slab shown above in an elevation view was added in a plan view at elevation X by locating two points using the INCL point locator. |
11 : If User and Site Options > Modeling > " Automatically process after modeling operation " is set to ' Process and create solids ', the thickened slab will be generated immediately. If not, it will be generated in the concrete slab the next time it undergoes Process and Create Solids .
12 : Confirm in the model that the thickened slab has been properly placed. If the thickened slab is upside down, then you need to delete the thickened slab and locate two points again, this time in the opposite direction. If the thickened slab dimensions are not correct, the problem is with the template.
 Thickened Slab custom component settings:
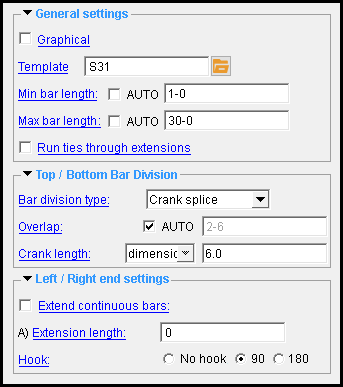
------  General settings ------
|
A Thickened Slab component is automatically set to "
Graphical " whenever you make graphical changes to any of its bars. For example, when you Edit Material or apply the Extend Rebar Ends tool on one of the bars. This stops the component from being changed during Process and Create Solids . Click here for more information.
Instead of allowing the component to be made "
Max bar length: ![]() AUTO or
AUTO or ![]() AUTO .
AUTO .
'
'
AUTO (not checked) ' lets you enter a distance in the primary dimension " Units " or other units .
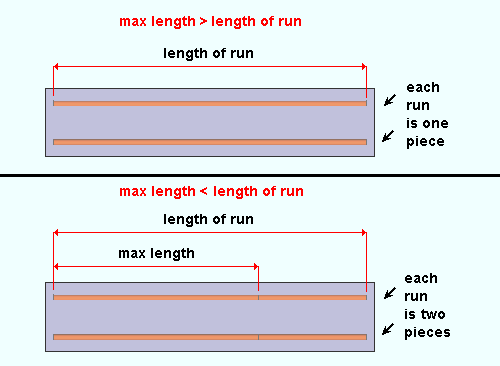
Max length >= length of run: If the " Max bar length " that is entered is greater than or equal to the length of the rebar run, the rebar run will consist of a single rebar that is the required length. Assuming that " Extend continuous bars " is not checked (
Max length < length of run: If the " Max bar length " that is entered is less than the length of run that is required and the thickened slab program does not override your entry due to " Min bar length " being set to auto, the rebar run is broken two or more rebar lengths, the first of which is (or are) the " Max bar length ."
Example: " Max bar length " results in each rebar run in the thickened slab being divided into three rebar segments. The first two segments are the " Max bar length ." The third segment is the length that is required to complete the run.
Note: A " Max bar length " that is less than the " Min bar length " is an invalid entry. You need to change that setting, or you will not be able to close the Thickened Slab Edit window using " OK ".
Min bar length: ![]() AUTO or
AUTO or ![]() AUTO .
AUTO .
'
'
Run ties through extensions: ![]() or
or ![]() . This applies when either or both the right or left end " Extend continuous bars " option is checked (
. This applies when either or both the right or left end " Extend continuous bars " option is checked ( ![]() ).
).
'
'
------ Top / Bottom Bar Division ------
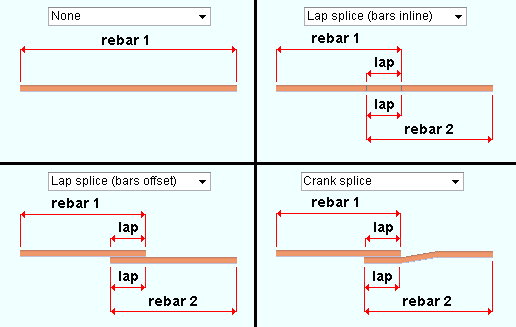
Bar division: None or Lap splice (bars inline) or Lap splice (bars offset) or Crank splice . These options determine if or how bars are spliced.
|
| Bar division options affect the length of rebar shape material. |
' None ' prevents splices from being modeled. The rebar is modeled as a single length.
' Lap splice (bars inline) ' models splices that accommodate the " Max bar length " and the " Overlap "; however, the splices are within the same rebar run and are modeled as clashing material.
' Lap splice (bars offset) ' models splices that accommodate the " Max bar length " and the " Overlap ". The bars are offset so that their material does not clash.
' Crank splice ' models splices that accommodate the " Max bar length " and the " Overlap ". The bars are within the same rebar run, but cranks are provided that conform to the " Crank length " options to prevent the bars from clashing.
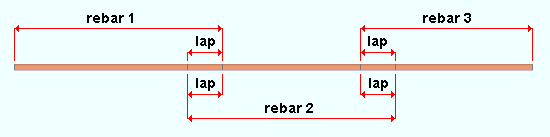
Overlap: ![]() AUTO or
AUTO or ![]() AUTO . This applies when the runs of horizontal rebar have been divided into multiple rebar lengths to accommodate the " Max bar length ." A lap splice is a common way of splicing two reinforcing bars. Lap splices that are within the same rebar run are modeled as a material clash between the two lengths of rebar that are being spliced. The length that the rebar clashes in the model is the " Overlap " that has been entered.
AUTO . This applies when the runs of horizontal rebar have been divided into multiple rebar lengths to accommodate the " Max bar length ." A lap splice is a common way of splicing two reinforcing bars. Lap splices that are within the same rebar run are modeled as a material clash between the two lengths of rebar that are being spliced. The length that the rebar clashes in the model is the " Overlap " that has been entered.
'
'
|
| Entering an appropriate " Overlap " ensures that sufficient lengths of rebar are ordered to achieve a lap splice. As shown in this diagram, a lap splice that is within the same rebar run is modeled as a material clash. |
Crank length: ratio or dimension . This option applies when " Bar division type " is ' Crank splice '.
' ratio ' specifies the ratio (expressed as a decimal number) of the crank length to bar size; that is, the ratio is the crank length divided by the bar size. It follows that if you enter a ratio, you can multiply that ratio by the bar size to calculate the resulting crank length:
Example using imperial units :
ratio = ' 6.0 '
bar size = #6 (i.e. 3/4", or 0.75 )
crank length = CC ÷ 0.75 = 6.0
C = 6.0 × 0.75
C = 4.5 , or 4 1/2"Example using metric units :
ratio = ' 6.0 '
bar size = #19 (i.e. 19 mm)
crank length = CC ÷ 19 = 6.0
C = 6.0 × 19
C = 114 mm' dimension ' specifies the crank length as a distance in the primary dimension " Units " or other units . This option allows the crank length to be entered directly.
------ Left / Right end settings ------
If this box is checked (
If the box is not checked (
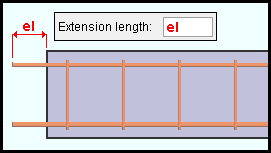
Extension length: This applies when " Extend continuous bars " is checked ( ![]() ). The distance (in the primary dimension " Units " or other units ) beyond which the continuous bars extend from the end of the thickened slab. The length of any " Hook " added to the extension is not included in this distance. If the thickened slab template has a " Tie " template item, ties will be added to your continuous bars as required. Ties can be added to the extensions if " Run ties through extensions " is also checked (
). The distance (in the primary dimension " Units " or other units ) beyond which the continuous bars extend from the end of the thickened slab. The length of any " Hook " added to the extension is not included in this distance. If the thickened slab template has a " Tie " template item, ties will be added to your continuous bars as required. Ties can be added to the extensions if " Run ties through extensions " is also checked ( ![]() ).
).
Hook: No hook or 90 or 180 . This applies when " Extend continuous bars " is checked ( ![]() ). This is the bend, if any, that appears at the end of the rebar shape material.
). This is the bend, if any, that appears at the end of the rebar shape material.

To delete or edit a Thickened Slab :
To delete a Thickened Slab custom component: 1 ) Use the Component Selection Tool and select the component in the concrete slab. Or , select the component in the Model Tree . 2 ) Press the Delete key (or choose Edit > Delete ). 3 ) Process and Create Solids if User and Site Options > Modeling > " Automatically process after modeling operation " is not set to a choice that makes create solids take place automatically.
In the Model Tree , the Thickened Slab custom component is listed as Thickened slab @ ( [ x, y, z ] ) when " View By " is set to ' Member piecemark ' or ' Member number '. The Thickened Slab component is listed under its member, after that member's connection components ( Left End and Right End ), and before that member's submaterials.
To edit a Thickened Slab custom component or review its settings, you can find the member it is added to and open its edit window. The component's settings will be contained in that window in a section named [ Thickened Slab ] . To edit a Thickened Slab custom component without opening a member edit window, use the Model Tree . You also can use the Selection Filter toolbar item to select the ' Custom Components ' filter and double-click the thickened slab to edit it. The Component Selection Tool can also be used to edit (and find) custom components.

