 Add Web Penetration with Stiffeners ( Modeling )
Tool summary :
|
- You can click the Add Web Penetration with Stiffeners icon instead of doing steps 2 and 3 of the procedure that follows. The icon can be found in the command group ' Model--Component ' for the Ribbon Editor.
- Preselection method of adding: 1 ) In Modeling , select a wide flange or channel or welded plate wide flange beam. 2 ) Invoke Add Component . 3 ) On the custom component selection list, choose " Web Penetration with Stiffeners ." 4 ) Locate a point on the selected beam. 5 ) On the Web Penetration window, make the choices you want then press " OK ." 6 ) If User and Site Options > Modeling > " Automatically process after modeling operation " is set to ' Process and create solids ', the web penetration and stiffeners will be generated immediately. If not, the web penetration and stiffeners will be generated on the beam the next time that beam undergoes Process and Create Solids .
- If you use in-tool selection -- that is, select the beam after selecting " Web Penetration with Stiffeners " as the custom component you want to add -- only wide flange, welded plate wide flange and channel beams will be selectable.
- Adding a Web Penetration with Stiffeners to a beam results in the " Weight of item " and " Surface area " reported on the General Information window for that beam's main material being reduced by the volume of material that is penetrated by the opening. Other ways to add voids include the Void Space Layout component.
- A single work point anywhere along the beam can be used to locate the component. The reference point that is used to position the component is in alignment with that point, perpendicular to the top flange of the beam. In the first of the videos below, since Intersection of Construction Line with Member ( INCM ) is used for work point location, the reference point for locating the component exactly matches the work point location.
VIDEO 
The point locator INCM is used to locate the intersection of a vertical construction line with the top flange of a beam. - To edit a Web Penetration custom component, you can double-click one of its materials (to open the Web Penetration window) or you can open its beam's edit window and find the component's leaves in the window's [Web Penetration] section. The Component Selection Tool can also be used to edit (and find) custom components. Note that the " Selection filter " must be set to ' Default ' or ' All ' or ' Custom Components '' in order for you to use the double-click method of editing.
![]() Web Penetration custom component settings :
Web Penetration custom component settings :
-- ![]() Graphical -----------------------------------------------------------
Graphical -----------------------------------------------------------
|
- A Web Penetration component is automatically set to "
 Graphical " whenever you make graphical changes to any of its stiffeners. For example, when you Edit Material or perform a material cutting operation on a stiffener. This stops the component from being changed during Process and Create Solids . Click here for more information.
- Instead of allowing the component to be made " Graphical ," you may wish to Explode Component .
-- ![]() Configuration ----------------------------------------------------------------------------
Configuration ----------------------------------------------------------------------------
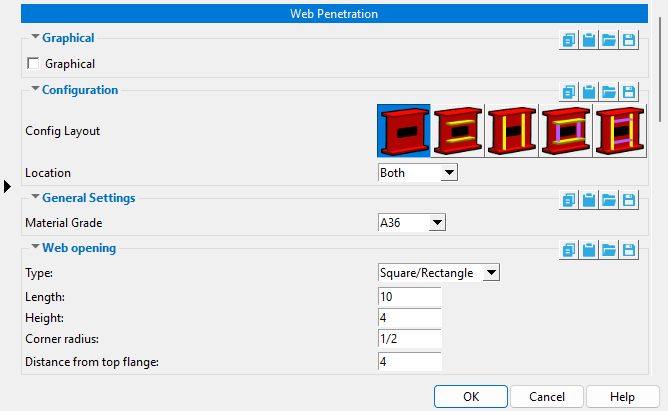
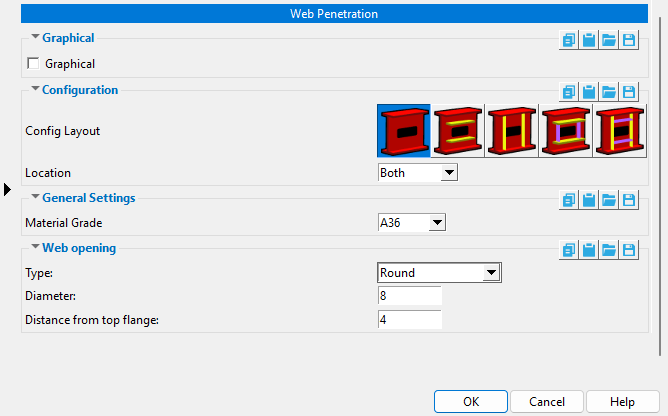
Config layout: Layout 1 or Layout 2 or Layout 3 or Layout 4 or Layout 5 . Press the button that depicts the stiffener layout that you want.
 | Layout 1 gets you an opening without stiffeners. |
 | Layout 2 gets you horizontal stiffeners above and below the opening. |
 | Layout 3 gets you full-depth vertical stiffeners to the left and right of the opening. |
 | Layout 4 gets you partial-depth vertical stiffeners to the left and right of the opening along with horizontal stiffeners above and below the opening. |
 | Layout 5 gets you full-depth vertical stiffeners to the left and right of the opening along with horizontal stiffeners above and below the opening. |
Location: Near Side or Both or Far Side .
 | 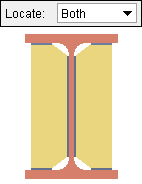 | 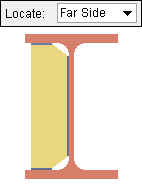 |
The left end of the beam is shown in all three of these examples.
| ||
' Near Side ' places the stiffeners on the near side of the beam. If you are looking at the web of a beam, and the left end of the beam is to your left, then you are looking at the near side web of the beam.
' Both ' places the stiffeners on both the near side and far side of the beam.
' Far Side ' places the stiffeners on the far side of the beam's web.
-- ![]() General settings -----------------------------------------------------------------
General settings -----------------------------------------------------------------
Material grade: A36 or A572 or etc. This is the grade of steel for the stiffeners. This is also the " Steel grade " of the rectangular plate material that each stiffener is made of.
Setup: If the grade of steel you want is not shown on the list box (
), you can use Home > Project Settings > Job > Plate Grades to add it to the list.
-- ![]() Web opening ----------------------------------------------------------------------------
Web opening ----------------------------------------------------------------------------
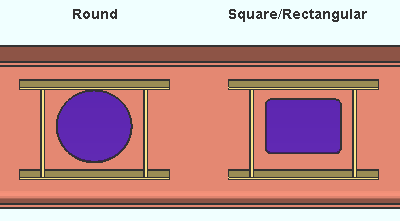
Type: Round or Square/Rectangle .
Diameter: The diameter of the web opening (in the primary dimension " Units " or other units ).
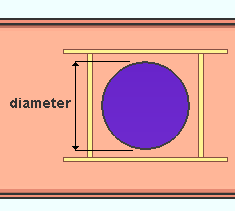 | You can enter a diameter when the " Type " of web opening is ' Round '. |
Length: The distance (in the primary dimension " Units " or other units ) from the left edge of the opening to the right edge of the opening. This dimension of the opening is measured parallel with the slope of the beam. If the beam does not slope, this dimension is horizontal.
 | You can enter a length and height when the " Type " of web opening is ' Square/Rectangle '. |
Height: The distance (in the primary dimension " Units " or other units ) from the top edge of the opening to the bottom edge of the opening. This dimension of the opening is measured perpendicular to the slope of the beam, parallel with the beam's depth. If the beam does not slope, this dimension is vertical.
| You can enter a length and height when the " Type " of web opening is ' Square/Rectangle '. |
Corner radius: A distance in the primary dimension " Units " or other units .
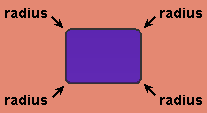 | The " Corner radius " that is entered applies to all four corners of the opening. |
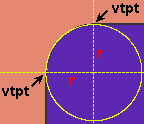 | Vertical and horizontal construction lines at the vertex points ( vtpt ) of a rounded corner in an opening meet at the center point of a construction circle whose " Radius " is equal to the " Corner radius ." |
' 0 ' results in the opening having square corners.
' A distance greater than 0 ' results in the opening having radiused corners as described above.
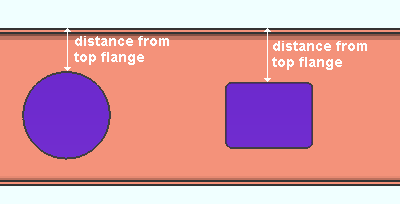
Distance from top flange: The distance (in the primary dimension " Units " or other units ) from the top flange of the beam to the top of the opening. This dimension is measured perpendicular to the slope of the beam, parallel with the beam's depth. If the beam does not slope, this dimension is vertical.

