 Sheet Revision Chart Editor ( Drawing Editor )
Tool summary :
Also see :
- Drawing Editor (where you can find the Sheet Revision Chart Editor )
- Sheet Revisions (sets up appearance of chart)
- Revision chart edit window (lets you alter the layout of an individual revision chart)
- Place Revision Chart (puts a revision chart on a sheet)
- Increment Sheet Revisions (to edit charts on multiple detail sheets)
- Detail with revisions (during Detail Members may affect revision chart)
- To delete a revision chart
![]() Example :
Example :
Entries in the sheet revision editor:

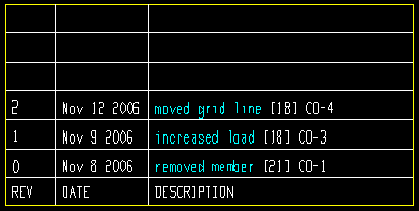
The above entries as they appear in the actual revision chart. The cyan-colored lettering was entered manually using the sheet revision editor.
Report Writer: DetailSheet.Revision.ManualRevision
Report Writer: DetailSheet.Revision.RevisionDescription
Report Writer: DetailSheet.Revision.RevisionDate
Report Writer: DetailSheet.Revision.User1
Report Writer: DetailSheet.Revision.User3
Report Writer: DetailSheet.Revision.User3
Report Writer: DetailSheet.Revision.User4
Report Writer: DetailSheet.Revision.Locked
Locked - a new revision is required before sheet can be modified: ![]() or
or ![]() . The current revision is the last revision shown on this window and the top revision on a revision chart whose " Order of revision lines " is set to " Bottom to top ." The current revision is also shown as the " Sheet revision " in the Drawing Data Panel. This option is not applicable when an entry has not yet been made to the revision chart.
. The current revision is the last revision shown on this window and the top revision on a revision chart whose " Order of revision lines " is set to " Bottom to top ." The current revision is also shown as the " Sheet revision " in the Drawing Data Panel. This option is not applicable when an entry has not yet been made to the revision chart.
|
|
| Bottom two lines of a revision chart : |
|
| Not locked ( |
|
| Locked ( |
|
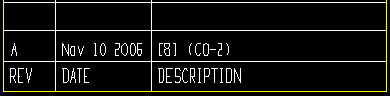
| Note: Similar examples could be created for " Detail with revisions " (submaterials) and " Detail with revisions " (erection views). However, those examples could not include the annotation [8] (C0-2) , which is the " Short revision description " and only applies to member details, not to submaterials or erection views. . |
If this box is checked (
), the current line in the revision chart is locked, and a new base drawing is created for each drawing on this sheet when this sheet is saved (unless " Disable automatic creation of BASE drawings " is checked). If any drawings on this detail sheet, gather sheet or erection sheet undergo auto detailing with the box checked for " Detail with revisions " ( Detail Members ) or " Detail with revisions " ( Detail Submaterial ) or " Detail with revisions " ( Detail Erection Views ), auto detaling increments the sheet revision (adds a new line to the chart) if a sheet item has changed (including status information). If you Increment Sheet Revisions and this box is checked, Increment Sheet Revisions increments the sheet revision. If the revision is incremented in either of these ways, this box automatically goes from checked (
).
If the box is not checked (
Also see: When you plot sheets, there is an option to " Lock sheet revision chart ." Lock/ Unlock Sheet Revisions is also a change option. For Home > Export > 2D > Export PDF Drawing , there is also an option to " Lock revision chart ."
Report Writer: DetailSheet.Revision.Locked
![]() Editing a revision chart (step-by-step) :
Editing a revision chart (step-by-step) :
1 . Before editing a revision chart :
Place Revision Chart is not required before editing a revision chart. It is required if you want to print revision information other than the " Sheet revision ," which can be printed using the $REV special label . The sheet revision can be downloaded with KISS Export or FabTrol Export regardless of whether or not a revision chart has been placed. These instructions assume that a revision chart has been placed on the sheet.
Open the sheet that the revision chart is placed on.
2 . Open the Sheet Revision Chart Editor using one (1) of the following methods:
▸ Click the Sheet Revision Chart Editor icon. The icon can be taken from the group named ' Objects -- Revision Chart ' and placed on the ribbon.
▸ Sheet Revision Chart Editor can also be invoked using a keyboard shortcut , the context menu , or a mode . For the ' Lightning ' layout style, configuration of the interface is done using Customize Interface .
3 . The sheet revision editor opens. Type in entries to the revision chart beginning with the first line. The revision chart is filled out from bottom to top, with the entry made to the first line on this window appearing at the bottom of the chart. Press " OK " to close this window and apply your entries to the revision chart.
The revision chart is able to expand dynamically to accommodate new revision information. In other words, if you enter more lines than are currently available in the revision chart, that revision chart's " Number of lines " will automatically be increased.
See " Locked " for information on what that option does.
To delete an entire line on the revision chart, simply delete the entry to " REV " for that line.
Double-click selects the contents of a cell. Backspace deletes a selection.
The following keys may be used to navigate this window: Tab , Shift + Tab , ↓ , ↑ .
An entry of now or today to the " DATE " column is substituted with today's date when you press " OK " to close the sheet revision editor.
Leave blank those columns on this window that do not appear on your current sheet's revision chart. For example, if " USER 1 " in Home > Project Settings > Fabricator > Sheet Revisions is set to ' Inactive ' and you make an entry to " USER 1 " on this window, your entry will not appear on the revision chart.
If entries made to this window do not align properly on the revision chart, you can double-click the physical chart on the sheet, than make changes on the revision chart's edit window to alter the chart's layout (that chart only).
closes the sheet revision editor and applies the changes made to it. You will still need to save the sheet or sheet outline to make your changes permanent.
closes the sheet revision editor without making any changes to the revision chart.
undoes all changes made in the sheet revision editor since it was originally opened.
4 . The changes you made in the sheet revision editor should now be visible on the revision chart that is on the sheet that is your current drawing. Please note the following:
You must save the changes made to your current sheet or sheet outline if you want the changes to the revision chart to be permanent.
If the revision chart is on a detail sheet and you detail any members that are also on that detail sheet, auto detailing may automatically add the " Short revision description " selected in Member Status Review to the "DESCRIPTION" for your current revision (that is, to the top line of the chart).

