 Connection Cube Edit
- General Overview
- Step-By-Step
- Tips and Tricks
- Related Tools
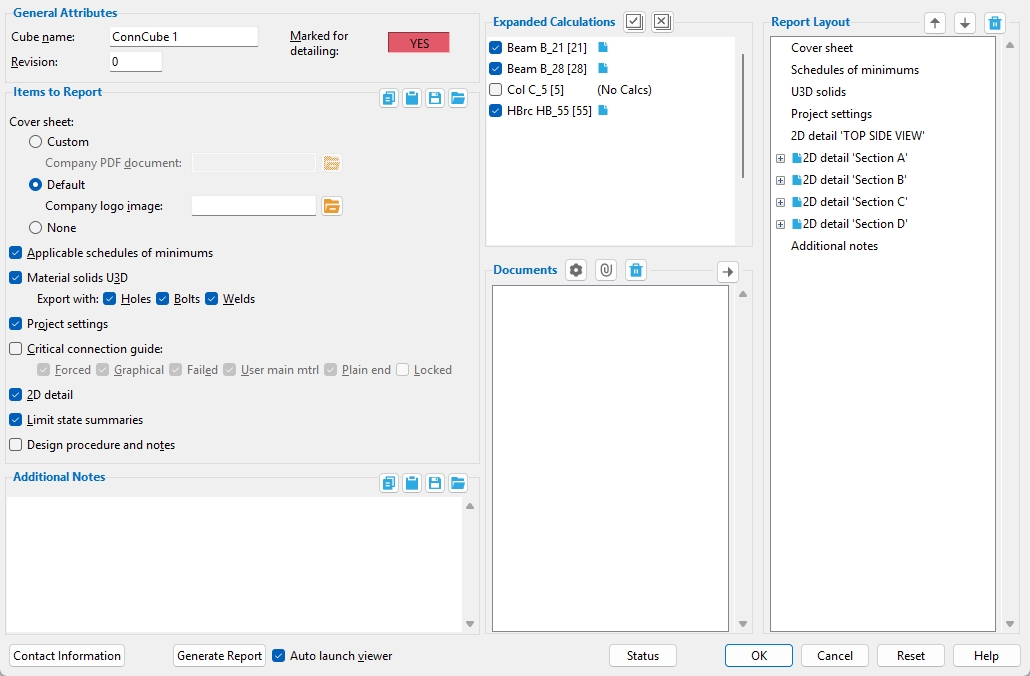
General Attributes
Cube name: This is the name by which the connection cube will be identified in the Model Tree and in the selection list when you Detail Connection Cubes.
Revision: a revision number that will be listed on the default cover sheet when the connection cube report is generated.
Marked for detailing: ![]() or
or ![]() or
or ![]() . You can click this button to switch it between ' YES ' and ' NO '.
. You can click this button to switch it between ' YES ' and ' NO '.
means this connection cube will automatically be selected for detailing the next time you Detail Connection Cubes from list . Connection Cubes are automatically marked for detailing if they have not yet been detailed, or if they have been altered in Modeling since the time their details were generated.
means that the member has undergone Detail Connection Cubes and has not been altered in Modeling since that time, or it means that the user has switched this button to ' NO ' to prevent a detail from being detailed again.
indicates mixed entries . You can set all connection cubes you are editing to ' YES ' or ' NO ' or keep them mixed.
Items to Report
Cover sheet: ![]() Custom or
Custom or ![]() Default or None.
Default or None.
Custom : Applies a user specified PDF as the cover sheet for the Connection Cube report.
Company PDF document : First, use the Connection Cube Attachment Manager to add the PDF to the xxxx_xxxx/connection_cube/attachments folder in your current Job . Press the " Browse " button (
) to browse for the cover sheet attachment.
Company logo image : First, use the Connection Cube Attachment Manager to add your company logo to the xxxx_xxxx/connection_cube/attachments folder in your current Job . Press the " Browse " button (
Applicable schedules of minimums: ![]() or
or ![]() .
.
If this box is checked (
), relevant schedules of minimums are included when you " Generate Report ." These may include the Schedule of Minimums for Structural Members and the Schedule of Minimums for Single Plate Shear Connections .
If the box is not checked (
), schedules of minimums are not included.
If the box is not checked (
If this box is checked (
Export with: Choosing
Holes and/or
If this box is checked (
If the box is not checked (
Critical connection guide : ![]() or
or ![]() .
.
If this box is checked (
You can choose
If the box is not checked (
If this box is checked (
If the box is not checked (
Tip: You can create preset views for inclusion on the connection cube's 2D detail when you use Connection Cube Isolate .
If this box is checked (
If the box is not checked (
Design procedure and notes: ![]() or
or ![]() .
.
If this box is checked (
If this box is not checked (
Additional Notes
Entering text to the " Additional Notes " field adds a section containing that text when you " Generate Report ." If this field is left empty, an Additional Notes section is not added to the report. Long lines of text (typically those longer than 100 characters) will be wrapped to fit the page width of the generated report.
Expanded Calculations

![]() or
or ![]() Member type, piecemark, and member number:
Member type, piecemark, and member number:
If this box is checked (
If the box is not checked (
 Select all : When select all is pressed, the expanded connection design calculations for all members that have design calculations in the connection cube will be checked (
 ![]() ).
).
 Deselect all : When deselect all is pressed, the expanded connection design calculations for all members in the connection cube will be unchecked
 ![]() )
)
Documents
This shows the files that are attached to the connection cube. You can then add these documents to a connection cube report.
 Launch connection cube attachment manager
Opens the Connection Cube Attachment Manager .
Connection cube attachments -- including cover sheets -- are stored inside the xxxx_xxxx/connection_cube/attachments folder in your current Job . You can use the manager to add attachments to that folder or to remove them.
 Add document to connection cube
Opens the Attach to Connection Cube selection window, from which you can add attachments stored in the xxxx_xxxx/connection_cube/attachments folder to the " List of attachments ."
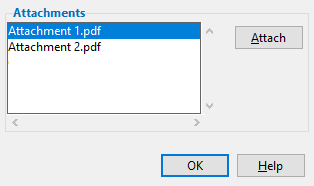
On the Attach to Connection Cube window, click an item in the list, or hold down the Shift key and click multiple items. Clicking the " Attach " button in the window adds the selected attachments to a the connection cube report and to the " List of attachments ." Press " OK " to close the window.
 Remove document from connection cube
Removes attachments from the " List of attachments ." Click an item in the list to select it for removal, or hold down the Shift key and click multiple items.
Select the document(s) you want to include in the connection cube report and click this button to add them to the Report Layout list. When a document is added to the Report Layout, a green check mark (
) is displayed next to it on the Documents list.
Report Layout
This list displays all items that you selected to be included in the cube report when you click Generate Report.
You can change the order attached documents are listed by selecting it and pressing one of the arrow buttons. The order of other items on this list cannot be changed. You can remove attached documents from the Report Layout by selecting them and clicking the trash bin ( ) icon. Other items on this list can be removed by changing their settings in the General Attributes area.
 Move document up one position
 Move document down one position
Remove document from report
Contact information : when pressed, the Connection Cube Contact Information window opens. This allows you to set the Project name, Engineer name, and Fabricator name to be used in the report's header, footer and on the default cover sheet.
Generate Report : when pressed, generates the connection cube report.
A possibility: "
If this box is checked (
If the box is not checked (
Status : opens the Connection Cube Status window, which can give you additional information about the connection cube, and which you can use to enter status information.
OK : (or the Enter key) closes the edit window and saves any changes you have made on the window to the connection cube.
Cancel : (or the Esc key or the ![]() button) closes the edit window without saving any changes that you have made. " Cancel " does not undo a " Generate Report " operation.
button) closes the edit window without saving any changes that you have made. " Cancel " does not undo a " Generate Report " operation.
Tip: Any time you use Connection Cube Edit just to review a connection cube, the best way to close this window is to " Cancel. "
Reset : undoes any changes made since you opened this window.
Exception: " Reset " does not undo changes made to the " Documents " or " Report Layout " sections.
![]() Copy, Paste, Save, Load buttons:
Copy, Paste, Save, Load buttons:
- The position of these "form" buttons on the window tells you what settings they apply to. Click here for more information.
- You can
 Copy the settings on this window, then
  Paste those settings to a different edit window of the same type.
- You can
 Save the settings on this window to a file stored in a global folder that is used by your current version of SDS2. Give the file a name that will help other users identify its purpose. You can
  Load a saved file to replace the settings on this window (except Piecemark) with the settings that are stored in the file you select.
- When editing multiple windows at the same time, Paste and Load replace mixed entries to a single field with a single entry. Copy and Save ignore fields with mixed entries, treating them as if they have no entry or do not exist.
1 . Preselect one or more connection cubes to enable the Connection Cubes contextual page and click the Edit icon  )
)
Alternative: Use the Find Tool by searching the command name and clicking the Connection Cube Edit icon, which is pictured above. Proceed to step 2.
Learn more about alternative methods for launching commands.
2 . Select the connection cube(s).
▸ Right-click and select "OK" from the shortcut menu.
▸ Press the Enter key.
Alternative : You can press the Esc key or right-click and choose "Cancel" on the shortcut menu to end the command.
3 . The connection cube edit window opens.
Option 1 : Click Generate Report to create the Connection Cube report.
Option 2 : When you are done using the edit window, click OK to accept changes and close the window.
Option 3 : Click Cancel to close the window without accepting any of the changes made to its settings, and end the command.
- Connection Cube Attachment Manager ( Home > Utilities > Utility Functions > )
- Connection Cubes ( Display Options in Modeling )
- Detail Connection Cubes ( Home > Utilities > Process Detail > )
- Expanded Connection Design Calculations Report (can be included in a connection cube report)
- Add Components or Member Ends to a Connection Cube
- Remove Components or Member Ends from a Connection Cube
- Isolate Connection Cube (isolates the cube to set detailing views)

