 Hole Add ( Drawing Editor )
Tool summary :
- Draws a hole. Locate the same point twice to add a flat hole. Locating the two points at different locations adds a length view of the hole.
- Hole Add does not add a hole to the 3D model, only to the drawing. See the warning!
- Here's an example:
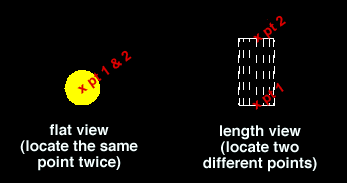
Flat or length views of holes. Left-click ( Locate ) twice at the same point to add a flat view. Left-click ( Locate ) at two different points to add a length view. Flat holes are filled with the " Filled hole pen color " in Drawing Presentation . - See (on this page):
Also see :
- Drawing Editor (where you can add a hole)
- Hole Edit (window opens when you Hole Add )
- Holes on drawings (topic)
- Filled hole pen color ( Fabricator > Detailing > Drawing Presentaton > " Pens " >)
- Holes on Drawings (topic)
- Layer Panel (sets default layer for adding hole to)
- Hole Add in Modeling (usually a better way to add a hole)
Warning!
It is strongly recommended that you use the 3D Hole Options in Modeling instead of adding holes in the Drawing Editor for the following reasons:
Step-by-step instructions :
The following instructions assume that you are using a 3-button mouse.
1 . Before using this tool:
1a (optional) : On the Layer Panel, select the default layer that you want to add the hole to. This step is optional because you can change the drawing layer in step 4.
1b (optional) : To set the defaults for the to-be-added hole(s) to be those of an existing hole, double-click the existing hole then press " OK " on its edit window.
1c (if applicable) : Unshorten a drawing that has been shortened before adding a hole if you want Detail Members to later be able to correctly preserve ' User-created ' annotations. For best accuracy, you can count on measurement tools such as Dimension Add or Ruler or Construction Line Add using BSCL to reliably produce precise and consistent results in an unshortened drawing.
2 . Invoke Hole Add using any one (1) of the following methods:
▸ Click the Hole Add icon. The icon can be taken from the group named ' Objects -- Holes ' and placed on the ribbon.
▸ Hole Add can also be invoked using a keyboard shortcut , the context menu , or a mode . For the ' Lightning ' layout style, configuration of the interface is done using Customize Interface .
▸ With Hole Mode mouse bindings active, middle-click ( Add ).
3 . Locate - Repeat - Return mouse bindings become active along with various point locators .
|
|
|
bindings |
Alternative 1 : Select the Locate icon that you want (if it's not pressed already). Place the mouse pointer (
) so the point location target (
) snaps to the location where you want the center of (or one end of) the hole to be, then left-click ( Locate ). Go to step 4.
Alternative 2 : Right-click ( Return ) if you do not want to add any more holes. Do not continue.
4 . Hole Add requires that you locate two points to define a hole. Do one (1) of the following:
|
|
|
bindings |
Alternative 1 : Left-click ( Locate ) at the same point you did in step 3 to get a flat view (top/bottom view).
Alternative 2 : To get a length view of a hole, left-click ( Locate ) when the point location target (
5 . The Hole Edit window opens.
Alternative 1 : Enter the hole settings that you want and press the " OK " button at the bottom of the window to cause the hole to appear on screen. Go to step 6.
Alternative 2 : Press the " Cancel " button to end the Hole Add operation without adding this hole. Do not continue.
6 . Locate - Repeat - Return mouse bindings again become active along with various Locate options. Do one of the following:
|
|
|
bindings |
Alternative 1 : Follow these instructions beginning with step 3 to place additional holes with different settings than the one you just added.
Alternative 2 : Middle-click ( Repeat ) to cause a duplicate of the hole you just added to be placed where the point location target (
Alternative 3 : Right-click ( Return ) if you are done adding holes. Go to step 7.
7 . The mouse bindings that were active when you invoked Hole Add become active again.
Note: Any holes added using this procedure can be instantly removed (one at a time, in reverse-order of their addition) by using Undo .

