Add Cap Plate ( Modeling )
Tool summary :
- Creates a cap plate for any HSS rectangular (tube) or HSS round (pipe) beam, column or brace.
For you to be able to add this custom component to a member, the member must be a beam, column, vertical brace or horizontal brace whose " Section size " is an HSS (round or rectanular) or TS or PIPE. - Options that control the editing of an HSS cap plate component can be found on the HSS Cap Plates window (shown below) or on the edit window of the HSS member to which the cap plate was applied.
For an HSS column, the settings will appear in the [ HSS Cap Plate ] section of that member's Column Edit window.
For an HSS vertical brace, the settings will appear in the [ HSS Cap Plate ] section of that member's Vertical Brace Edit window.
For an HSS horizontal brace, the settings will appear in the [ HSS Cap Plate ] section of that member's Horizontal Brace Edit window.
Also see :
|
- HSS Cap Plates Setup (default setup for this window)
- Modeling (where custom components can be added)
- Customers' Classroom: SDS2 Components 101 (YouTube) (
 )
)
- Custom components (topic)
- Component Plugin Setup ( Home > Project Settings > Job > Component Plugin Defaults > )
- Copy Component (to copy the cap plate(s) to another member)
- Move Component (to move the cap plate(s) to another member)
- Explode Component (to reduce the component to its constituent materials)
- Component Selection Tool (to search for custom components of a selected type)
- Model Tree (to find custom components and select them for deletion, editing, etc.)
To edit or delete the HSS Cap Plates custom component :
- The HSS Cap Plates custom component can be applied to an HSS rectangular (tube) or HSS round (pipe) member. The member can be a beam or column or brace. It doesn't matter as long as it is not a miscellaneous member.
- Setup of default settings is available for the edit window that opens when you add this component. See Component Plugin Setup .
Selecting any material that is part of the HSS Cap Plates custom component selects the entire component when the " Selection filter " is set to ' Default ' or ' All ' or ' Custom Components ', 
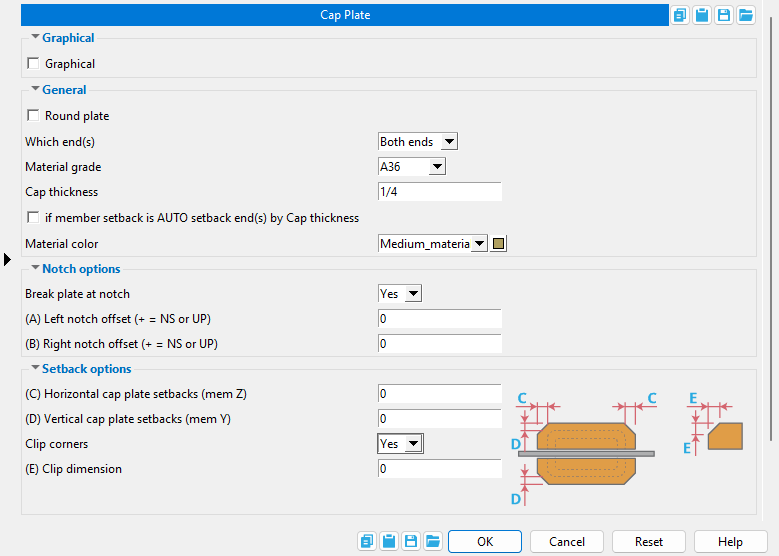
HSS Cap Plates custom component settings :
![]() Graphical ---------------------------------------------------------------------------
Graphical ---------------------------------------------------------------------------
Graphical : ![]() or
or ![]() .
.
- An HSS Cap Plates component is automatically set to "
 Graphical " whenever you make graphical changes to any of its materials. For example, when you Edit Material or perform a material cutting operation on an HSS Cap Plates material. This stops the component from being changed during Process and Create Solids . Click here for more information.
- Instead of allowing the component to be made " Graphical ," you may wish to Explode Component .
![]() General information -----------------------------------------------------------
General information -----------------------------------------------------------
|
A round cap plate on an HSS round vertical brace . The HSS Cap Plates custom component can also apply a round plate to an HSS rectangular member, but for most situations that would not bet a desirable choice.. |
|
If this box is checked (
If the box is not checked (
), the cap plate will be a rectangular plate . This option works best on HSS rectangular (tube) members since the " Material width " and " Order length " will automatically be calculated so that the cap plate is flush with the flat surfaces of the member's HSS rectangular section size.
Which end(s): : Left End or Right End or Both Ends . You can, if you choose to, add two different cap plate custom components to the same member, one for the left end and the other for the right end. Doing this permits you to, for example, specify plates that are one thickness on one end and a different thickness on the other end.
' Left End ' results in the cap plate being generated on the left end of the member. On the member's edit window, the left-end settings will have a section named [ HSS Cap Plate ].
' Right End ' results in the cap plate being generated on the right end of the member. On the member's edit window, the right-end settings will have a section named HSS Cap Plate .
' Both Ends ' results in cap plates being generated on both ends of the member. Both cap plates will be the same " Cap thickness " and " Material grade ," etc. On the member edit window, the left- and right-end settings will each have a section named HSS Cap Plate .
Material grade: A36 or A572 or etc. This is the grade of steel for the cap plate. This is also the " Steel grade " of the rectangular plate or round plate material that the cap plate is made of.
Setup: If the grade of steel you want is not shown on the list box (
), you can use Home > Project Settings > Job > Plate Grades to add it to the list.
Cap thickness: The thickness of each of the cap plate (in the primary dimension " Units " or other units ). This is also the " Material thickness " of the rectangular plate or round plate that cap plate plate is made of. Click here (rectangular plate) or here (round plate) for more information.
Material color: A predefined color or a custom color . This is the approximate color of the cap plate when the member it is a submaterial of is displayed in one of the three solid forms .
The predefined colors are set up on the Predefined Colors window. The color swatch next to the list box (
Select ' Custom Color ' (last choice on the list) to launch your operating system's color picker and define any color you like.
![]() Tube notch -----------------------------------------------------------------------
Tube notch -----------------------------------------------------------------------
Break plate at notch: Yes or No .
| An example of a rectangular cap plate that is split at the notch in the vertical brace's HSS rectangular material. The notch is for insertion of the gusset plate, which is not shown in this example. |
|
' Yes ' splits the rectangular plate cap plate at the notch in the HSS vertical brace.
' No ' makes the cap plate a single piece of rectangular plate material. The plate will clash with the gusset plate inserted into the vertical brace notch.
Left notch offset (+ = NS or UP):
Right notch offset (+ = NS or Up):
![]() Cap plate setbacks -----------------------------------------------------------
Cap plate setbacks -----------------------------------------------------------
Horizontal cap plate setback (mem Z): A positive or negative distance (in the primary dimension " Units " or other units ). This distance affects the length of the cap plate in the Z member axis direction and therefore effects the extension of the cap plate in relation to the two HSS sidewalls that are perpendicular to the member Z axis.
' 0 (zero) ' results in the rectangular plate cap plate being flush to outside of the Z-axis sidewalls of the HSS rectangular member.
' A positive distance ' results in the rectangular plate cap plate being extended past each each of two Z-axis sidewalls of the HSS rectangular member. The extension past each sidewall will be the distance that is entered. This might be done to permit welding of the cap plate.
' A negative distance ' results in the rectangular plate cap plate being set back inside of the Z-axis sidewalls of the HSS rectangular member.
Vertical cap plate setback (mem Y): A positive or negative distance (in the primary dimension " Units " or other units ). This distance affects the length of the cap plate in the Y member axis direction and therefore effects the extension of the cap plate in relation to the two HSS sidewalls that are perpendicular to the member Y axis.

' 0 (zero) ' results in the rectangular plate cap plate being flush to outside of the Y-axis sidewalls of the HSS rectangular member.
' A positive distance ' results in the rectangular plate cap plate being extended past each each of two Y-axis sidewalls of the HSS rectangular member. The extension past each sidewall will be the distance that is entered. This might be done to permit welding of the cap plate.
' A negative distance ' results in the rectangular plate cap plate being set back inside of the Y-axis sidewalls of the HSS rectangular member.

' Yes ' clips the corners of the rectangular cap plate based on the " Clip dimension " that is entered.
' No ' keeps the corners of the rectangular cap plate square.
Clip dimension: A horizontal or vertical distance (in the primary dimension " Units " or other units ) from one corner of the clip cut to the other. The distance is measured horizontally or vertically; that is, parallel with one or the other edges of the cap plate. The clip cut will always be 45 degrees. A " Clip dimension " of ' 0 ' keeps the corners square.