 Shape File Report (shape file data)
Tool summary :
Also see :
- Shape File Management (topic)
- Create New Shape File ( Home > Utilities > Shapes Properties > )
- Shapes Properties (for editing a shape file)
- Choosing a local shape file (when creating a Job)
- Rename/Relocate Shape File ( Home > Utilities > Utility Functions > )
- Copy Shapes ( Home > Utilities > Utility Functions > )
- Delete Shape File ( Home > Utilities > Utility Functions > )
- Shape File Comparison Report (report compares two shape files)
- Reports ( User and Site Options > Output > " Reports " > set report output)
- Report viewer (a good way to output a report)
page 1 | contents | home > reports > system reports > | reports >
 Examples of some reports :

|
Excerpt from a report on available angle sections in the USA shape file . |

|
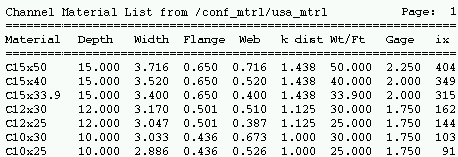
Excerpt from a report on available channel sections in the USA shape file. |

|
Excerpt from a report on wide flange sections in the USA shape file. |
page 1 | contents | home > reports > system reports > | reports > | top
 How to output a Shape File Report :
1 . Use any one (1) of the following methods to begin output of this report:
Method 1 : Home > Reports > System Reports > Shapes Properties > Shapes Properties .
Method 2 : Click the Shape File Report icon. The icon can be taken from the group named ' Reports ' and placed on a toolbar (classic) or the ribbon (lightning). Ribbon configuration is done using Customize Interface .
Method 3 : If " Modeling layout style " or " Drawing Editor layout style " is ' Classic ', you can use the menu system to choose Reports > Shape file > Shape File Report .
2 . The Shape File Report dialog opens. Alternative 1 : Type in the file path (if you know it). Alternative 2 : Press " Local " to enter the file path to the local shape file stored in your current Job. Alternative 3 : Press the " Browse... " button and select a shape file to enter the path to that file. Then press the " OK " button and go to step 3.
| Shape file: |
|
|
|
| Shape file paths: | |
| /*/main/job_mtrl | * = your current Job . This is the path to the " local " shape file in your current Job. Pressing the " Local " button enters this path automatically. |
| /*/conf_mtrl/SDS2 | * = current version . This folder contains the default USA ( usa_mtrl ), default Canadian ( can_mtrl ) and default All ( all_mtrl ) shape files. Since these files are updated with the installation of new versions of SDS2, there's no point in your changing them, though you may want to copy materials from them. |
| /*/conf_mtrl/usa_mtrl
/*/conf_mtrl/can_mtrl /*/conf_mtrl/all_mtrl |
* = current version . These are the USA, Canadian and All shape files. They are editable copies of the default files. Since these files are not overwritten when you update to new versions of SDS2, any changes you make to these files will be retained. |
3 . A selection dialog opens. On it is a selection list of the material types Wide Flange , Channel , Angle , W tee , Pipe , HSS / TS , Welded Plate Wide Flange , Welded Plate Box , Joist , Cold Formed Channel , Cold Formed Z , S Shape , S Tee , Beaded Flat , Clevis , Turnbuckle , Rail .
|
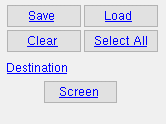
Optional: The button under " Destination " can temporarily override the report output. In this example, that button is named " Screen " since output is to the report viewer . |
Alternative 1 : Select each material type that you want included in the report, then press the " OK " button. Go to step 4.
Alternative 2 : Press " Cancel " to end this operation without outputting the report. Do not continue.
4 . A Shape File Report is output.
Note 1: If you output the report to the report viewer (" Screen "), you can now review the report on screen then optionally print it or output it to disk (see report viewer ).
Note 2: The report includes all materials in the shape file you selected (in step 2) that are of the type(s) you selected (in step 3).
page 1 | contents | home > reports > system reports > | reports > | top


