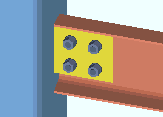
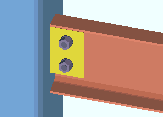
Shear Connection ("  Connection specifications " and more)
- Topics:
- Connection specifications:
Also see :
- Shear (index)
- Shear (Connection Guide)
- Setup for shear connections (index)
- Status Display ( Connection type > Shear ) (
 )
)
Design restrictions for shear connections :
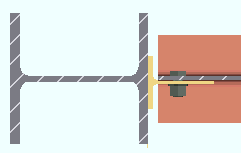
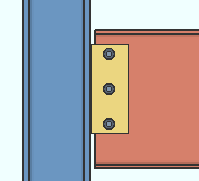
- ' Shear ' connections are system connections that may be applied on the end of a W or S or welded plate W or C or HSS/TS (HSS rectangular) beam for beam-to-beam or beam-to-column framing situations.
- Single-plate shear connections may frame to wide flange , S shape , HSS rectangular , HSS round , welded wide flange or welded plate box columns. They can also be designed on a beam to a W beam flange .
- Shear through connections may frame to HSS rectangular or HSS round columns.
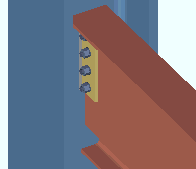
- W tee shear connections and built-up plate tee connections must be shop welded if framing to a tube column. Bolted-bolted W tee or pate tee connections can have a different " NM bolt type to supported " and " NM bolt type to supporting "
- Single-plate ' Shear ' connections and bolted-bolted W tee or built-up plates tee ' Shear ' connections may optionally be detailed on (shop attached to) the supporting member (column or beam). Or they can be detailed on (shop attached to) the supported beam. Click here for more information.
- Single-plate shear connections are often used in skewed framing situations. W tee and built-up plates shear connections can be designed on a sloping beam but not on a skewed beam.
- For a vertical brace framing to a beam and column, a shear plate is designed for the gusset-to-column interface if the beam connects to the column with a shear plate. The beam's " Connection specifications " provides an option to " Combine beam/vbr shear plates ."
- " Moment " flange plates can be designed on beams with skewed or perpendicular shear-plate connections and slopes up to 30 degrees from horizontal.
- Connection design looks to relevant setup options and shear " Connection specifications " to design an initial minimum setup connection. If needed to stand up to the " Shear load " on the supported beam, connection design first increases rows of bolts, then bolt diameter and last plate thickness to design a connection that works. If a tee connection has been specified and no appropriate WT material is entered to the Home > Project Settings > Fabricator > Standard Fabricator Connections > Preferred WT Sizes list, connection design creates a sheer plate connection instead.
------" Connection specifications " for beam ' Shear ' connections ------
(shear plate, shear tee, shear through plate)
|
" |
Material type: Plate or W Tee or Built-up plates . This " ![]() Connection specifications " option sets the material for connecting the supported beam to the supporting column or beam when the left and/or right " Input connection type " on the Beam Edit window is ' Shear '. The option can also be found at Home > Project Settings > Job > Connections > Auto Standard Connections and User Defined Connections .
Connection specifications " option sets the material for connecting the supported beam to the supporting column or beam when the left and/or right " Input connection type " on the Beam Edit window is ' Shear '. The option can also be found at Home > Project Settings > Job > Connections > Auto Standard Connections and User Defined Connections .
|
|
|||
| A moment connection can be designed on non-auto standard shear connections that are any of these types. |
' Plate ' specifies that connection design create a single-plate shear connection (a shear tab connection). A single-plate shear connection can be designed in skewed framing situations.
' W Tee ' instructs connection design to attempt to create a shear W tee connection. For a shear tee connection to be designed, there must be W tee material entered to Home > Project Settings > Fabricator > Standard Fabricator Connections > Preferred WT Sizes . If no WT material is in the list (or if an appropriate size is not listed), connection design defaults to plate material for the connection. Shear tee connections must be shop welded to the column if framing to a HSS/TS column. Also see: " Center shear tee on beam centerline " in Shear Plate Settings .
' Built-up plates ' configures connection design to create a built-up tee connection composed of two plates that are welded together. The " Attachment " and " Attached to " options found here in "
Advanced Selection: m.Ends[0].Designed.MaterialType
Parametric module: m.Ends[0].Designed.MaterialType
End connection failure message: Axial load not applicable to this connection type (' W Tee ')
Attachment: Bolted or Welded . This " ![]() Connection specifications " option applies when ' W Tee ' or ' Built-up plates ' is selected as the shear connection " Material type ." The option can be found on the Beam Edit window and at Home > Project Settings > Job > Connections > Auto Standard Connections and User Defined Connections .
Connection specifications " option applies when ' W Tee ' or ' Built-up plates ' is selected as the shear connection " Material type ." The option can be found on the Beam Edit window and at Home > Project Settings > Job > Connections > Auto Standard Connections and User Defined Connections .
|
||
| Note that connection design uses different W tees for the bolted and welded connections. |
' Bolted ' specifies that connection design attempt to create a W tee or built-up plates connection that bolts in the shop to the supporting beam or column. The connection may be " Attached to " (shop bolted to) the ' Supported ' or the ' Supporting ' member.
' Welded ' specifies a ' W Tee ' or ' Built-up plates ' connection that shop welds to the supporting member.
Advanced Selection: m.Ends[0].Designed.IsBolted
Parametric module: m.Ends[0].Designed.IsBolted
Attached to: Supported or Supporting . This " ![]() Connection specifications " option applies regardless of the shear connection " Material type ." The option can be found on the Beam Edit window and at Home > Project Settings > Job > Connection > Auto Standard Connections and User Defined Connections .
Connection specifications " option applies regardless of the shear connection " Material type ." The option can be found on the Beam Edit window and at Home > Project Settings > Job > Connection > Auto Standard Connections and User Defined Connections .
| W tee or built-up plates | Shear plate connection | ||
| ' Supported '
(shop bolted to) 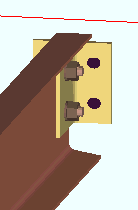 |
' Supporting '
(shop bolted to) 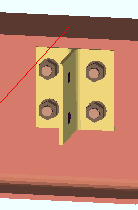 |
' Supported '
(shop bolted to)  |
' Supporting '
(shop welded to)  |
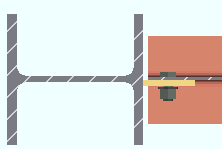
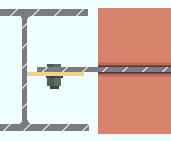
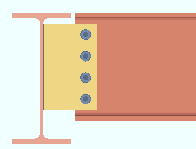
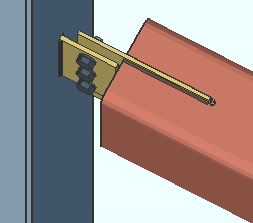
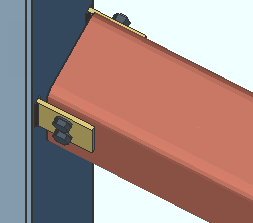
' Supported ' specifies that the connection attaches in the shop to the supported beam (this beam). For a bolted W tee or built-up plates shear connection, this means that the connection shop bolts to this beam and field bolts to the supporting beam or column. Connection design applies the field clearance entered for Home > Project Settings > Job > Field Clearances > " Shear tees ." For a shear plate connection, the plate shop bolts to this beam and field welds to the supporting member. A supporting member is not required to get a connection, and a 3D field weld will be generated in the model even if there is no supporting member.
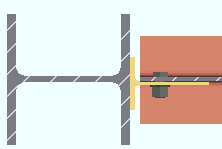
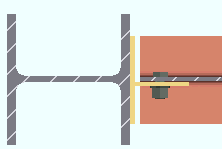
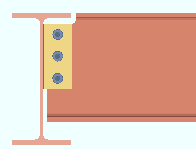
' Supporting ' specifies that the connection attaches in the shop to the supporting member. For a W tee or built-up plates connection, the tee flange shop bolts to the supporting beam or column and its stem field bolts to the supported beam (this beam). For a shear plate connection, the plate shop welds to the supporting member and field bolts to this beam. The shop welds are shown in the model, and shop welding instructions are provided on the member detail. Weld specifications are also provided in the Connection Design Calculations Report or Expanded Connection Design Calculations Report .
Shear plate/tee side: Automatic or Near side or Far side or Both . This " ![]() Connection specifications " option reads " Shear plate side " when ' Plate ' or ' Built-up plates ' is selected as the shear connection " Material type ." It reads " Shear tee side " when ' W Tee ' is selected.
Connection specifications " option reads " Shear plate side " when ' Plate ' or ' Built-up plates ' is selected as the shear connection " Material type ." It reads " Shear tee side " when ' W Tee ' is selected.
' Near side '
|
' Far side '
|
' Both '
|
' Automatic ' specifies, when Home > Project Settings > Fabricator > Standard Fabricator Connections > Shear Plate Settings > " Shear plate alignment " is set to ' Offset ', that the shear plate (or tee stem) be designed on the near side of the web if this is the left end of the beam, on the far side if this is the right end of the beam. When the " Shear plate alignment " is ' Opposite ', then setting the left end to ' Automatic ' places the left-end plate/tee on the near side of the beam, and setting the right end to ' Automatic ' places the right-end plate/tee on the near side of the beam.
' Near side ' or ' Far side ' specifies that the shear plate or through plate (or tee) be designed on the side of the supported beam's web that is selected. The near side is the face of the web that you are facing when the left end of the beam is to your left and the right end of the beam is to your right.
' Both ' applies when ' Plate ' is selected and the " Section size " is a tube (HSS rectangular). Click here for some examples from the Connection Guide.
Example: You set the " Shear plate/tee side " on the left end of the beam to ' Automatic '. For the right end, you set it to ' Far side '. The shear plate on the left end will be on the near side of the beam's web. The shear plate on the right end will be on the far side. This is true regardless of the choice made to Home > Project Settings > Fabricator > Standard Fabricator Connections > Shear Plate Settings > " Shear plate alignment ."
Advanced Selection: m.Ends[0].Designed.ShearPlateSide
Parametric module: m.Ends[0].Designed.ShearPlateSide
Flange splice plates on: This member or Opposite member . Flange plates can be designed when ' Bolted ' is the " Moment type " set for this end of this beam in its " ![]() Moment " leaf. If the supporting beam is the same depth as the supported beams (they are shown here as different), the choice made here applies to the bottom flange plate as well as the top flange plate.
Moment " leaf. If the supporting beam is the same depth as the supported beams (they are shown here as different), the choice made here applies to the bottom flange plate as well as the top flange plate.
' This member '
|
' Opposite member'
|
' This member ' specifies that the moment flange splice plate be detailed with and shop bolted to the beam whose settings you are currently specifying.
' Opposite member ' specifies that the moment flange splice plate be detailed with and shop bolted to the beam that is opposite to the beam whose settings you are currently specifying.
Defaults: By default, the shorter beam carries the shared flange plate(s) in a beam-to-beam moment connection . When the bottom flange plate welds to the supporting beam (as shown), it is a submaterial of the supporting beam.
Support condition: Automatic or Rigid or Flexible . This " ![]() Connection specifications " option applies to single-plate shear connections (shear tabs). The option can be found on the Beam Edit window and at Home > Project Settings > Job > Connections> Auto Standard Connections and User Defined Connections .
Connection specifications " option applies to single-plate shear connections (shear tabs). The option can be found on the Beam Edit window and at Home > Project Settings > Job > Connections> Auto Standard Connections and User Defined Connections .
' Automatic ' instructs connection design to apply a setup choice ( Home > Project Settings > Job > Design > Design Settings > " Always base design on flexible support condition ").
' Rigid ' specifies that the single-plate shear connection be designed for a rigid support.
' Flexible ' specifies that the single-plate shear connection to be designed for a flexible support.
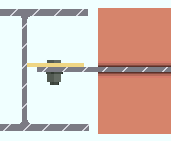
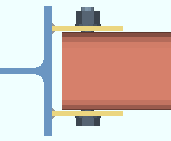
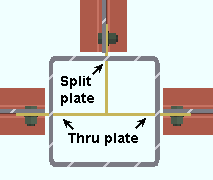
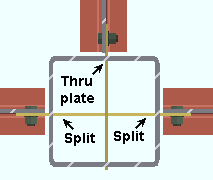
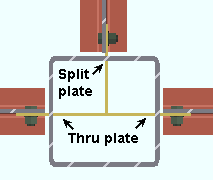
Through shear plate: No or Through plate or Split plate . This " ![]() Connection specifications " option applies to shear plates to HSS rectangular (tube) or HSS round (pipe) columns. The option can be found on the Beam Edit window and at Home > Project Settings > Job > Connections > Auto Standard Connections and User Defined Connections . Best practice is to mark the through plates ' Through plate ' or ' Split plate ' based on your desired outcome instead of letting connection design decide for you.
Connection specifications " option applies to shear plates to HSS rectangular (tube) or HSS round (pipe) columns. The option can be found on the Beam Edit window and at Home > Project Settings > Job > Connections > Auto Standard Connections and User Defined Connections . Best practice is to mark the through plates ' Through plate ' or ' Split plate ' based on your desired outcome instead of letting connection design decide for you.
|
|
The top beam is set to ' Split plate '. The left and right beams are each set to ' Through plate '. |
|
The top beam is set to ' Through plate '. The left and right beams are each set to ' Split plate '. |
' No ' instructs connection design to weld the shear plate to the outer wall of the HSS round or HSS rectangular column. No through plate will be created.
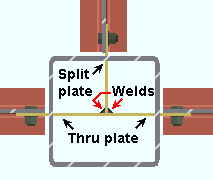
' Through plate ' specifies that connection design attempt to create a connection plate that runs through both walls of an HSS round (pipe) or HSS/TS steel column. If two beams are in alignment with one another and frame to the opposite sides of the column and have ' Through plate ' selected for their appropriate ends, a single through plate is designed for field bolting each of the opposing beams. The program automatically notches the column and welds the through plate to its outer walls. If another pair of beams intersects perpendicular to that through plate, setting those other beams to ' Split plate ' can avoid letting connection design decide which plate to split. If you set all beams to ' Through plate ', connection design will split the shallower of the plates. If all plates are the same depth, connection design will choose which to split based on the beam's member number.
' Split plate ' instructs connection design to split the through plate where it perpendicularly intersects a through plate. The program automatically notches the entry side wall of the column and welds the split plate to that same wall of the column and to the through plate.
End connection failure message : Unable to determine which beams should have split through plates
Advanced Selection: m.Ends[0].Designed.ThruShearPlate
Parametric module: m.Ends[0].Designed.ThruShearPlate
Member Detailing Settings: HSS notch radius , Total notch width clearance
Shear Plate Settings: Cope dissimilar through plate sides (
Weld split plate to through plate: Automatic or Yes or No . This " ![]() Connection specifications " option applies when ' Through plate ' or ' Split plate ' is selected as the " Through shear plate ."
Connection specifications " option applies when ' Through plate ' or ' Split plate ' is selected as the " Through shear plate ."
|
' Yes '
|
' No '
|
' Automatic ' specifies that connection design apply a setup choice ( Home > Project Settings > Fabricator > Standard Fabricator Connections > Shear Plate Settings > " Weld split plate to through plate ").
' Yes ' instructs connection design to weld split the plate to the through plate.
' No ' instructs connection design not to weld the split plate to the through plate.
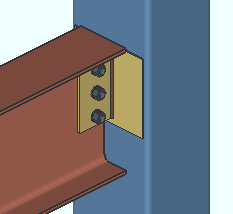
Extend past flange: ![]() or
or ![]() . This "
. This " ![]() Connection specifications " option applies to shear plates to a beam web or to a column web. The option can be found on the Beam Edit window and at Home > Project Settings > Connections > Job > Auto Standard Connections and User Defined Connections .
Connection specifications " option applies to shear plates to a beam web or to a column web. The option can be found on the Beam Edit window and at Home > Project Settings > Connections > Job > Auto Standard Connections and User Defined Connections .
 |
 |

|
|
If this box is checked (
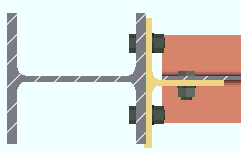
), connection design attempts to extend the shear plate past the flanges of the supporting member that the shear plate welds to. The supporting member can be a wide flange, S shape or welded plate wide flange beam or column. For a beam-to-beam shear plate, creating an extend-past-flange connection eliminates the coping of the supported beam that might otherwise be required. For a beam-to-column-web connection, stability for the extended shear plate is provided by top and bottom "
If the box is not checked (
), connection design does not create an extend-past-flanges shear plate connection when the supported beam (this beam) frames to the web of a beam or column.
A design limitation: For beams framing to sloping beams, the angle between the beam web and a line perpendicular to the slope of the supporting beam is limited to a maximum of 15 degrees.
Setup: Home > Project Settings > Job > Design Settings > " Always provide stabilizer plates " applies when the ' ASD14 ' or ' LRFD14 ' is the connection design method.
Connection design locks: "
Advanced Selection: m.Ends[0].Designed.ExtendPastFlange
Parametric module: m.Ends[0].Designed.ExtendPastFlange
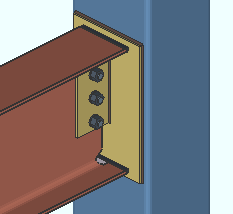
Extend stabilizer plates to: Automatic or Web . This applies when -- here in " ![]() Connection specifications " -- "
Connection specifications " -- " ![]() Extend past flange " is on (checked) for a beam to a column web. Also, the option at Home > Projects Settings > Job > Design > Design Settings > " Always provide stabilizer plates " may have to be turned on (checked).
Extend past flange " is on (checked) for a beam to a column web. Also, the option at Home > Projects Settings > Job > Design > Design Settings > " Always provide stabilizer plates " may have to be turned on (checked).
|
|
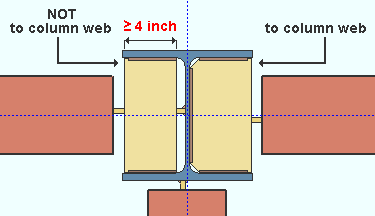
The stabilizer plate on the left is not extended since its unextended width is greater than or equal to 4 inches. The stabilizer on the right is extended because " Extend stabilizer plates to " is set to ' Web '. |
' Automatic ' permits connection design to determine whether or not to extend the stabilizer plates to the column web. The stabilizer plates will be fully extended to the web if the stability plate width (unextended) would be less than 4 inches (102 mm). A more complete explanation is provided in the Connection Guide.
' Web ' instructs connection design to extend the stabilizer plates to the column web.
Connection design locks: "
Also see: Connection Guide (two styles of stability plates)
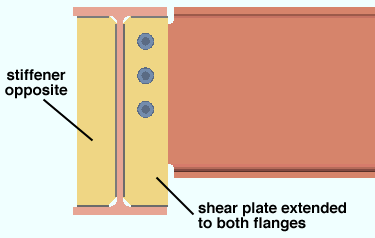
Stiffener opposite: ![]() or
or ![]() . This "
. This " ![]() Connection specifications " option applies when a beam frames to the web of a beam whose " Section size " is a flanged material such as wide flange, S shape or welded plate wide flange. To get the stiffener, something other than ' As required ' needs to be selected for " Extend size to ."
Connection specifications " option applies when a beam frames to the web of a beam whose " Section size " is a flanged material such as wide flange, S shape or welded plate wide flange. To get the stiffener, something other than ' As required ' needs to be selected for " Extend size to ."
If this box is checked (
If the box is not checked (
Advanced Selection: m.Ends[0].Designed.StiffenerOpposite
Parametric module: m.Ends[0].Designed.StiffenerOpposite
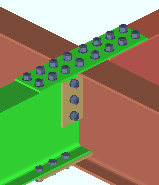
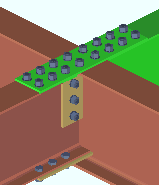
Extend size to: As required or Top flange or Bottom flange or Both flanges or Top K or Bottom K or Both K's or Top flange & bottom K or Top K & bottom flange . This " ![]() Connection specifications " option applies to beam-to-beam connections when the supporting beam's " Section size " is a flanged material such as wide flange, S shape or welded plate wide flange. The option can be found on the Beam Edit window and at Home > Project Settings > Connections > Job > Auto Standard Connections and User Defined Connections .
Connection specifications " option applies to beam-to-beam connections when the supporting beam's " Section size " is a flanged material such as wide flange, S shape or welded plate wide flange. The option can be found on the Beam Edit window and at Home > Project Settings > Connections > Job > Auto Standard Connections and User Defined Connections .
' Top flange '

|
' Both flanges '

|
' Both k's '

|
' As required ' specifies that connection design attempt to size the shear plate as required by the framing situation and the applied " Shear load ." Note: Connection design does not design a " Stiffener opposite " when ' As required ' is selected.
' Top flange ' specifies that connection design extend the top of the shear plate to the top flange of the supporting beam.
' Bottom flange ' instructs connection design to extend the shear plate to the bottom flange of the supporting beam.
' Both flanges ' configures connection design to extend the shear plate to both flanges of the supporting beam.
' Top K ' extends the top of the shear plate to the top " k distance " of the supporting beam.
' Bottom K ' extends the bottom of the shear plate to the bottom " k distance " of the supporting beam.
' Both K's ' extends the shear plate to both the top flange and the bottom " k distance " of the supporting beam.
' Top flange & bottom K ' extends the shear plate to both the top flange and the bottom " k distance " of the supporting beam.
' Top K & bottom flange ' extends the shear plate to both the top " k distance " and the bottom flange of the supporting beam.
Advanced Selection: m.Ends[0].Designed.ExtendSizeToBottom
Advanced Selection: m.Ends[0].Designed.ExtendSizeToTop
Parametric module: m.Ends[0].Designed.ExtendSizeToBottom
Parametric module: m.Ends[0].Designed.ExtendSizeToTop
Use expanded vertical bolt spacing : Automatic or Yes or No . This " ![]() Connection specifications " option applies to ' Non-moment ' shear plates or shear tees to a beam or a column. The option can be found on the Beam Edit window and at Home > Project Settings > Job > Connections > Auto Standard Connections and User Defined Connections .
Connection specifications " option applies to ' Non-moment ' shear plates or shear tees to a beam or a column. The option can be found on the Beam Edit window and at Home > Project Settings > Job > Connections > Auto Standard Connections and User Defined Connections .
|
|

' Automatic ' specifies that connection design apply a setup choice ( Home > Project Settings > Fabricator > Standard Fabricator Connections > Shear Plate Settings > " Use expanded vertical bolt spacing ").
' Yes ' permits connection design to expand the vertical spacing of bolts to 1.5 times or 2 times the Home > Project Settings > Fabricator > Detailing > Connection Erectability Settings > " Bolt spacing " that is set per bolt diameter. Connection design may also adjust to a spacing other than 1.5 or 2 times the standard bolt spacing in order to accommodate piecemarking issues, loading conditions and unusual geometries.
' No ' instructs connection design to use the Home > Project Settings > Fabricator > Detailing > Connection Erectability Settings > " Bolt spacing " that is set per bolt diameter.
Tip: Expanded vertical hole spacing can help to reduce fabrication costs by minimizing the number of rows of bolts in shear plates and shear tees.
Combine beam/vbr shear plates: Automatic or Yes or No . When this end of this beam frames to a column with a single-plate shear connection and a vertical brace frames to this beam and that same column, connection design can either create one combined shear plate or two shear plates (one for the beam-to-column interface, the second for the gusset-to-column interface).
|
|
' Automatic ' specifies that connection design apply a setup choice ( Home > Project Settings > Fabricator > Standard Fabricator Connections > Shear Plate Settings > " Combine beam and vertical brace shear tabs ").
' Yes ' instructs connection design to create a single shear plate to connect both the beam and vertical brace gusset plate to the column. The shear plate uses the " NM bolt diameter " and " NM bolt type to supported " that is set for the beam.
' No ' configures connection design to design two separate shear plates, one to connect the beam to the column, the other to connect the vertical brace gusset plate to the column.
Note: Connection design does not support connections on vertical braces connecting to a beam and column when the beam " Section size " is a channel.
Try two-bolt-column shear tabs: ![]() or
or ![]() . This "
. This " ![]() Connection specifications " option can be found on the Beam Edit window and at Home > Project Settings > Job > Connections > Auto Standard Connections and User Defined Connections . The option applies when " Moment type " is set to ' Non-moment ' in this beam end's "
Connection specifications " option can be found on the Beam Edit window and at Home > Project Settings > Job > Connections > Auto Standard Connections and User Defined Connections . The option applies when " Moment type " is set to ' Non-moment ' in this beam end's " ![]() Moment " leaf or at Home > Project Settings > Job > Connections > User Defined Connections .
Moment " leaf or at Home > Project Settings > Job > Connections > User Defined Connections .
|
|
If this box is checked (
If the box is not checked (
Advanced Selection: m.Ends[0].Designed.TryTwoBoltColumnShearTabs
Parametric module: m.Ends[0].Designed.TryTwoBoltColumnShearTabs
Use paddle plate : ![]() or
or ![]() . This "
. This " ![]() Connection specifications " option applies to the design of shear plate connections when the beam's " Section size " is an HSS rectangular or tube (TS). The option can be found on the Beam Edit window and at Home > Project Settings > Job > Connections > Auto Standard Connections and User Defined Connections .
Connection specifications " option applies to the design of shear plate connections when the beam's " Section size " is an HSS rectangular or tube (TS). The option can be found on the Beam Edit window and at Home > Project Settings > Job > Connections > Auto Standard Connections and User Defined Connections .
|
|
|
If this box is checked (
If the box is not checked (
Connection design locks: "
Skew holes in plate: Automatic or Yes or No . This " ![]() Connection specifications " option applies to shear plates on slightly sloping beams when the box is checked for Home > Project Settings > Fabricator > Detailing > Member Detailing Settings > the " Beams " section > "
Connection specifications " option applies to shear plates on slightly sloping beams when the box is checked for Home > Project Settings > Fabricator > Detailing > Member Detailing Settings > the " Beams " section > " ![]() Square cut ends of sloped beams ."
Square cut ends of sloped beams ."
|
|
' Automatic ' instructs connection design to apply a setup choice ( Home > Project Settings > Fabricator > Standard Fabricator Connections > Shear Plate Settings > " Skew holes in shear tabs ").
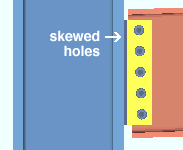
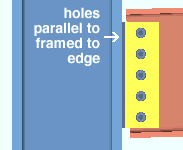
' Yes ' instructs connection design to create a shear plate with bolts skewed so that they run parallel with the edge of the supported, sloping, square-cut beam.
' No ' configures connection design to create a shear plate with bolts that are parallel to the surface on the supporting member that the shear plate welds to.
Advanced Selection: m.Ends[0].Designed.SkewHolesInPlate
Parametric module: m.Ends[0].Designed.SkewHolesInPlate
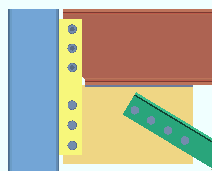
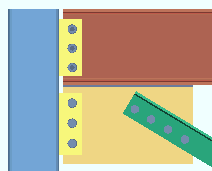
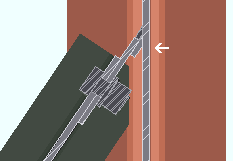
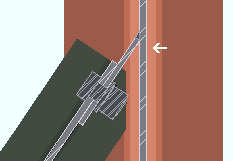
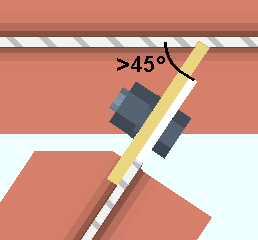
Use back-up bar: Automatic or Yes or No . This " ![]() Connection specifications " option applies to skewed beam-to-beam or beam-to-column single-plate shear connections with angles to the supported member of less than 45 degrees. Standard AISC practices call for a back-up bar to be used for such welds. The views in the following illustrations are from below the top flanges of the beams.
Connection specifications " option applies to skewed beam-to-beam or beam-to-column single-plate shear connections with angles to the supported member of less than 45 degrees. Standard AISC practices call for a back-up bar to be used for such welds. The views in the following illustrations are from below the top flanges of the beams.
|
|
' Automatic ' specifies that connection design apply a setup choice ( Home > Project Settings > Fabricator > Connection Detailing and Fabrication Options > " Use backing bar for pre-qualified welds ").
' Yes ' instructs connection design to create a back-up bar (the angle between members must be less than 45 degrees).
' No ' instructs connection design to not create a back-up bar.
Use HSS column reinforcement plate : Automatic or Yes or No . This " ![]() Connection specifications " option applies to non-moment shear plate connections (" Material type " = ' Plate ') and welded moment connections (" Moment type " = ' Welded ' ) that frame to an HSS rectangular (or tube) column with a thin wall.
Connection specifications " option applies to non-moment shear plate connections (" Material type " = ' Plate ') and welded moment connections (" Moment type " = ' Welded ' ) that frame to an HSS rectangular (or tube) column with a thin wall.
|
|
|
|

' Automatic ' specifies that connection design apply a setup choice ( Home > Project Settings > Job > Plate Design Settings > " Use HSS column reinforcement plate ").
' Yes ' configures connection design to weld a reinforcement plate to the face of the HSS rectangular column if such a reinforcement plate is needed to prevent a connection design failure. The non-moment shear plate connection or welded moment connection welds to this reinforcement plate.
' No ' instructs connection design to not create an HSS column reinforcement plate. The connection may fail with the message " Slender col wall - not valid for a shear tab conn ."
Plate Design Settings: Use HSS column reinforcement plate ( Home > Project Settings > Job > Plate Design Settings )
End connection failure message (on the beam): Slender col wall - not valid for a shear tab conn
Connection design locks (on the beam): "
Connection Guide: Single-plate shear connection
Connection Guide: Welded moment connection
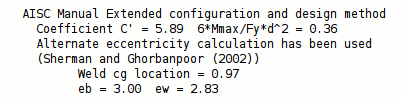
Use alternate eccentricity: Automatic or Yes or No . This " ![]() Connection specifications " option applies to "
Connection specifications " option applies to " ![]() Extend past flange " shear connections designed using an AISC " Connection design method ." Per the AISC 13th Edition , p 10-103 and AISC 14th Edition , p 10-104, "alternate considerations of the design eccentricity are acceptable when justified by rational analysis. For example, see Sherman and Ghorbanpoor (2002)."
Extend past flange " shear connections designed using an AISC " Connection design method ." Per the AISC 13th Edition , p 10-103 and AISC 14th Edition , p 10-104, "alternate considerations of the design eccentricity are acceptable when justified by rational analysis. For example, see Sherman and Ghorbanpoor (2002)."
|
The two connection design calculation reports notify you when the alternate eccentricity calculation has been used. |
' Automatic ' specifies that connection design apply a setup choice ( Home > Project Settings > Job > Design Settings > " Use alternate eccentricity for extended shear tabs ").
' Yes ' instructs connection design to use the alternate method prescribed by Sherman and Ghorbanpoor (2002) for calculating eccentricity. In the Connection Design Calculations or Expanded Calculations , you will get a note that the " Alternate eccentricity calculation has been used " or that the " Alternate eccentricity calculation is not applicable to this connection ."
' No ' instructs connection design to use the standard method for calculating eccentricity.
Check supporting member for axial load: If required or For supporting column or For supporting beam or never . The " Supporting member web stress " will be reported as a " Left/Right end limit state " when a " Tension load " has been applied to the supported beam's shear plate connection end. This option affects whether or not that limit state is incorporated as a check within connection design that can potentially cause the shear plate connection to fail.
' If required ' results in design calculations 265 and 264 being potential causes of connection failure when applicable. Design calculation 265 is applicable when the shear plate connection on this end of the supported beam has a " Tension load " applied to it and that shear plate welds to a supporting HSS column. Calculation 264 is applicable when the shear plate connection on this end of the supported beam (this beam) has a " Tension " load applied to it and the shear plate welds to a supporting HSS beam.
' For supporting column ' results in calculation 265 being a potential cause of connection failure in the design of the shear plate on this end of the supported beam (this beam) when that end has a " Tension load " applied to it and the shear plate welds to a supporting HSS column. Calculation 264 will not result in connection failure of a shear plate to an HSS beam, though the calculation will still be done, and a for-information-only note reporting the results of the calculation will be provided, when applicable, in both design calculations reports.
' For supporting beam ' results in calculation 264 being a potential cause of connection failure in the design of the shear plate on this end of the supported beam (this beam) when that end has a " Tension load " applied to it and the shear plate welds to an HSS beam. Calculation 265 will not result in connection failure of a shear plate to an HSS column, though the calculation will still be done, and a for-information-only note reporting the results of the calculation will be provided, when applicable, in both design calculations reports.
' Never ' results in calculations 265 and 264 still being performed, if applicable, but not ever causing the connection to fail. In the Connection Design Calculations or Expanded Connection Design Calculations , the results of the check will be reported with a parenthetical, for-information-only note such as " (Allowable local axial transverse force on the HSS wall: K1, (264) 8.7 kips ) " for a beam. For a column, the parenthetical note will be something like " (Allowable local longitudinal axial force on the HSS wall: K1, (265) 21.1 kips ) ."
End connection failure message: " HSS wall strength fails ."
Shear plate grade: Auto or user-entered . This " ![]() Connection specifications " option applies to shear plates and shear through plates, but not to shear tee connections. The option can be found on the Beam Edit window and at Home > Project Settings > Job > Connections > Auto Standard Connections and User Defined Connections .
Connection specifications " option applies to shear plates and shear through plates, but not to shear tee connections. The option can be found on the Beam Edit window and at Home > Project Settings > Job > Connections > Auto Standard Connections and User Defined Connections .
'
'
). Choices on the list box come from Home > Project Settings > Job > Plate Grades .
Embed plate location: Automatic or Inside wall or Outside wall . This " ![]() Connection specifications " option applies when a beam frames to a concrete wall and the beam's " Input connection type " is ' Shear ' and an " Embed schedule entry " has been made. The option can be found on the Beam Edit window and at Home > Project Settings > Job > Connections > Auto Standard Connections and User Defined Connections .
Connection specifications " option applies when a beam frames to a concrete wall and the beam's " Input connection type " is ' Shear ' and an " Embed schedule entry " has been made. The option can be found on the Beam Edit window and at Home > Project Settings > Job > Connections > Auto Standard Connections and User Defined Connections .
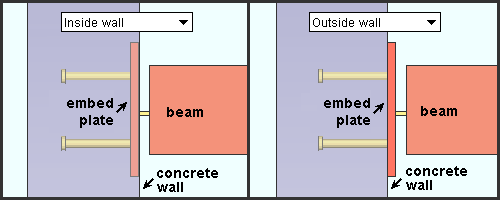
|
| If you have a concrete license , you can also get a shear plate connection to an embed plate mounted inside or flat to a tilt-up panel . |
' Automatic ' specifies that the choice made to Concrete Setup > Embed Schedule > " Plate location " sets whether the plate is located inside the concrete wall or flat to the surface of the wall.
' Inside wall ' embeds the plate in the concrete wall .
' Outside wall ' locates the plate flat to the wall.
Bevel shear plate as required: Automatic or Yes or No .
|

' Automatic ' specifies that connection design apply a setup choice ( Home > Project Settings > Fabricator > Standard Fabricator Connections > Shear Plate Settings > " Bevel shear plate as required ").
' Yes ' configures connection design to bevel the shear plate when 5/16 - 3/8 thick plate is greater than 30° and less than 45° from perpendicular. 1/2 thick plates are beveled when the plate is greater than 22° and less than or equal to 45° from perpendicular.
' No ' instructs connection design to not bevel the shear plate.
Also see: Bevel precision ( Home > Project Settings > Fabricator > Standard Fabricator Connections > Shear Plate Settings ).
Connection design locks for shear connections :
Connection design locks for shear connections may appear, under a leaf with one of the below-listed names, on the Beam Edit window, or on a Connection Component window. For one special situation, noted below, you can find such locks on the Vertical Brace Edit window. They may also appear on the User Defined Connections window.
| Connection Design Locks
(" Input connection type " = ' Shear ') |
|
| Leaf Name | Situation |
| Shear Tee (W tee) | This leaf appears when " W tee " material is selected. |
| Shear Tab (plate) | " Plate " material is selected. |
| Paddle Plate for HSS Beam |
" |
| Stability Plate
(bm to col wb) |
Locks under this leaf allow you to specify top/ bottom stability plates for a shear tab (' Plate ') to a column web. |
| Safety Seat |
May be applied for non-moment shear plates or tees in beam-to-column framing situations. Under " |
| Shear Tab
(vertical brace) |
For field bolting a vertical brace gusset plate to a column for a vertical brace to beam & column when the beam has an shear plate. |
| Shear Through Plate On | " Through shear plate " is set to ' Through plate ' or ' Split plate ' for a beam framing to an HSS column. |
| Top Moment Plate Bottom Moment Plate | Bolted moment flange plates are specified. The " Connection material " is ' Plate '. |
| Top Moment Angle Bottom Moment Angle |
Under " |
| Moment Cap Plate | A beam with a welded moment connection to the top of a column flange. The moment cap plate shop welds to the column. |
| Column Web Doublers & Column Flange Stiffeners |
The boxes for " Design for doublers " and/or " Design for stiffeners " are checked on the Beam Edit window, " |
| Column Reinf Plate | " Use HSS column reinforcement plate " is set to ' Yes ' or ' Automatic '. The beam connection can be a simple single-plate shear connection or a welded moment connection. The HSS rectangular column must have a thin wall. |

