 Add Deck Support ( Modeling ) (a custom component )
Tool summary :
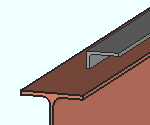
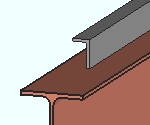
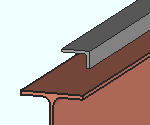
- Adds deck support material to the top flange of a beam.
YouTube video: Deck Support .
(Recorded in SDS2 Detailing , v2020i) - Break points can be added automatically around beams or joist members, manually around chosen points, both, or none.
- The component includes templates that help to ensure that the deck support will be properly called out and dimensioned on the beam member detail. These templates are applied whenever the "
 Detail using template " option is checked in the member's saved detailing settings .
- The Add Deck Support tool can be found in Modeling in the " Command group " called ' Component ' in Toolbar Configuration or in the Ribbon Editor . It is available at no additional cost to SDS2 software users whose support accounts are current. For more information, contact your SDS2 sales representative.

- Default settings can be set up for the window shown above. See Home > Project Settings > Job > Component Plugin Defaults > Component Plugin Setup .
- On this page, see to add and to edit or delete the custom component .
page 1 | contents | model > component > add > | toolbox
To add the Deck Support custom component :
1 . In Modeling , select a beam to add the component to.
2 . Invoke Add Component .
3 . On the custom component selection list, choose " Deck Support. "
4 . The Selection Method window opens. Press the appropriate button to select a method for adding break points to your deck support. A break point is a location at which the deck support component is divided into separate deck supports.
' Beam/Joist members ' allows you to select beams or joists. This adds break points where the member intersects the beam that you selected in step 1.
' Points ' allows you to select points by left-clicking with your mouse.
' Both ' instructs the program to prompt you to select beams or joists and then points.
' None ' prevents the program from prompting you to add break points. (You can later add break points to the Deck Support edit window by clicking the " Add Point " button, if you wish.)
5 (a possibility) . You are prompted to select break points (unless you selected ' None ' as the selection method.) Depending on your choice on the Selection Method window, you may be prompted to...
"Select member(s) for decking supports." To add break points to the decking support component, left-click ( Select ) joists or beams that intersect the beam that you selected in step 1. You can hold down the Shift key and left-click to select multiple members or, alternatively, select them with an area box . When you are finished, right-click ( Menu ) and select " OK " from the context menu.
"Select decking support POINT locations." Left click ( Locate ) to select break points. When you are finished, right-click ( Return ) to accept the points.
7 . The Deck Support edit window opens. Select a section size, welds, etc. for the deck support(s), then press " OK ."
8 . If User and Site Options > Modeling > " Automatically process after modeling operation " is set to ' Process and create solids ', the deck support(s) will be generated immediately. If not, they will be generated the next time that the member undergoes Process and Create Solids .
- If you use in-tool selection -- that is, select the member after launching this tool or after selecting " Deck Support " as the component you want to add -- only beams will be selectable.
page 1 | contents | model > component > add > | toolbox
To edit or delete the Deck Support custom component :
- To edit a Deck Support component , you can double-click one of its materials (to open the Deck Support edit window), or you can open its Beam Edit window and change the settings in the section that is named [ Deck Support ]. The support(s) will be regenerated automatically when the editing is complete if the appropriate choice has been made to User and Site Options > Modeling > " Automatically process after modeling operations ." The Component Selection Tool can also be used to edit (and find) custom components. Note that the " Selection filter " must be set to ' Default ' or ' All ' or ' Custom Components '' in order for you to use the double-click method of editing.
page 1 | contents | model > component > add > | toolbox
------  Graphical ------
VIDEO 
With respect to " A Deck Support component is automatically set to "
Instead of allowing the component to be made "
page 1 | contents | model > component > add > | toolbox
------ Point/analyzed member data ------
Left End Distance: The distance (in the primary dimension " Units " or other units ) from the left end of the beam to a break point. A break point is a location at which the deck support component is divided into separate deck supports.
Angle: read only . If, during break point selection, the type chosen was " Beam/joist members ," this is the angle of a chosen member at that break point to the beam on which deck supports are placed.
![]() adds a row to the Point/analyzed member data table to which you can specify a " Left End Distance " for a new break point.
adds a row to the Point/analyzed member data table to which you can specify a " Left End Distance " for a new break point.
![]() removes all rows from the Point/analyzed member data table, and thus all break points. This results in a single deck support. Click this button if you want a single continuous deck support.
removes all rows from the Point/analyzed member data table, and thus all break points. This results in a single deck support. Click this button if you want a single continuous deck support.
page 1 | contents | model > component > add > | toolbox
------ General settings ------
General
Section size: The deck support's main material (e.g., ' L2x2x1/8 '). Only materials listed in the local shape file can be specified here.
To enter a section size: You can type in the section size that you want, or you can press the "file cabinet" browse button (
) and double-click any section that is on the list of available materials in the local shape file . Validation only lets you enter a material that is listed in the local shape file and that is either a wide flange, angle, channel or HSS/TS.
Toe direction: In or Out . This applies when the support is angle or channel material.
|
|

' In ' points the toe of the angle (or toes of the channel) down in a plan view (toward the right if the work line of the beam is vertical in a plan view). It points the leg (or toes) toward you if you are facing the near side of the material in an elevation view.
' Out ' points the leg (or toes) up in a plan view (toward the left if the work line of the beam is vertical in a plan view). It points the leg of the angle (toes of the channel) away from you if you are facing the near side of the material in an elevation view.
Material grade: A36 or A572 or etc . The " Steel grade " of the W, L, C or HSS/TS material that the support is made of.
Setup: If the grade of steel you want is not shown on the list box (
), you can use Home > Project Settings > Job > Material Grades and add it to the Wide Flange , Angle , Channel , or HSS/TS Grades list.
Material long leg/side direction: Vertical or Horizontal . This applies if the " Section Size " if the support material is an angle whose legs are of unequal length. Otherwise, this field will be disabled ( grayed out ).
|
|
' Vertical ' positions the long leg of the angle is aligned vertically.
' Horizontal ' positions the long leg of the angle extends horizontally, parallel to the beam.
Setbacks
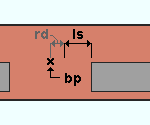
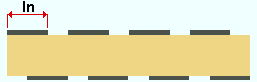
Left setback from point: The distance (in the primary dimension " Units " or other units ) by which supports are offset from break points on their left ends, exclusive of the " Round down " distance. The left end of a support is the one that is towards the left end of the beam on which the support is placed. Possibly, the left end may be further set back by the " Round down " distance.
|
ls = " Left setback from point "
rd = " Round down to nearest " bp = support break point. |
Right setback from point: The distance (in the primary dimension " Units " or other units ) by which supports are offset from break points on their right ends, exclusive of the " Round down " distance. The right end of a support is the one that is opposite the left end of the beam on which the support is placed.

|
rs = " Left setback from point "
bp = support break point. |
Additional options
Minimum support length: A length (in the primary dimension " Units " or other units ). Supports that are shorter than this length are not generated.
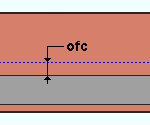
Offset from centerline: A positive (+) or negative (-) distance (in the primary dimension " Units " or other units ) by which the support material will be offset from the beam's work line. A positive distance moves the material down in a plan view if the beam is horizontal, and toward the right if the work line of the beam is vertical in a plan view. When ' 0 ' is entered, the support material is not offset.
|
|

Round down to nearest: The distance (in the primary dimension " Units " or other units ) that you want supports to be rounded down to. Entering ' 1/8 ', for example, rounds the length of supports down to the nearest 1/8" as required. Entering ' 0 ' results in no rounding. Any reduction of length is applied to a support's left end -- that is, the one that is towards the left end of the beam on which the support is placed.
Add left end support material: ![]() or
or ![]() . This applies if the deck support component has at least one break point.
. This applies if the deck support component has at least one break point.
|
|


If this box is checked (
If the box is not checked (
), the leftmost deck support material is not generated.
Add right end support material: ![]() or
or ![]() . This applies if the deck support component has at least one break point.
. This applies if the deck support component has at least one break point.
|
|
If this box is checked (
If the box is not checked (
page 1 | contents | model > component > add > | toolbox
------ Weld ------
If this box is checked (
If the box is not checked (
Weld type: Fillet . This applies when " ![]() Add weld " is checked, and sets the " Weld type " on the Weld Edit window in Modeling as well as the " Weld type " for the weld symbol on the member detail.
Add weld " is checked, and sets the " Weld type " on the Weld Edit window in Modeling as well as the " Weld type " for the weld symbol on the member detail.
| symbol | name | weld used for... |
|
|
fillet | General welding of material. |
Weld size: A distance (in the primary dimension " Units " or other units ) that indicates depth of preparation, size or strength of the weld. This sets the " Weld size " on the Weld Edit window in Modeling as well as the " Weld size " for the weld symbol on the beam detail.
Arrow side (options are available when " ![]() Add weld " is checked.)
Add weld " is checked.)
If this box is checked (
If the box is not checked (
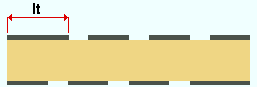
Length: A distance (in the primary dimension " Units " or other units ) that defines the length of each weld segment in a stitch weld. This applies when the arrow side " ![]() Stitch weld " is checked.
Stitch weld " is checked.
|
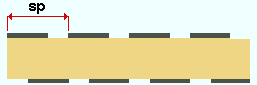
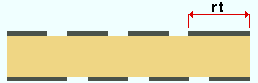
Spacing: The distance (in the primary dimension " Units " or other units ) from the beginning of one weld segment to the beginning of the next weld segment. This applies when the arrow side " ![]() Stitch weld " is checked.
Stitch weld " is checked.
|
Left termination: The weld length (in the primary dimension " Units " or other units ) of the weld segment at the left end of a stitch weld. This applies when the arrow side stitch " ![]() Stitch weld " is checked.
Stitch weld " is checked.
|
Right termination: The weld length (in the primary dimension " Units " or other units ) of the weld segment at the right end of a stitch weld. This applies when the arrow side stitch " ![]() Stitch weld " is checked.
Stitch weld " is checked.
|
Other side (options are available when other side " ![]() Add weld " is checked.)
Add weld " is checked.)
Stitch: ' ![]() None ' or '
None ' or ' ![]() Independent ' or '
Independent ' or ' ![]() Opposite ' or '
Opposite ' or ' ![]() Offset '
Offset '
' None '
 |
' Opposite '
 |
' Offset '
 |
'
None ' results in a continuous weld (not a stitch weld).
'
'
'
Length: A distance (in the primary dimension " Units " or other units ) that defines the length of each weld segment in a stitch weld. This applies when the other side " ![]() Stitch weld " is checked, and when it is '
Stitch weld " is checked, and when it is ' ![]() Independent .'
Independent .'
Spacing: The distance (in the primary dimension " Units " or other units ) from the beginning of one weld segment to the beginning of the next weld segment. This applies when the other side " ![]() Stitch weld " is checked, and when it is '
Stitch weld " is checked, and when it is ' ![]() Independent .'
Independent .'
Left termination: The weld length (in the primary dimension " Units " or other units ) of the weld segment at the left end of a stitch weld. This applies when the other side " ![]() Stitch weld " is checked, and when it is '
Stitch weld " is checked, and when it is ' ![]() Independent .'
Independent .'
Right termination: The weld length (in the primary dimension " Units " or other units ) of the weld segment at the right end of a stitch weld. This applies when the other side " ![]() Stitch weld " is checked, and when it is '
Stitch weld " is checked, and when it is ' ![]() Independent .'
Independent .'