v2021 & v2021i Enhancements
SDS2 v2021 & v2021i
v2021 Enhancements:
- Home replaces the Main Menu
- The new ribbon interface for Modeling and Drawing Editor
- Seismic bolted or welded moment connections
- Connections to cruciform columns
- Column to user base/cap plate welds
- Split shear through plates
- New horizontal brace connection specifications
- Flush framed joist connections
- New auto bolt setup options
- New Utility Functions
- End connection fail messages
v2021i Enhancements:
- Point clouds (beta)
- Drawing Editor lighting interface
- Ribbon contextual pages are now user-configurable
- Modes are configurable in the lightning interface
Home replaces the Main Menu as the dashboard for SDS2 :
- The name of your current Job (project) and Fabricator (setup file) is shown in the upper, left corner of Home . You can click the jobname to change to a different Job or create a new one . You can click the fabname to change to a different Fabricator or create a new one .

jobname 
fabname 
reponame 
"jobname" stands for your active Job (project). "fabname" stands for your active Fabricator . "reponame" stands for the name of the Job repository in which your active Job ("jobname") is stored. These names are also buttons. - Modeling and the Drawing Editor can be launched at Home .
Launch Modeling 


Launch Drawing Editor
- Modeling and the Drawing Editor can be launched at Home .
- Home > Project Settings replaces what was called " Job and Fabricator Setup " on the pre-v2021 Main Menu . To, for example, access the Design Settings window, you can choose Home > Project Settings > Job > Design > Design Settings .
- A project settings Search is another way to find setup windows. Instead of choosing Home > ... > Design Settings , you can type "design settings" to Search then click the appropriate result that search finds. Since Design Settings was called Design Criteria in earlier SDS2 versions, you can type "design criteria" to Search in order to accomplish the same. You can also accomplish the same by typing "connection design method" or the name of any other options that are found on the Design Settings window.
- Home > Reports gives you control over the output and, in some cases, the configuration of reports.
- In this tab and other tabs, the most-powerful or most-used tools are represented with icons at the top of the tab.

" ABM Report " opens the same ABM Report window. 
" Connection Design Calculations " can output Expanded Calculations or Design Calculations . 
" Generate Report " can output any report created with Report Writer .

" Create Report Template " starts up Report Writer with a blank, untitled report.
- In this tab and other tabs, the most-powerful or most-used tools are represented with icons at the top of the tab.
- Home > Import gives you one-stop control over imports to SDS2.
- Import Model is the new name for what, in previous versions, was called Design Link .
- Setup windows for imports such as Drawing Import Settings are opened by clicking the gear (
 ) next to Home > Import > 2D > As Reference Drawing or Home > Import > 2D > As Job Standard .
- Home > Export provides a one-stop location for the export of 2D drawings, 3D models and MRP information.
- Setup windows such as EJE Setup and FabTrol Setup and Kiss Export Setup and P2 Setup are opened by clicking the gear ( ) next to the "export name" that outputs the export. In other words, report output and setup are at the same location.
- Setup windows such as EJE Setup and FabTrol Setup and Kiss Export Setup and P2 Setup are opened by clicking the gear (
- Home > Utilities provides functions that are, for the most part, for manipulating data files that are maintained in your current Job.
- Most Home > Utilities > Utility Functions and Shapes Properties can only be accessed only from Home . Shapes Properties is the new name for the Material file editor .
- Verify and Fix and Shapes Properties are opened with icons at the top of the tab.
- Member attributes can be input using Update Attributes , which was formerly called Update Status . You can also update members using Member Edit . Both are icons at the top of the Home > Utilities tab.
- User and Site Options -- unlike other Home > Utilities -- can apply to any Job, not just your current Job. Also, if you make choices to these options from Home , you very often have to restart Modeling or the Drawing Editor to see the changed settings configure the user interface of those programs.
- " Customize Interface " also can apply to any Job, not just your current Job. It opens a dialog from which you can select a role configuration file to customize. Roles are per-user files that configure keyboard shortcuts, ribbon layout, and context menus.
Seismic bolted or welded moment connections :
- "
 Seismic " is a new leaf on the Beam Edit window. A beam-to-column-flange seismic moment connection can be designed when:
- Beam Edit > " Seismic " > " Seismic moment frame member " is set to ' Yes ' or, possibly, to ' Automatic '.
- Beam Edit > " Seismic " > " Seismic moment frame type " is set to ' OMF ' or ' IMF ' or ' SMF ' or, possibly, to ' Automatic '.
- The beam's left- and/or right-end " Moment " > " Moment type " is ' Bolted ' or ' Welded '.
- Beam Edit > "
- ' SMF ' or ' IMF ' seismic moment connections can be designed when the " Connection design method " is any LRFD edition. ' OMF ' seismic moment connections can be designed for LRFD and ASD editions.
- Beam Edit > " Loads " > " Panel zone moment load " controls the design of seismic moment connection column web doublers. " Seismic " > " Uniformly distributed gravity load " affects the "
 Auto " calculation of the " Panel zone moment load " for the end(s) of this beam that have an ' IMF ' or ' SMF ' welded or bolted seismic moment connection.
- Connection failure messages for beam-to-column-flange seismic moment connections:
Connections to cruciform columns :
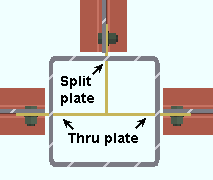
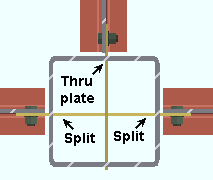
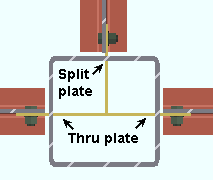
Split shear through plates :
- You can now set which shear plates are split when beams with through plates frame perpendicular to other beams with thru plates.
- Shear connection " Connection specifications " > " Through shear plate " used to be an on/off ( /
 ) option. Now its choice of settings are ' No ' or ' Through plate ' or ' Split plate '.
- The following illustrations demonstrate how these settings work:
|
The top beam is set to ' Split plate '. The left and right beams are each set to ' Through plate '. |
|
The top beam is set to ' Through plate '. The left and right beams are each set to ' Split plate '. |
- Weld split plate to through plate is an ' Automatic ' or ' Yes ' or ' No ' option in " Connection specifications ."
' Yes '
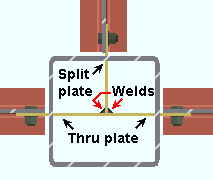
' No '
- Connection failure messages for through plates and split through plates:
New horizontal brace connection specifications :
New options under " ![]() Connection specifications " give you control over whether connection components for a horizontal brace with a clip angle are shipped with the beam or brace. The clip angle only can be shipped with the beam. Or the clip angle and gusset can be shipped with the beam. Or the clip angle and gusset can be shipped with the brace. These new connection specification options are:
Connection specifications " give you control over whether connection components for a horizontal brace with a clip angle are shipped with the beam or brace. The clip angle only can be shipped with the beam. Or the clip angle and gusset can be shipped with the beam. Or the clip angle and gusset can be shipped with the brace. These new connection specification options are:
- Beam to clip connection (' Welded ' or ' Bolted ')
- Attach clip to (' On gusset ' or ' On supporting ')
- Attach gusset to (' On brace ' or ' On supporting ')
- Related end connection failure messages:
- Home > Project Settings > Fabricator > Member Detailing Settings >
- the " Horizontal Braces: Clip angle of gusset " section > " Beam to clip connection "
- the " Horizontal Braces: Clip angle of gusset " section > " Attach clip to "
- the " Horizontal Braces: Clip angle of gusset " section > " Attach gusset to "
Column to user base/cap plate welds :
- Each line on the User Base/Cap Plate Schedule now has a " Weld ... " button, which opens an instance of the Base / Cap Plate Weld Options window. That instance is for the one line only, and it lets you configure the weld pattern to be applied when the particular column plate from that line on the schedule is used in the model.
- Different weld patterns can be specified when a particular line in the User Base/Cap Plate Schedule is used as a cap plate opposed to a base plate. To set different patterns for cap plates and base plates, " Use the same options for base and cap plates " needs to be unchecked, and the settings applied under the "' Base Plate Welds " and " Cap Plate Welds " sections need to be different.
- Settings on Base / Cap Plate Weld Options window will be applied as specified for a particular column in the model when:
- The " Input connection type " is ' User base/cap plt ', and the appropriate " Plate schedule number " is entered to one or both ends of that column.
- In "
 Connection specifications " for the appropriate end of that column, " Weld all around " and " Flange welds " and " Web welds " and " Seal welds " are each set to ' Automatic '.
- The Base / Cap Plate Weld Options window permits the application of " Column flange preps " when " Flange welds " are set to ' Bevel Groove '.
- When the weld " Type " set on the Base / Cap Plate Weld Options window for flange welds or web welds is ' Square groove ', the column " Material setback " sets the root opening of the weld to be one half the wall thickness of an HSS rectangular column, or one half the flange or web thickness of a wide flange column.
- Fillet weld sizes applied on the Base / Cap Plate Weld Options window are permitted to be less than the " Minimum for job " and greater than the " Maximum for non strength connections ."
- Choice made in Base / Cap Plate Weld Options can be overridden using the user base/cap plate " Connection specifications " named Weld all around " and " Flange welds " and " Web welds " and " Seal welds ." However, the welds specified in " Connection specifications " will always be fillet welds whose size is greater than or equal to the " Minimum for job " and less than or equal to the " Maximum for non strength connections ."
- Not new is the ability to override choices made in " Connection specifications " using " Column Plate Welds " locks.
Flush framed joist connections :
| YouTube video: Flush Framed Joists. |
- 'Flush framed shear' is a new " Input type connection " for the Joist Edit window. The new connection type can also be selected at Home > Project Settings > Job > Connections > Auto Standard Connections and User Defined Connections .
- Note: If ' Vulcraft ' is not the " Joist manufacturer ," you will have to " Force " the connection to get a flush framed shear connection.
- Vulcraft CJ series joists are typically used with the ' Flush framed shear ' connection type. However, using a CJ series joist as your " Section size " is not a requirement. Connection design can create a flushed frame joist for other series.
- Joists with flush framed connections do not have shoes. Joists with bearing or seated connections are designed with shoes.

Input by Top of Joist Elevation
- Note: If ' Vulcraft ' is not the " Joist manufacturer ," you will have to "
- To get a ' Flush framed shear ' joist-to-beam end connection, the top of the joist must be at the same elevation as the supporting beam. When locating points for Member Add Joist , use the Input by Top of Joist Elevation modifier.
- The ' Flush framed shear ' input connection type can also be used when a joist frames to a column.
- Setup for flush framed shear plates:
- Home > Project Settings > Job > Modeling > Joist Manufacturers > set " Joist manufacturer " to ' Vulcraft '.
- If ' Vulcraft ' is not available to be selected as the " Joist manufacturer ," use the Joist Manufacturer Manager utility to add the manufacturer to your current Job.
- When ' Vulcraft ' is the " Joist manufacturer ," the Shapes Properties section in the local shape file that is named " Joist: Nucor-Vulcraft " will populate the " Section size " selection list that opens when you press the
 button on the Joist Edit window.
- Vulcraft CJ series joists can be found in the " Joist: Nucor-Vulcraft " section of the local shape file.
- Home > Project Settings > Fabricator > Standard Fabricator Connections > Shear Plate Settings has options that apply to joist shear plate connections as well as beam shear plate connections.
- Home > Project Settings > Fabricator > Standard Fabricator Connections > Joist Connection Settings .
- Home > Project Settings > Job > Modeling > Joist Manufacturers > set " Joist manufacturer " to ' Vulcraft '.
- " Connection specifications " for joist shear plate connections are similar to those for beam shear plates:
- Connection design locks can be used, in Modeling , to make adjustments to a flush framed joist connection's initial design:
Leaf Name Situation Knife Plate The flush framed shear connection bolts to the joist's knife plate. Shear Tab Joist to a beam or column. Tab Clips and Copes Joist to a beam or column. Stability Plate Joist to a column web. - Flush framed joist connection failure messages:
- Flush framed joist connection only valid for Vulcraft joists
- Flush framed joist elevation not at supporting beam top of steel
- Shear or knife plates clash with bottom extension plate/angle
- Joist bottom extension stabilizer won't fit in supporting beam web (also for bearing connections)
- User top chord setback less than minimum required
- Shear plate connection failure messages that now also apply to joists:
- Required bolt dia is greater than maximum available
- Design valid only for A325 or F1852 bolts
- Invalid bolt edge distance
- Invalid bolt row-column combination
- Maximum number of bolt rows exceeded
- Connection will not fit in beam
- Invalid bolt spacing
- Minimum weld metal ten. strength is 70 ksi; 483 MPa
- Minimum weld metal tensile strength is 490 MPa
- User slot length is longer than maximum allowed
- Weld strength to supporting member exceeded
- Invalid weld configuration
- Home > Project Settings > Job > Bolts, Washers, and Holes > Bolt Settings has several new options for setting " Auto " bolt diameters for connections.
- A default bolt type and diameter can be set -- under " CJ joist bolts " -- for CJ series joists with bearing connections or seated connections. CJ series joists are a type of Vulcraft joist.
- For any joist series, including CJ series joists, the default auto bolt type and diameter for joist flush framed shear or clip angle connections is set under " Flush framed joist connections ."
- For vertical brace or horizontal brace HSS welded connections with erection bolts, the default auto type and diameter of those erection bolts is set under " HSS welded brace erector bolts ."
New Utility Functions :
- Related to the new lightning interface:
- Home > Utilities > Utility Functions > General > Convert Classic Keyboard, Shortcut, and Modes
- Home > Utilities > Utility Functions > Delete > Delete Role Configurations
- Home > Utilities > Utility Functions > Delete > Delete Keyboard Shortcuts
- Home > Utilities > Utility Functions > Delete > Delete Context Menus
End connection fail messages (in addition to those listed elsewhere on this page) :
Point clouds (v2021i) :
- The Point Cloud Manager lets you import E57 formatted point cloud files into the 3D model. You can then move, color, delete, or toggle the visibility of the scans within imported point cloud groups.
Ribbon contextual pages are now use-configurable (v2021i) :
- In the following example of the ' Layout ' contextual page of the Modeling ribbon, some pictorial icons were made into textual icons.

- You can add icons to a contextual page, but not widgets. Widgets are fixed features of a ribbon contextual page. In the above example, widgets are shown in the ' Tools ' section of the page.
Modes are configurable in the lightning interface (v2021i) :
- Each mode configuration is stored in a mode configuration file, which can be used in one or multiple roles . In the example below, the mode configuration file is named my_favorite_tools . You can change the mode configuration file using Customize Interface .
| Mode configuration: |
|
|
|

