Member and Material Piecemarking
- General Overview
- Tips and Tricks
- Related Tools

Main Member
Break major marks apart by: Not Broken or Field Bolts or Sequence or Zone or Individual member. Piecemarks are assigned to members during Create Solids. This applies to system piecemarks. User piecemarks are not combined or broken apart.
Not Broken instructs piecemarking to assign the same member piecemark to identical members that have different field bolts or are in different sequences or in different zones. Exceptions: See note 1 and note 2 (below) for exceptions that cause piecemarking to break apart the piecemarks anyway.
Field Bolts instructs piecemarking to assign different member piecemarks to members that have different field bolts even if those members are otherwise exactly the same. If field bolts are Summarized in the member bill of material, both the Unit Quantity and Total Quantity are reported (and multiplying the unit quantity by the number of members with that mark gives you the total quantity).
Sequence instructs piecemarking to assign different member piecemarks to members in different sequences even if those members are otherwise exactly the same.
Zone instructs piecemarking to assign different member piecemarks to members in different zones even if those members are otherwise exactly the same. A zone is a combination of sequences. Which sequences are assigned to which zone are defined on the Zone and Sequence window.
Individual member instructs piecemarking to assign each member a unique member piecemark (B_1 or B_2 or B_3 or etc.) so that the member can be tracked individually. This results in each member being limited to a quantity of 1. Certain highly regulated and meticulously engineered construction projects such as nuclear power plants require structural members to be tracked individually through various phases of manufacturing, erection, and beyond.
Note 1: If Break submaterial marks apart by sequence is checked, member piecemarks are automatically broken apart by sequence regardless of the choice you make here.
Note 2: If Break submaterial marks apart by zone is checked, member piecemarks are automatically broken apart by zone regardless of the choice you make here.
Note 3: If you have set Break major marks apart by to Sequence or to Zone, some members may be assigned new piecemarks as you change their sequences.
Tip: The
Use to split piecemarks option is available to break apart a member piecemark based on an entry that you can make to Edit Properties for a member.
Report Writer: Member.PiecemarkHashwoZoneSequence returns the same hash number for piecemarks that are different only due to sequence or zone.
Use member mark for member main material in shop bill: ![]() or
or ![]() . The choice made here affects the details of members -- except stairs and group members -- whose piecemarks you select when you Detail Members.
. The choice made here affects the details of members -- except stairs and group members -- whose piecemarks you select when you Detail Members.
If this box is checked (
If the box is not checked (
), the main material is identified by a submaterial mark as shown below:
Tip: You don't need to check this box if you have already checked the box for
Also see:
Use member mark for member main material in shop bill of stair member details (a similar option, but for stairs)
Use member mark for member main material in shop bill of group member details (a similar option, but for group members)
Show submaterial mark for main material on beam member details: ![]() or
or ![]() . This applies when you Detail a beam and the box is checked for Use member mark for member material in shop bill.
. This applies when you Detail a beam and the box is checked for Use member mark for member material in shop bill.
|
If this box is checked (
is always turned on when this option is enabled, the main material's submaterial mark will be referenced only on the drawing, not in the bill of material. If the box is not checked (
Show submaterial mark for main material on column member details: ![]() or
or ![]() . This applies when you Detail a column member and the box is checked for Use member mark for member material in shop bill.
. This applies when you Detail a column member and the box is checked for Use member mark for member material in shop bill.
|


If this box is checked (
is always turned on when this option is enabled, the main material's submaterial mark will be referenced only on the drawing, not in the bill of material. If the box is not checked (
Show submaterial mark for main material on vertical brace member details: ![]() or
or ![]() . This applies when you Detail a vertical brace member and the box is checked for Use member mark for member material in shop bill.
. This applies when you Detail a vertical brace member and the box is checked for Use member mark for member material in shop bill.
|
If this box is checked (
is always turned on when this option is enabled, the main material's submaterial mark will be referenced only on the drawing, not in the bill of material. If the box is not checked (
Show submaterial mark for main material on horizontal brace member details: ![]() or
or ![]() . This applies when you Detail a horizontal brace member and the box is checked for Use member mark for member material in shop bill.
. This applies when you Detail a horizontal brace member and the box is checked for Use member mark for member material in shop bill.
|
If this box is checked (
If the box is not checked (
Show submaterial mark for main material on miscellaneous member details: ![]() or
or ![]() . This applies when you Detail a miscellaneous member and the box is checked for Use member mark for member material in shop bill.
. This applies when you Detail a miscellaneous member and the box is checked for Use member mark for member material in shop bill.
|
If this box is checked (
If the box is not checked (
Use member mark for member main material in shop bill of stair member details: ![]() or
or ![]() . The choice made here affects the details of stairs whose piecemarks you select when you Detail Members.
. The choice made here affects the details of stairs whose piecemarks you select when you Detail Members.
If this box is checked (
If the box is not checked (

Stair main materials: A stair can have as many as 6 main materials. At minimum, the NS stringer and FS stringer will each be a main material. If the stair has NS and FS top returns and NS and FS bottom returns, those are also main materials.
Tip: You don't need to check this box if you have already checked the box for
Also see:
Use member mark for member main material in shop bill (a similar option, but for member types other than stairs and group members)
Use member mark for member main material in shop bill of group member details (a similar option, but for group members)
Show submaterial mark for main material on stair member details: ![]() or
or ![]() .
.
|
If this box is checked (
If the box is not checked (
Use member mark for member main material in model: ![]() or
or ![]() . This affects the naming of submaterial marks that are assigned to member main materials.
. This affects the naming of submaterial marks that are assigned to member main materials.
If this box is checked (
The two main materials of double-angle braces or stairs are given the designation L for the left angle, R for the right angle (e.g., HB_28L and HB_28R for a brace; S_12R and S_12S for a stair).
For welded plate wide flange (3 main materials) or welded plate box material (4 main materials), if
is not checked for a beam or a column or vertical brace, each main material is named for the member piecemark followed by T or B or R or L for the plate's position. Also see: To name a member, piecemarking applies the appropriate Member Piecemark Prefix found in Home > Project Settings > Fabricator > Piecemarking > Member Descriptions.
If the box is not checked (
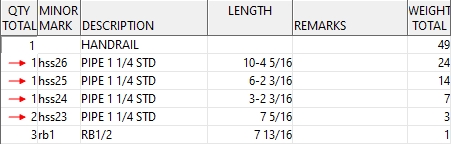
Show linear measure for handrail in shop bill: ![]() or
or ![]() .
.
If this box is checked (
If the box is not checked (
Show linear measure for rails: ![]() or
or ![]() . The choice made here affects the bills of material of handrail members whose piecemarks you select when you Detail Members.
. The choice made here affects the bills of material of handrail members whose piecemarks you select when you Detail Members.
|
|
|
|
|
|
| Note: (6 x 3-3) + 9-6 7/8 = 29-0 7/8 |
If this box is checked (
If the box is not checked (
Note: A top rail material Type can be Angle or Flat Bar or Pipe or Tube.
Show linear measure for posts: ![]() or
or ![]() . The choice made here affects the bills of material of handrail members whose piecemarks you select when you Detail Members.
. The choice made here affects the bills of material of handrail members whose piecemarks you select when you Detail Members.
|
|
|
|
|
|
| Note: (2 x 3-3 1/2) + (2 x 3-5 1/2) = 13-6 |
If this box is checked (
If the box is not checked (
Show linear measure for elbows: ![]() or
or ![]() . The choice made here affects the bills of material of handrail members whose piecemarks you select when you Detail Members.
. The choice made here affects the bills of material of handrail members whose piecemarks you select when you Detail Members.
|
|
|
|
|
|
| Note: 2 x 5 9/16 = 11 1/8 |
If this box is checked (
If the box is not checked (
Show linear measure for grab bars:  or
or ![]() .
.
|
|

|
|
|
|
If this box is checked (
If the box is not checked (
Show submaterial mark for posts on handrail member details: or ![]() . The choice made here affects the details of handrail members whose piecemarks you select when you Detail Members.
. The choice made here affects the details of handrail members whose piecemarks you select when you Detail Members.
|
If this box is checked (
If the box is not checked (
Show submaterial mark for rails on handrail member details: ![]() or
or ![]() . The choice made here affects the details of handrail members whose piecemarks you select when you Detail Members.
. The choice made here affects the details of handrail members whose piecemarks you select when you Detail Members.
|
If this box is checked (
If the box is not checked (
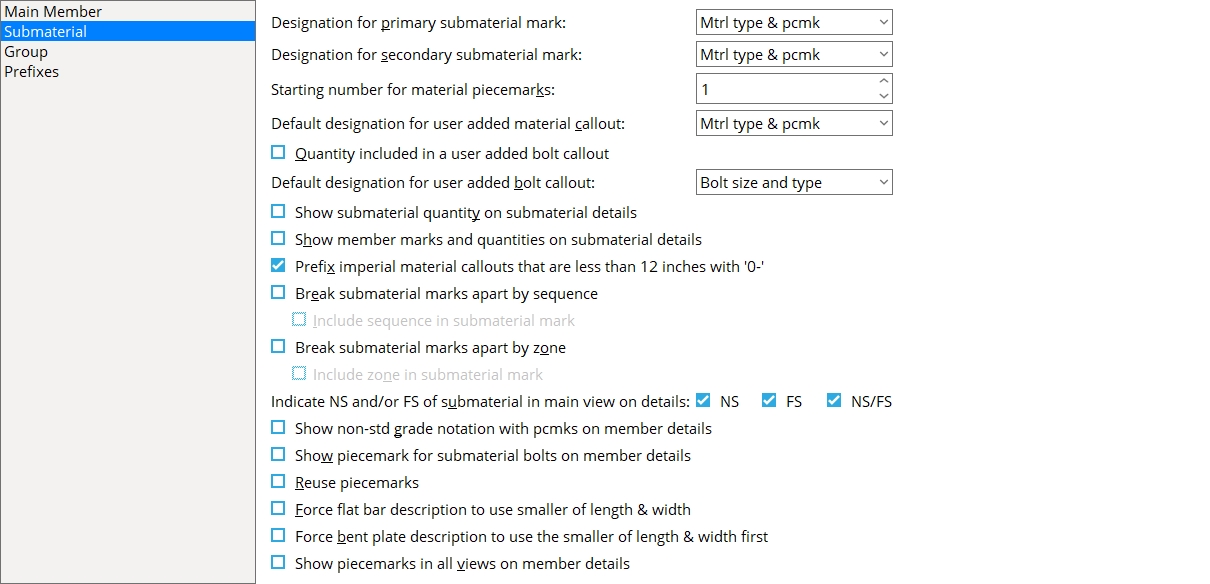
Submaterial
Designation for primary submaterial mark: Pcmk only or Mtrl type & pcmk or Mtrl type, size & pcmk. This applies to the details of members whose piecemarks you select when you Detail Members.
|
If Pcmk only is selected, then the submaterial mark will be listed on automatically detailed member details along with the quantity (e.g., 2 - a17).
If Mtrl type & pcmk is selected, then the material type will be listed on automatically detailed member details along with the quantity and the submaterial mark (e.g., 2 - L a17).
If Mtrl type, size & pcmk is selected, then the size of the material will be listed along with the quantity, material type, and piecemark (e.g., 2 - L3x3x1/4x9 a17).
Designation for secondary submaterial mark: Pcmk only or Mtrl type & pcmk or Mtrl type, size & pcmk. The choice made here applies to the details of members whose piecemarks you select when you Detail Members.
|
Starting number for material piecemarks: A positive whole number from 1 to 50,000. The selection you make here directly affects the submaterial marks of materials on all members that subsequently undergo Process and Create Solids.
Example: 100 is entered here and a is entered as the submaterial piecemarking prefix for angles. The submaterial mark for the first angle generated would be a100, the second angle generated would be given the piecemark a101, and the third angle generated would be a102.
Default designation for user added material callout: This applies when you create a Material Callout to call out a material. It sets the default choice that is made to Material designation type, which is an option that appears on the Edit Label window when you add a material callout.
|


Pcmk only lists the submaterial mark and quantity on the callout (e.g., 2 - a3).
Mtrl type & pcmk lists the material type and submaterial mark on the callout (e.g., 2 L - a3).
Mtrl type, size & pcmk lists the material size, quantity, material type, and piecemark on the callout (e.g., 2 - L31/2x3x5/16x10 a3).
Quantity included in a user added bolt callout: ![]() or
or ![]() . This applies when you create a Material Callout to call out a bolt. It sets the default choice that is made to Material designation type, which is an option that appears on the Edit Label window when you add a bolt callout.
. This applies when you create a Material Callout to call out a bolt. It sets the default choice that is made to Material designation type, which is an option that appears on the Edit Label window when you add a bolt callout.
|

If the box is checked (
If the box is not checked (
Default designation for user added bolt callout: Bolt type only or Bolt size and type. This applies when you create a Material Callout to call out a bolt.
|


Bolt type only lists the bolt quantity on the callout (e.g., A325N BOLT).
Bolt size and type lists the bolt size (dia x len) and the bolt type on the callout (e.g., 3/4 x 2 A325N BOLT).
Show submaterial quantity on submaterial details: ![]() or
or ![]() . The choice made here applies to the details of submaterials whose piecemarks you select when you Detail Submaterial.
. The choice made here applies to the details of submaterials whose piecemarks you select when you Detail Submaterial.
|
If the box is checked (
If the box is not checked (
Tip: To tell which submaterials are marked for detailing, choose Detail Submaterial -- those materials that are automatically selected on the selection dialog that opens are the materials that are marked for detailing.
Also see: Single-quantity designation in main callout (Home > Project Settings > Fabricator > Detailing > General Presentation)
Show member marks and quantities on submaterial details: ![]() or
or ![]() . The choice made here applies to the details of submaterials whose piecemarks you select when you Detail Submaterial.
. The choice made here applies to the details of submaterials whose piecemarks you select when you Detail Submaterial.
|
If the box is checked (
If the box is not checked (
Prefix imperial material callouts that are less than 12 inches with '0-': This applies to Detail Submaterial or to Detail Members when the primary dimension Units is set to Imperial (feet-in frac). For members, it applies when Designation for primary submaterial mark and/or Designation for secondary submaterial mark is set to Mtrl type, size & pcmk. The size (i.e., length) is the only part of a description-by-length callout wherein 0- may designate feet.
|
||||||||
| Examples of a main callout on a submaterial detail. |
|
||||||||
| Callouts on a member detail. Callouts with pointers are also affected, though they are not shown in these examples. |
If this box is checked (
If the box is not checked (
Break submaterial marks apart by sequence: ![]() or
or ![]() . The choice made here directly affects the submaterial of members that subsequently undergo Create Solids.
. The choice made here directly affects the submaterial of members that subsequently undergo Create Solids.
If this box is checked (
If the box is not checked (
Note 1: Ideally this should be set before members are added in a new project. If you do change this setting after you have already added members, you should run Verify and Fix to ensure continuity of member piecemarking within your Job.
Note 2: For standard piecemarks, such as those set by Base/Cap Plate Schedule and Standard Shear Plates, the sequence is appended after the mark. For example, if p2 is in sequence 4 its mark would be p2_4. If Break submaterial marks apart by zone is also checked (
Include sequence in submaterial mark: ![]() or
or ![]() . This applies when Break submaterial marks apart by sequence is checked. It affects the submaterial marks of members.
. This applies when Break submaterial marks apart by sequence is checked. It affects the submaterial marks of members.
If the box is checked (
If the box is not checked (
Note: If both the sequence and zone are included in the piecemark, the sequence-zone is appended after the mark with the sequence listed first. For example, if p2 is in sequence 4, zone 1, its mark would be p2_4_1.
Break submaterial marks apart by zone: ![]() or
or ![]() . The selection you make here directly affects the submaterial of members that subsequently undergo Process and Create Solids.
. The selection you make here directly affects the submaterial of members that subsequently undergo Process and Create Solids.
If this box is checked (
If the box is not checked (
Note 1: Ideally this should be set before members are added in a new project. If you do change this setting after you have already added members, you should run Verify and Fix to ensure continuity of member piecemarking within your Job.
Note 2: For standard piecemarks, such as those set by Base/Cap Plate Schedule and Standard Shear Plates, the zone is appended after the mark. For example, if p2 is in zone 1 its mark would be p2_1. If Break submaterial marks apart by sequence is also checked (
Include zone in submaterial mark: ![]() or
or ![]() . This applies only if Break submaterial marks apart by zone is checked. It affects the submaterial of members that subsequently undergo Process and Create Solids .
. This applies only if Break submaterial marks apart by zone is checked. It affects the submaterial of members that subsequently undergo Process and Create Solids .
If this box is checked (
If the box is not checked (
Note: If both the sequence and zone are included in the piecemark, the sequence-zone string is appended after the mark with the sequence listed first. For example, if p2 is in sequence 4, zone 1, its mark would be p2_4_1.
Indicate NS / FS of submaterial in main view on details: NS and/or FS and/or NS/FS. This applies to the details of members selected when you Detail Members.
|
|||||||

|
|||||
Show non-std grade notation with piecemarks on member details: ![]() or
or ![]() . The choice made here applies to the details of members whose piecemarks you select when you Detail Members. A non-standard steel grade is a steel grade other than the steel grade that is listed on the first line of the steel grades setup table for materials of a particular type. For example, if the Plate Grades setup table lists A36 on its first line, all other steel grades for plates that are shown on that table are non-standard steel grades.
. The choice made here applies to the details of members whose piecemarks you select when you Detail Members. A non-standard steel grade is a steel grade other than the steel grade that is listed on the first line of the steel grades setup table for materials of a particular type. For example, if the Plate Grades setup table lists A36 on its first line, all other steel grades for plates that are shown on that table are non-standard steel grades.
|
||||||||
| 1-PL p63 A572-50 indicates plate p63 has a non-standard steel grade of A572-50. | ||||||||
| 1-PL p63 Non-Std indicates p63 has a non-standard steel grade. The notation Non-Std was applied during Detail Members because Non-Std was entered to the Nonstandard Notation column on the Plate Grades setup table. | ||||||||

If this box is checked (
If the box is not checked (
A Nonstandard Notation column may be found on the following setup tables: Wide Flange Grades, Plate Grades, Flat Bar Grades, Round and Square Bar Grades, WT Grades, Channel Grades, Angle Grades, Pipe Grades, HSS / TS Grades, Steel Grades - Shear and Threaded Studs.
Show piecemark for submaterial bolts on member details: ![]() or
or ![]() . This applies to material bolts, which are bolts that have been added as a material, can be modified with material tools, and are given a submaterial mark. It applies to the details of members whose piecemarks you select when you Detail Members.
. This applies to material bolts, which are bolts that have been added as a material, can be modified with material tools, and are given a submaterial mark. It applies to the details of members whose piecemarks you select when you Detail Members.
|
If this box is checked (
If the box is not checked (
| Tip: Turn this option on ( |
If this box is checked (
In a single-user environment, a submaterial mark whose quantity goes to zero will not become available for reuse until the user exits and restarts Modeling.
In a multi-user environment, submaterial marks may be reused within a single session, since other users will release them when they exit Modeling.
Example: You delete all plates marked p2, exit and restart Modeling, then add a new plate which doesn't match any plate that is currently in the model. The new plate may be assigned p2 .
If the box is not checked (
Example: You delete all plates marked p2, then add a new plate. The new plate will be assigned p2 only if it matches the plate that was originally named p2.
Force flat bar description to use smaller of length & width: ![]() or
or ![]() . Regardless of the choice made here, Modeling will look at both the Material width and the Material length of a flat bar that is added as a material or miscellaneous member to see if one of those values plus the Material Thickness match a listing on the Preferred Flat Bar Sizes window. If there is a listing that matches, Modeling will use that listing as the flat bar's Description.
. Regardless of the choice made here, Modeling will look at both the Material width and the Material length of a flat bar that is added as a material or miscellaneous member to see if one of those values plus the Material Thickness match a listing on the Preferred Flat Bar Sizes window. If there is a listing that matches, Modeling will use that listing as the flat bar's Description.
If the box is checked (
If the box is not checked (
Force bent plate description to use the smaller of length and width first: or . This setting is unchecked )
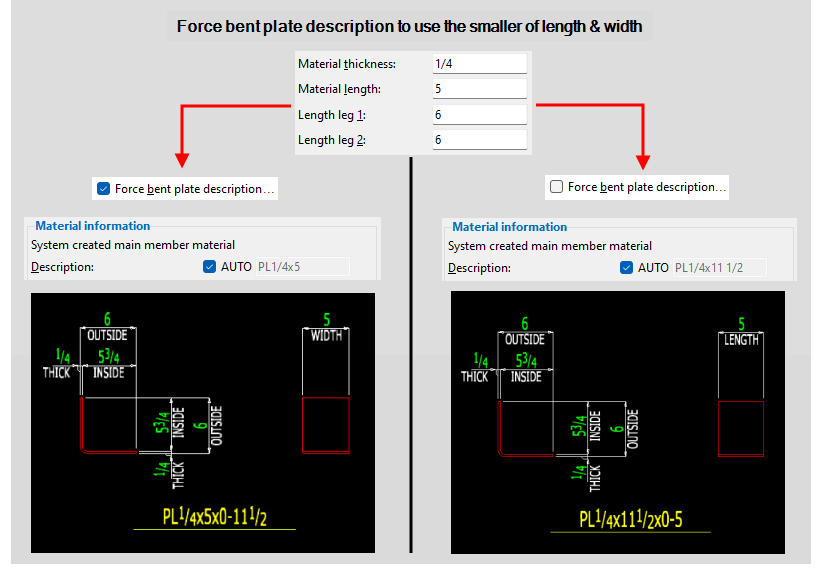
If the box is checked (
If the box is not checked (
Note 1: The Bent Plate Material window does not have a field for material width. Please refer to Dimension Settings for more information about how bent plate width is calculated in SDS2.
Note 2: This setting does not apply to Bent Plate Layout material.
Show piecemarks in all views on member details: ![]() or
or ![]() . The choice made here applies to the details of members whose piecemarks you select when you Detail Members. A member detail may have multiple views. Member isolation in Modeling gives you a preview of which views will be included on a member's detail.
. The choice made here applies to the details of members whose piecemarks you select when you Detail Members. A member detail may have multiple views. Member isolation in Modeling gives you a preview of which views will be included on a member's detail.
|

If the box is checked (
If the box is not checked (
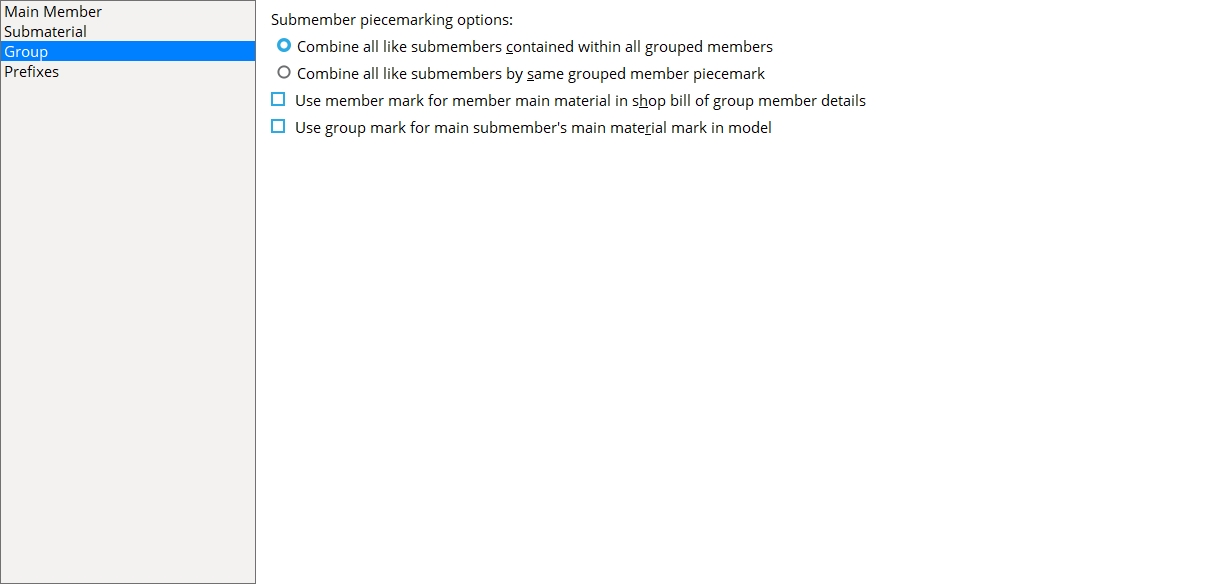
Group
Submember piecemarking options: Combine all like submembers contained within all group members or Combine all like submembers by same grouped member piecemark. A group member can be created using Model > Group Member > Create. The choice made here is the method that is used to break apart the member piecemarks of members that are components of group members. This applies only to system piecemarks for those submembers. User piecemarks are not combined or broken apart.
Combine all like submembers contained within all group members instructs piecemarking to assign unique member piecemarks to members that are components of any group members.
Members that are exactly the same and are components of any group member are assigned the same submember piecemark.
Members that are not components of group members are assigned different piecemarks than otherwise-exactly-the-same members that are components of group members.
Combine all like submembers by same grouped member piecemark instructs piecemarking to assign unique piecemarks to members that are components of any group member that has the same group member System piecemark or User piecemark.
Members that are exactly the same and are components of a group member with the same group member piecemark are assigned the same submember piecemark.
Members that are exactly the same but are components of group members with different group member piecemarks are assigned different submember piecemarks.
Members that are not components of group members are assigned different piecemarks than otherwise-exactly-the-same members that are components of group members.
To apply the choice made here: When you Model > Group Member > Create, piecemarking automatically assigns piecemarks at that time if the appropriate choice is made to User and Site Options > Modeling > Automatically process after modeling operation. If you change the setting here and want to apply the new setting to group members that have already been created, then Mark for Processing all the group members and Process and Create Solids again.
Use member mark for member main material in shop bill of group member details: ![]() or
or ![]() . The choice made here affects the details of stairs whose piecemarks you select when you Detail Member Groups.
. The choice made here affects the details of stairs whose piecemarks you select when you Detail Member Groups.
Tip: You don't need to check this box if you have already checked the box for Use member mark for member main material in model.
|
If this box is checked (
If the box is not checked (
Also see:
Use member mark for member main mateiral in shop bill (a similar option, but for member types other than stairs and group members)
Use member mark for member main material in shop bill of stair member details (a similar option, but for stairs)
Use group mark for main submembers main material mark in model: ![]() or
or ![]() . The main submember is whatever member is selected as the Main member on the Group Member Edit window.
. The main submember is whatever member is selected as the Main member on the Group Member Edit window.
|
||||||
| These bills have their Minor Mark column set to Merge into the PC Mark column. |
If this box is checked (
If the box is not checked (
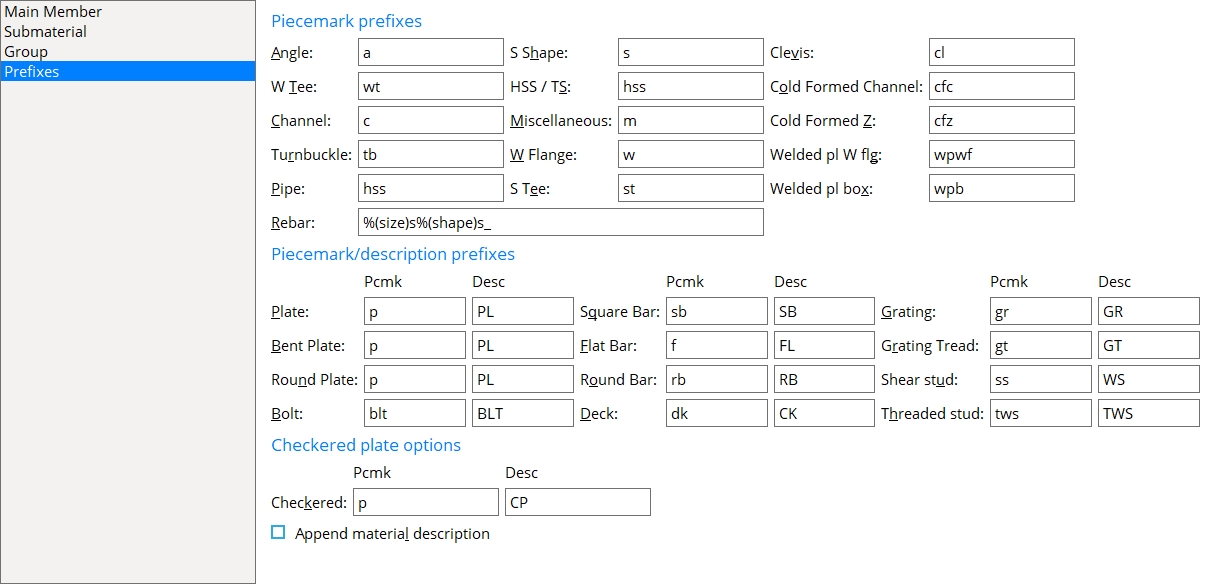
Prefixes
| Piecemark Prefixes (for material marks) | |||||
| Angle |
|
S shape |
|
Clevis |
|
| W tee |
|
HSS / TS |
|
Cold formed C |
|
| Channel |
|
Miscellaneous |
|
Cold formed Z |
|
| Turnbuckle |
|
W flange |
|
Welded pl W |
|
| Pipe |
|
S tee |
|
Welded pl box |
|
| Rebar |
|
||||
| Miscellaneous |
|||||
| Piecemark/Description Prefixes | |||||
| Pcmk | Desc | Pcmk | Desc | ||
| Plate |
|
|
Round bar |
|
|
| Bent plate |
|
|
Deck |
|
|
| Round plate |
|
|
Grating |
|
|
| Bolt |
|
|
Grating tread |
|
|
| Square bar |
|
|
Shear stud |
|
|
| Flat bar |
|
|
Threaded stud |
|
|
| These description prefixes are for materials that cannot be added to a shape file. Plate = rectangular, round, rolled, flat plate layout, checkered. Bent plate = bent plate, bent plate layout. | |||||
Allowable range of entries: A submaterial prefix or description prefix may be up to 5 characters in length (exception: for threaded stud, the description prefix can be longer). You may enter any Starting number for material piecemarks between 1 and 10,000. The %(size)s and %(shape)s labels are provided for rebar only.
The description prefixes entered here applies when
When are submaterial prefixes applied? Piecemarking assigns these submaterial prefixes to submaterial marks when members are added or edited or when materials are added to the model using Add Material or Material Copy or Add Assembly or Add [Legacy] Miscellaneous Member or Run Parametric.
Example: Before adding members to a Job, you open this window and assign Joe as the prefix for Angles. You also enter 1 to Starting number for material piecemarks. When you later add members, piecemarking assigns the submaterial mark Joe1 to the first angle that is generated. The first angle of a different size that is generated is assigned the submaterial mark Joe2. As the Job develops, every angle that is the same size, weight and dimensions of Joe1 is assigned that same piecemark.
Also see: Ways to assign submaterial marks (topic), Include sequence in submaterial mark (affects the naming of submaterial piecemarks).
------ Checkered Plate Options ------
| Pcmk | Desc | |
| Checkered |
|
|
|
|
||
Pcmk is the Pcmk prefix that is set under Piecemark/Description Prefixes for Plate. It is the material Piecemark that is assigned for rectangular plate or round plate or rolled plate or flat plate layout.
Desc affects the Description on the General Information window, which in turn affects the Description in the member bill of material. This applies when the box for Checkered is checked (
Append material description:
![]() or
or ![]() .
.
If this box is checked (
If the box is not checked (


|
|
OK (or the Enter key) closes this screen and applies the settings.
Cancel (or the Esc key) closes this screen without saving any changes.
Reset undoes all changes made to this screen since you first opened it. The screen remains open.